Contents
Chapter 1 · Getting started
Getting started
What ClinicDesk is, how to sign in, what is where on the screen, switching language and branch, changing your password and which menus each role sees
ClinicDesk runs a whole clinic, hospital or diagnostic centre in one place: the billing counter, patient registration, doctors' serials, lab samples and reports, admitted patients, accounts and staff salaries. This chapter covers the first-day basics so everyone on the team can start with confidence.
Signing in
ClinicDesk runs in a web browser (Chrome or Edge work best). The clinic owner creates an account for you; you sign in with your Mobile number and Password.
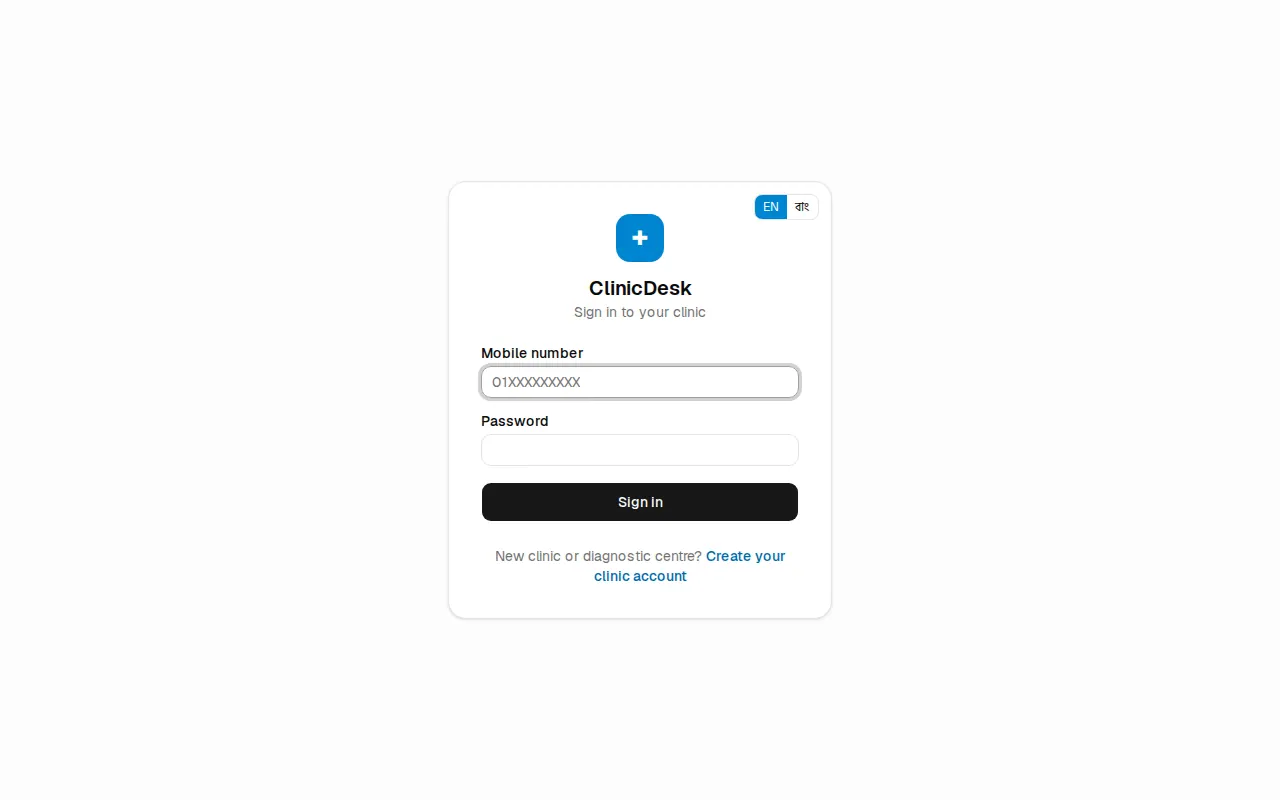
- Open your clinic's ClinicDesk address in the browser. The page says "Sign in to your clinic".
- Type your 11-digit number in Mobile number (for example
01XXXXXXXXX). - Type your Password.
- Press Sign in.
After signing in, each person lands on the page for their main job:
| Role | Page that opens after sign-in |
|---|---|
| Receptionist | New bill (POS) |
| Lab technologist | Worklist & results |
| Pathologist | Verification |
| Doctor | Doctor's desk |
| Owner, Manager, Nurse, Accountant | Dashboard |
The sign-in page has an EN | বাং switch in the top right corner, so you can pick the language before signing in.
The screen layout
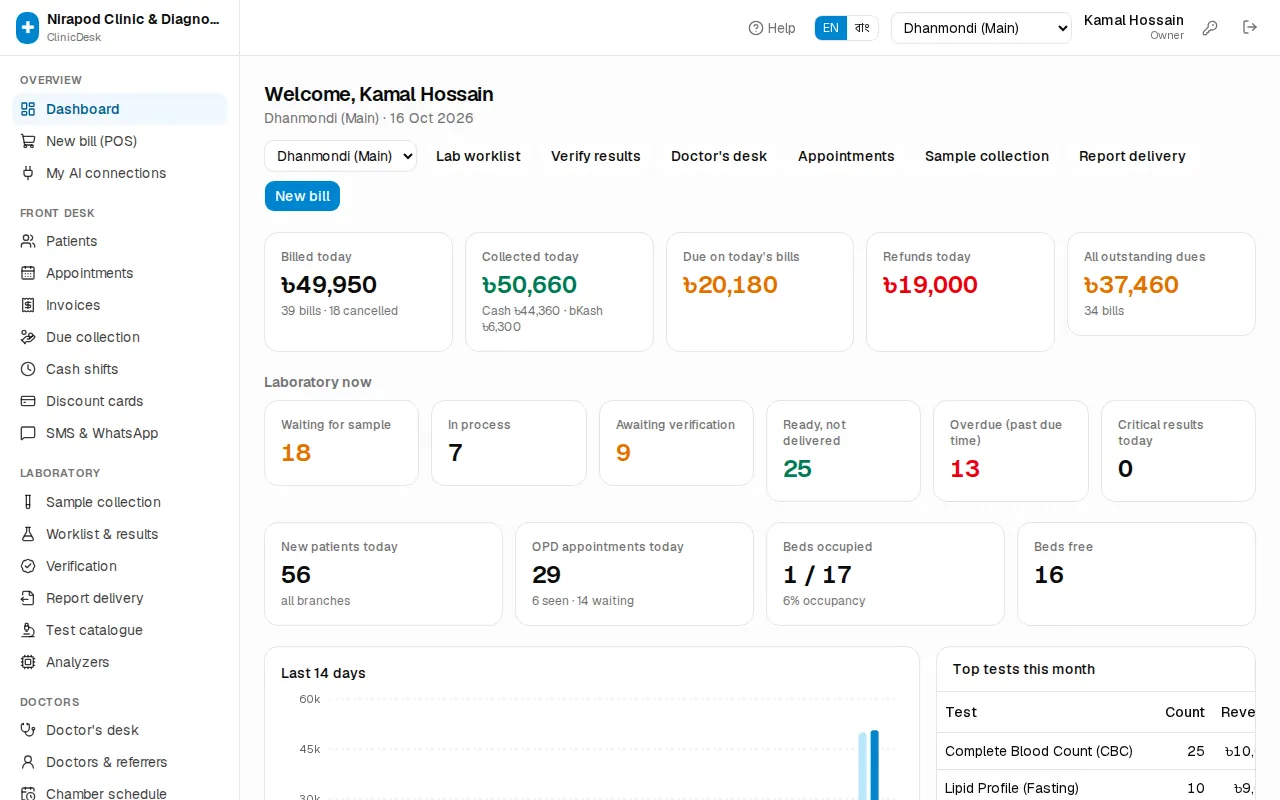
Left menu (sidebar): the clinic name at the top, then the menu in sections — Overview, Front desk, Laboratory, Doctors, In-patient (IPD), Finance, Staff (HR), Accounting, Admin. The page you are on is highlighted. Menus your role is not allowed to use are not shown at all, and modules that are not in the clinic's licence are hidden too.
Top bar (header), from right to left:
- Sign out — the door-shaped icon. Use it when you finish or leave the computer.
- Change password — the key icon. See Changing your password below.
- Your name and role (for example "Receptionist").
- The branch name, or a drop-down if you work in more than one branch.
- EN | বাং — the language switch.
- Help — opens the guide chapter for the page you are on, in a new tab, so a half-done bill is not lost.
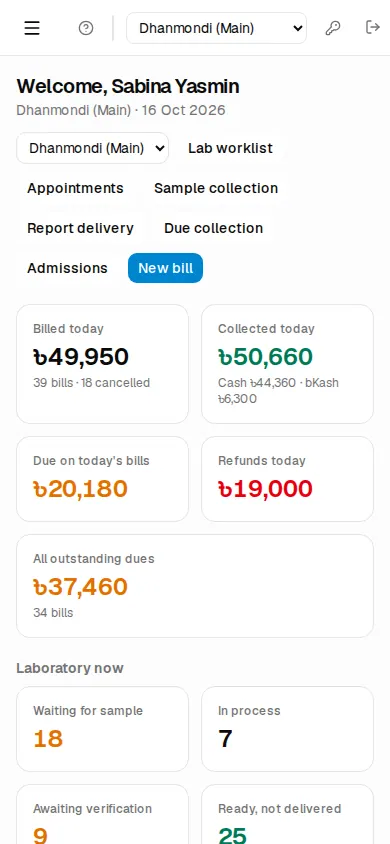
On a phone: the sidebar is hidden. Tap the three-line (☰) button at the top left to open the menu; it closes by itself when you pick a page.
Yellow banner at the top: when the licence has ended but is still in its grace days, a yellow banner says "Your licence has expired. ClinicDesk keeps working until (date); please renew." with a Details link. What to do is in Payments, licence & AI.
Reading the dashboard
The dashboard greets you with "Welcome, (your name)", the branch and today's date. The big blue button on the right is your role's main job — New bill for reception, Lab worklist for the lab, Verify results for the pathologist. The smaller buttons next to it open the other pages your role uses most.
- Money tiles (for those who can see bills or reports — reception, manager, accountant, owner): Billed today, Collected today (split by cash, bKash and so on), Due on today's bills, Refunds today and All outstanding dues.
- Laboratory now: Waiting for sample, In process, Awaiting verification, Ready, not delivered, Overdue (past due time) and Critical results today. Click a tile to open that lab page.
- New patients today, OPD appointments today, Beds occupied and Beds free.
- A Last 14 days collection chart, Top tests this month and OPD today by consultant.
Owners, managers and accountants who work across all branches also get a drop-down at the top; choose All branches to see the totals of every branch together.
Switching language
- Find the EN | বাং switch in the header.
- Press বাং for Bangla or EN for English.
The whole app changes at once. Your choice is saved on your account, so you see the same language on any computer. Staff who have never picked a language see the owner's Default language (Admin › Settings › Language). A few texts that have no Bangla translation yet still show in English.
Switching branches
If the clinic has more than one branch, each branch has its own bills, cash shifts, samples, appointments and wards. Patients and doctors are shared by all branches.
- Open the branch drop-down in the header.
- Pick the branch you are working in. The page reloads.
If you see just a branch name and no drop-down, the owner has tied your account to that one branch.
Changing your password
Everyone can change their own password.
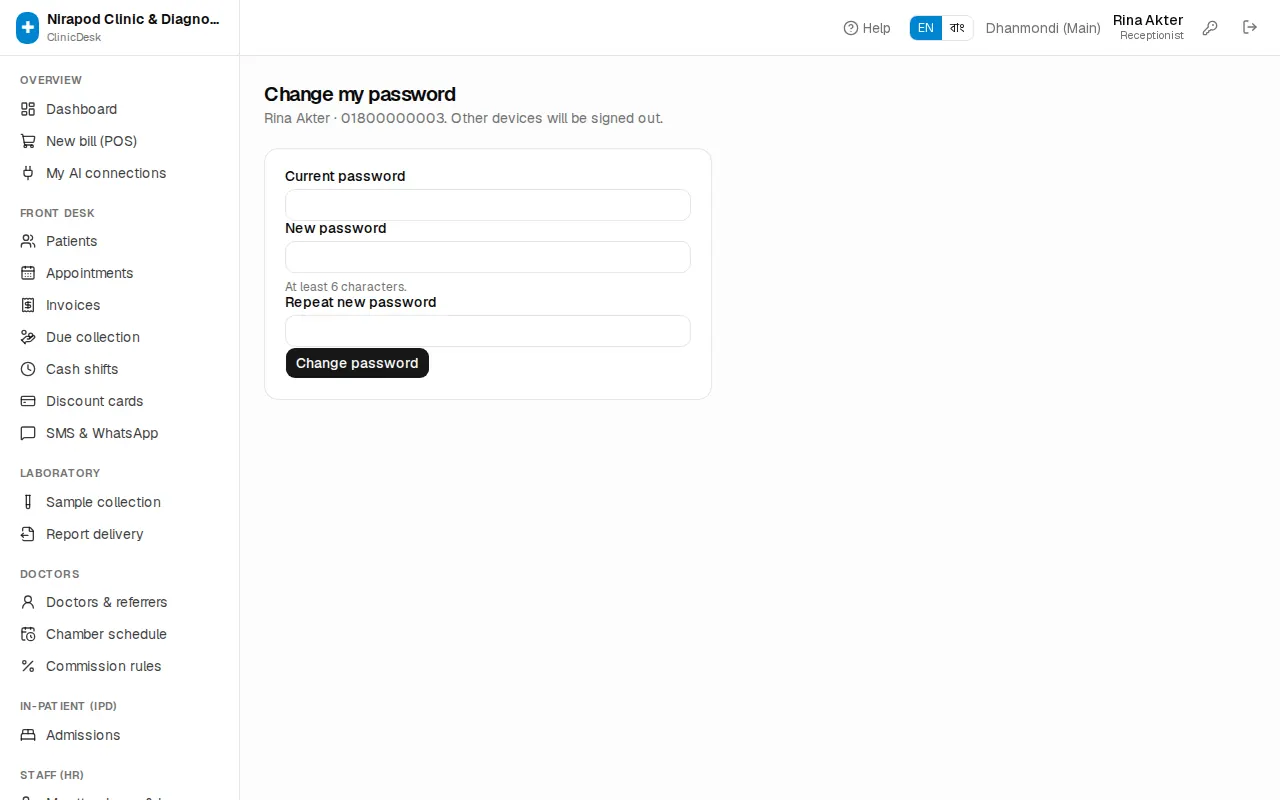
- Press the key icon in the header (or the Change my password link at the very bottom of the dashboard).
- Type your Current password.
- Type a New password — at least 6 characters.
- Type the same password again in Repeat new password.
- Press Change password. "Password changed" means it worked.
You stay signed in on this computer; every other device is signed out.
What each role sees
Every user has exactly one role. The role decides which menus appear and which buttons work.
| Role | Main work |
|---|---|
| Owner | Everything, including settings, users and online payments |
| Manager | Almost everything the owner does — cancelling bills, refunds, discounts above the cap, service prices, reports, audit log — but not settings or users |
| Receptionist | Patient registration, bills, due collection, appointments, discount cards, sample collection, report delivery, admissions, SMS |
| Lab technologist | Sample collection, worklist, entering results, report delivery |
| Pathologist | Entering and verifying results, test catalogue, analyzers |
| Doctor | Doctor's desk (own patients, prescriptions), viewing admitted patients |
| Nurse | Appointments and serials, sample collection, work on admitted patients |
| Accountant | Viewing invoices, due collection, expenses, doctor payouts, corporate billing, accounting, payroll, reports |
Every role can see their own attendance and leave (My attendance & leave). If a page shows No access, it is not meant for your role; ask the owner to change your role if you really need it.
Where to go next
- Owners: start with Owner setup.
- Reception: Reception & appointments and OPD billing & payments.
- Doctors: Doctors.
- Lab: Laboratory.
- Nurses: In-patients (IPD).
- Accountants: Accounting and Reports.
- When something goes wrong: Troubleshooting. Unfamiliar words: Glossary.
Chapter 2 · Owner & setup
Owner setup
Clinic profile, billing rules, receipt and lab report layout, branches, users and roles, services and prices, packages and the audit log
Before the first working day the owner sets up a few things once: the clinic's name and address, branches, staff accounts and service prices. This chapter walks through each of them. Doctors and chamber schedules are in Doctors; online payments, the licence and AI assistants are in Payments, licence & AI.
First-day checklist
- In Settings, fill in the clinic profile, billing, receipt and lab report rules (below).
- If you have more than one branch, add them in Branches (below).
- Add doctors and their chambers in Doctors & referrers (Doctors).
- Create an account for every staff member in Users & roles (below).
- Check test and service prices in Services & prices (below).
- Set up test parameters and reference ranges (Laboratory).
Clinic profile and settings
Open Admin › Settings in the sidebar.
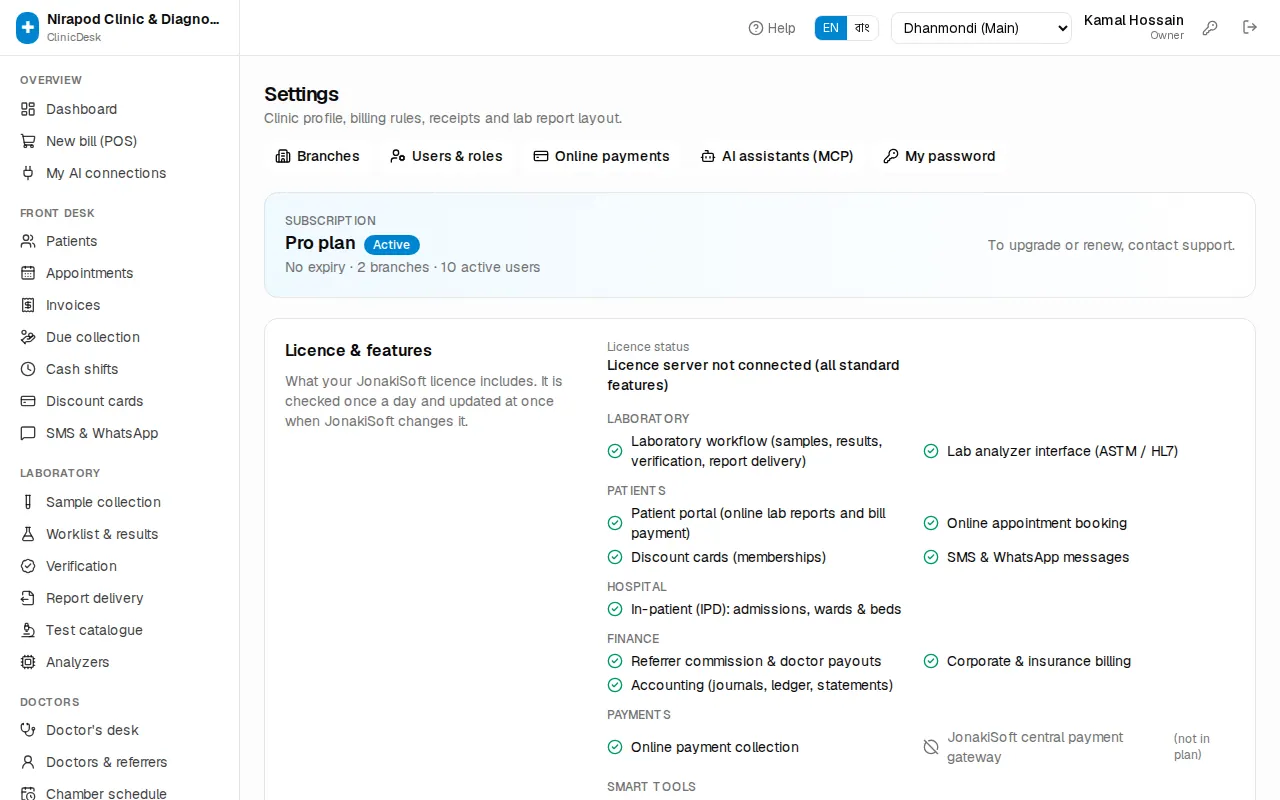
The Subscription box at the top shows your plan, expiry date, number of branches and active users. Below it is the Licence & features box (see Payments, licence & AI). The buttons at the top open Branches, Users & roles, Online payments, AI assistants (MCP) and My password.
Clinic profile
This is printed on bills, money receipts and lab reports.
- Fill in Clinic / hospital name, Phone, Email and Address.
- If you have them, add the DGHS licence no. and VAT registration (BIN).
- Press Save profile.
The other settings
The boxes below are saved together: change what you need, then press Save settings at the very bottom of the page.
- Language › Default language: what new staff see first. Each person can still choose their own.
- Billing:
- VAT (%) — 0 if your services are VAT-exempt.
- Receptionist discount cap (%) — reception cannot give more discount than this. Managers can go above it.
- Default referral commission (%) — used when neither the doctor nor the test has its own rate.
- Follow-up window (days) — a patient who comes back to the same doctor within this many days pays the follow-up fee.
- Round bills to whole Taka — drops the paisa so bills are in whole taka.
- Receipts: Paper size (80 mm thermal or A4 / half A4), a Header line (for example your hotline number) and a Footer note.
- Lab reports:
- Report header and Report footer.
- Print letterhead — turn it off if you print on pre-printed pads; a blank top margin is left instead.
- Pathologist verification required — results can't be printed or delivered until verified.
- Full payment before delivery — report delivery is blocked while the bill has due.
- Online report portal — patients download verified reports themselves with bill no. + PIN (Patient portal).
- Online appointment booking: Allow online booking and Days ahead patients can book. The booking address (
/book/...) is shown in this box. - SMS & WhatsApp: the link here opens Settings → Integrations (SMS & WhatsApp).
Branches
Open Admin › Branches. Each branch has its own bills, cash shifts, samples, appointments and wards; patients and doctors are shared.
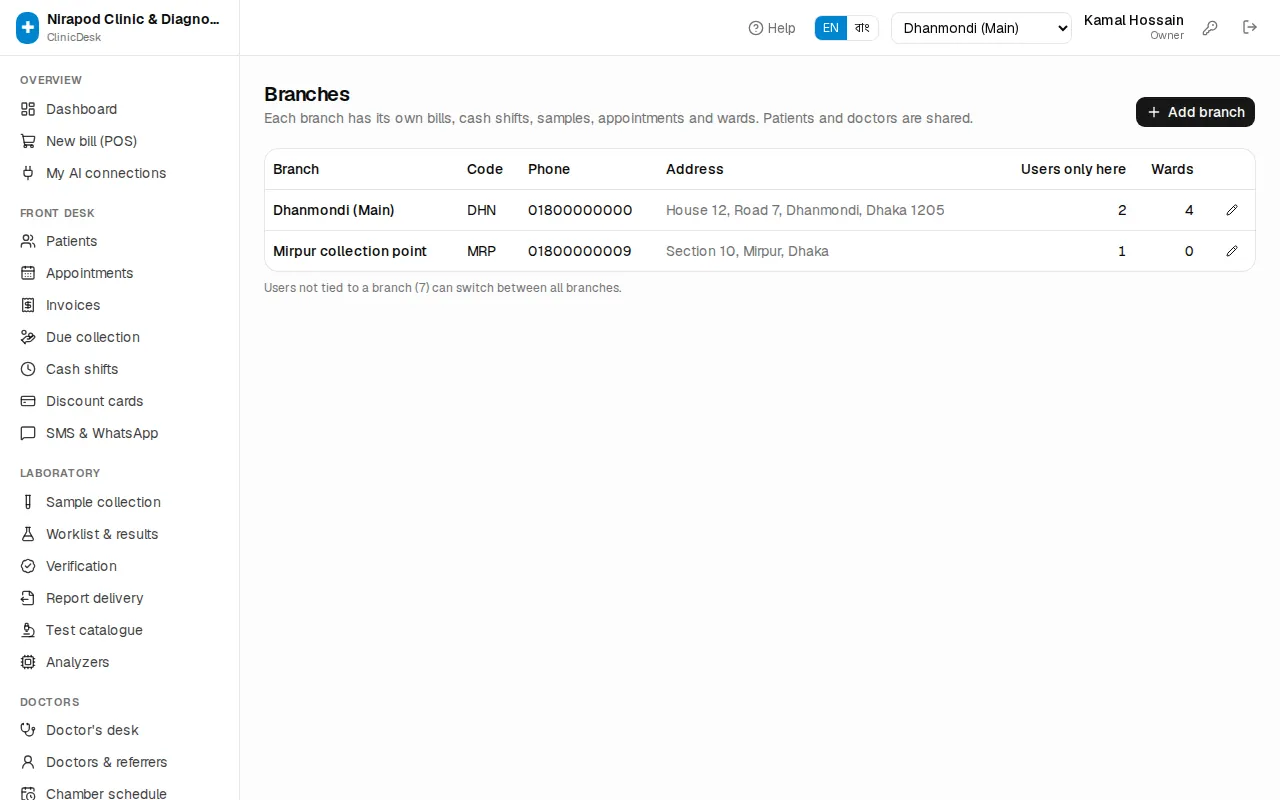
To add a branch:
- Press Add branch.
- Type the Branch name and a Code of 2–6 letters, for example
DHN. - Add the Phone and Address.
- Press Save. You see "Branch created".
Edit a branch with the pencil icon on its row. When a branch closes, untick Active: closed branches disappear from the branch switcher but their history stays. The Users only here column counts the staff tied to that branch.
Users and roles
Open Admin › Users & roles. Everyone who can sign in is listed here.
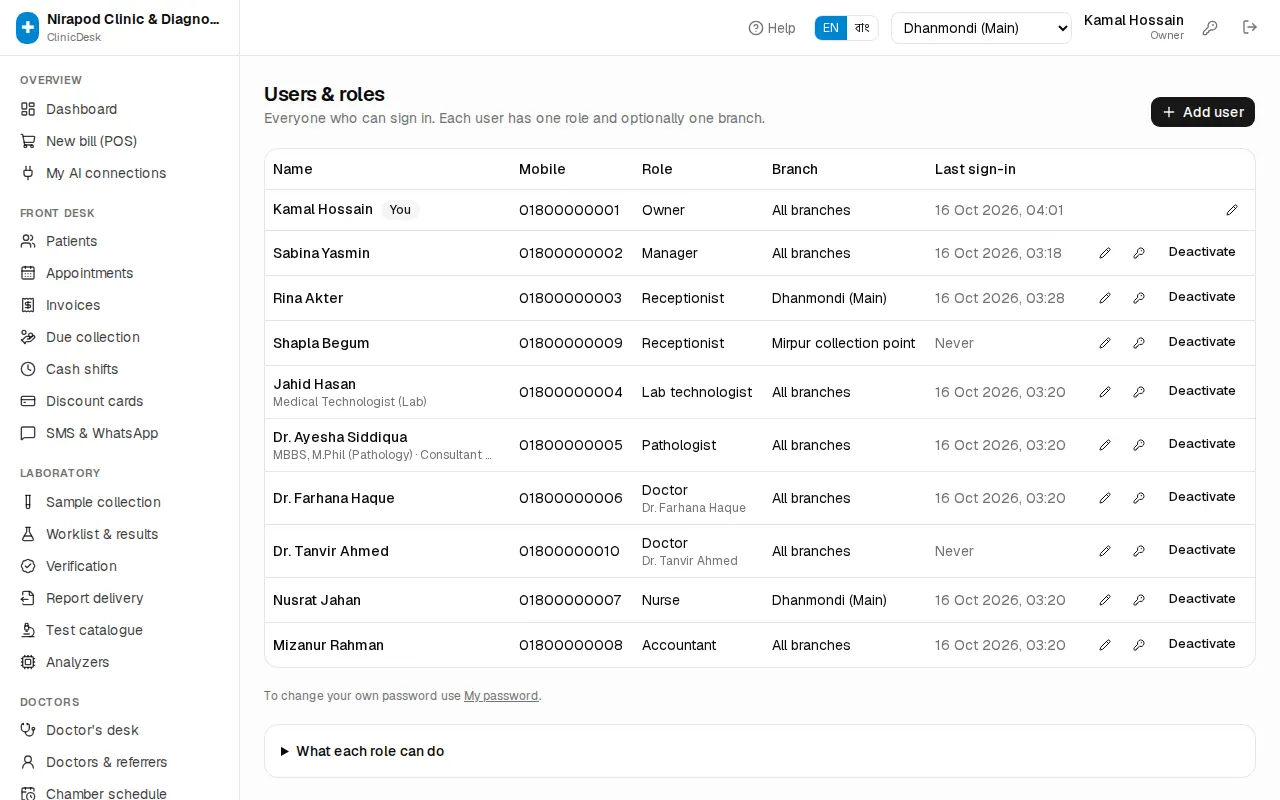
Adding a staff member
- Press Add user.
- Type the Full name and Mobile (login) — the number they sign in with.
- Choose the Role (Receptionist, Lab technologist, Doctor …).
- Branch: pick one to keep them in that branch only; leave it on All branches to let them switch between all branches.
- Language: leave blank to use the clinic default.
- For a doctor, choose their name in Doctor profile (Doctor role only) so the doctor's desk shows their own patients.
- For pathologists and technologists, fill in Designation / signature lines, one line per row. They are printed under the signature on lab reports.
- Give a Password of at least 6 characters and share it with the person privately.
- Press Save. You see "User created".
Managing accounts
Each row has three actions on the right:
- Pencil — change name, role, branch or language.
- Key — set a new password for someone who forgot theirs. After Set password that person is signed out everywhere.
- Deactivate — when someone leaves. They are signed out at once and cannot sign in again; everything they did stays on record. Activate brings them back.
Last sign-in shows when each person last signed in. You cannot change your own password here — use My password.
Open What each role can do at the bottom of the page to see the full table of permissions per role.
Services and prices
Open Admin › Services & prices. Everything that can be billed is here: tests, imaging, consultations, procedures, beds and packages.
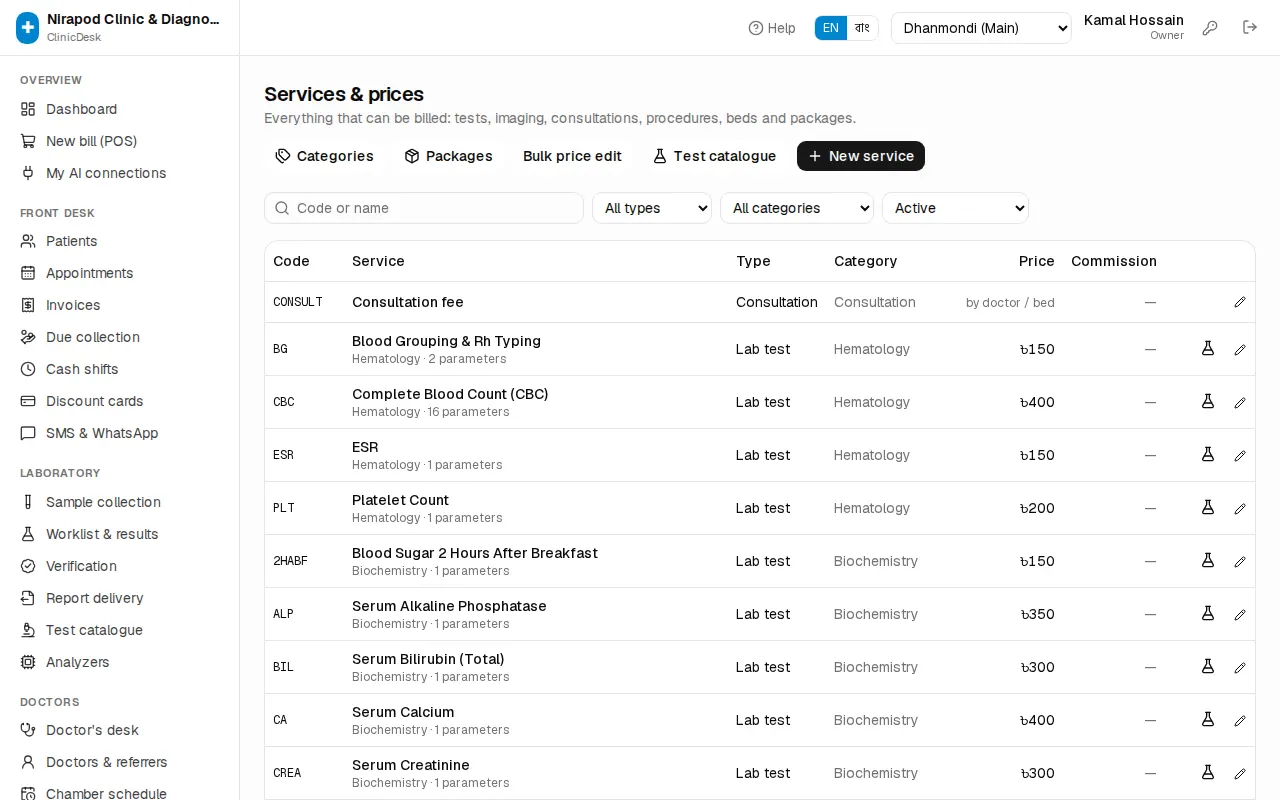
Search by code or name, and narrow the list with All types, All categories and Active.
A new service
- Press New service.
- Type a Code (for example
CBC) — the counter finds the service by typing it — and the Name. - Choose the Type (Consultation, Lab test, Imaging, Package, Procedure, Bed / ward, Medicine or Other) and the Category.
- Enter the Price (৳). For a consultation or bed, 0 means the price is taken from the doctor's fee or the bed rate.
- Leave Referral commission (%) blank to use the referring doctor's rate or the clinic default.
- For a lab test or imaging, type the Lab department (for example Biochemistry).
- Press Save.
Parameters, ranges and the report template of lab tests are set up in Test catalogue (Laboratory). A test showing "no parameters yet" cannot have results entered.
To stop offering a service, open it with the pencil and untick Active. Inactive services can't be billed but stay on old bills.
Categories
Open Service categories at the bottom of the page. Categories group services on bills and reports; the Order number sets how they are listed. Type a new category name and press Add. Only a category with no services can be deleted.
Bulk price edit
To change many prices at once — say, everything up 10% at the start of the year — use Bulk price edit.
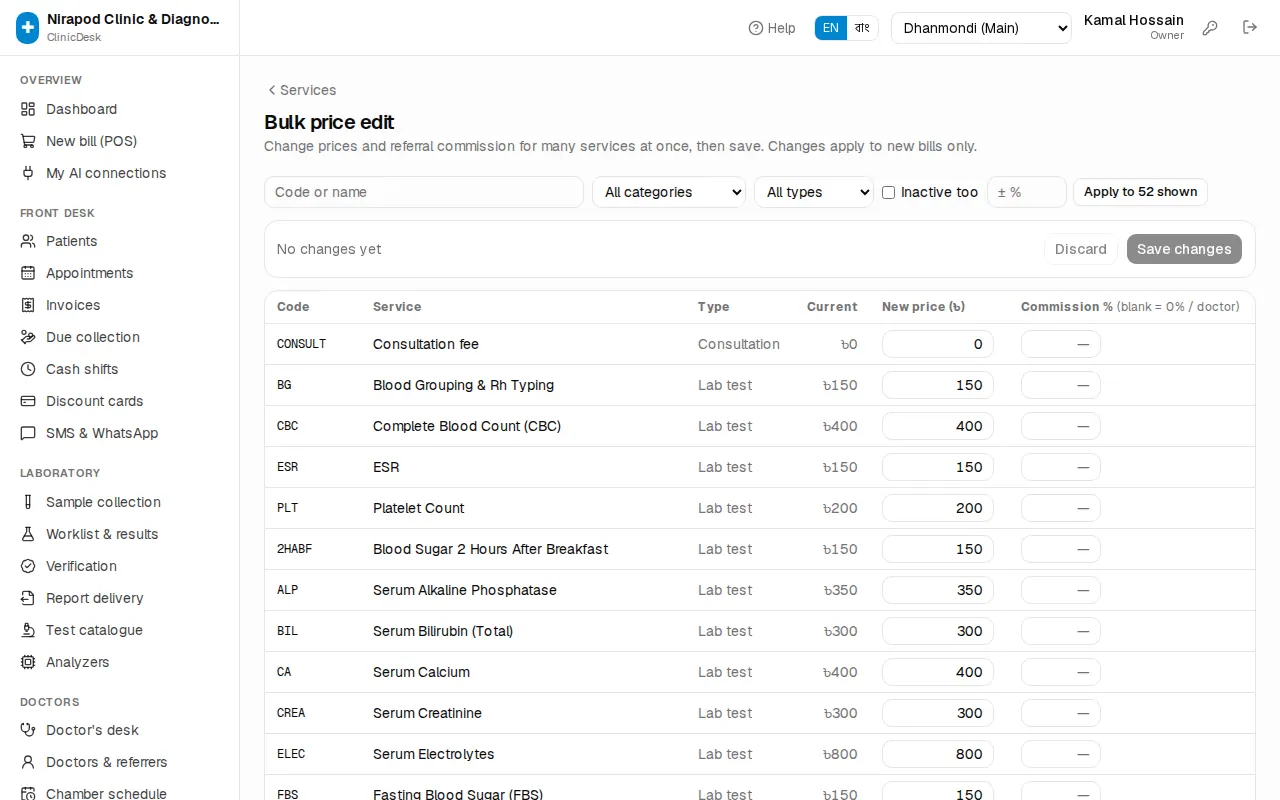
- Narrow the list by category or type.
- Type a New price (৳) and Commission % straight into the rows, or type a percent in the ± % box (for example
10or-5) and press Apply to N shown. - The bar shows how many changes you have made. Discard throws them away.
- Press Save changes.
Changes apply to new bills only; old bills keep their prices.
Health packages
Packages sell several tests at one price, for example a Diabetes profile or a Pre-employment medical. The lab gets every included test as its own order.
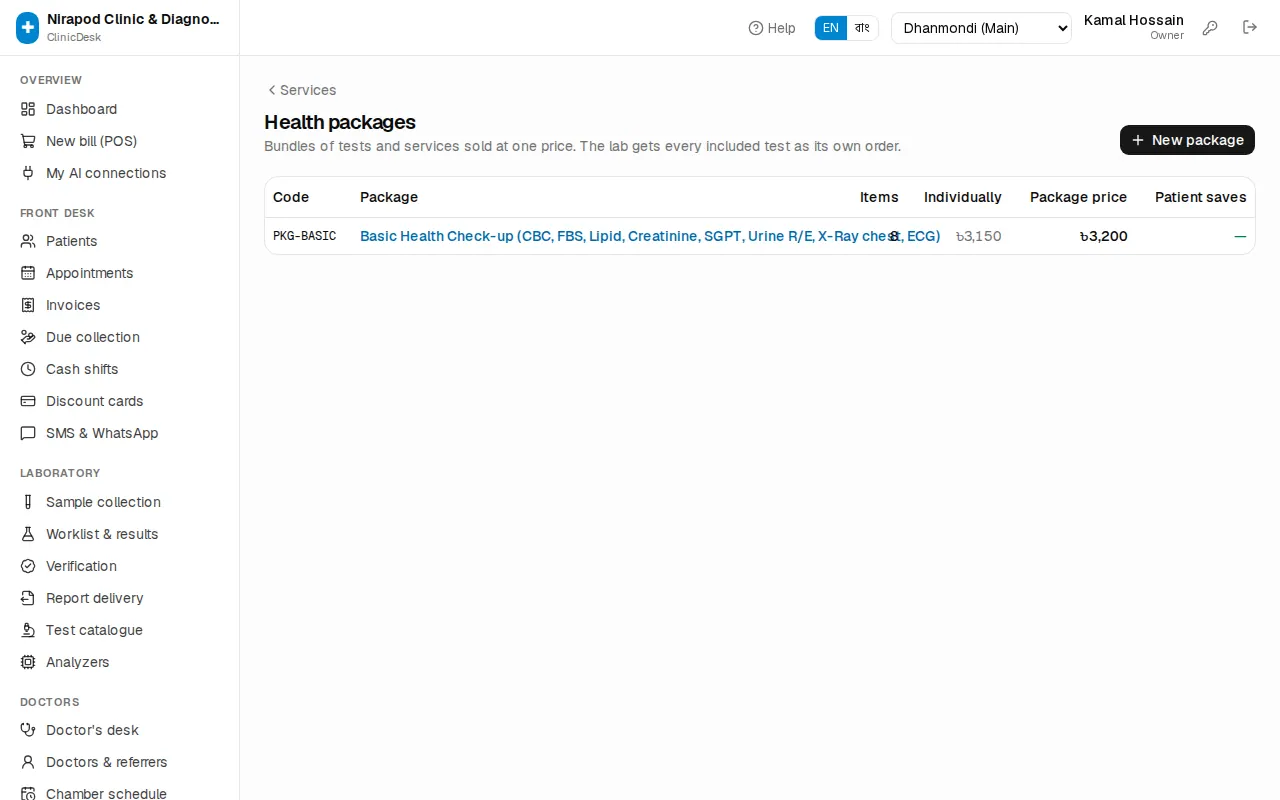
- On Services & prices, press Packages, then New package.
- Give it a code and name and save. You see "Package created — now choose what it includes".
- On the package page, type test codes or names in the search box and add them one by one.
- Enter the Package price (৳). Next to it you see what the tests cost individually and how much the Patient saves.
- Press Save package.
Audit log
Open Admin › Audit log. It records who did what and when: bills, cancellations, refunds, verifications, prices, settings, users and more.
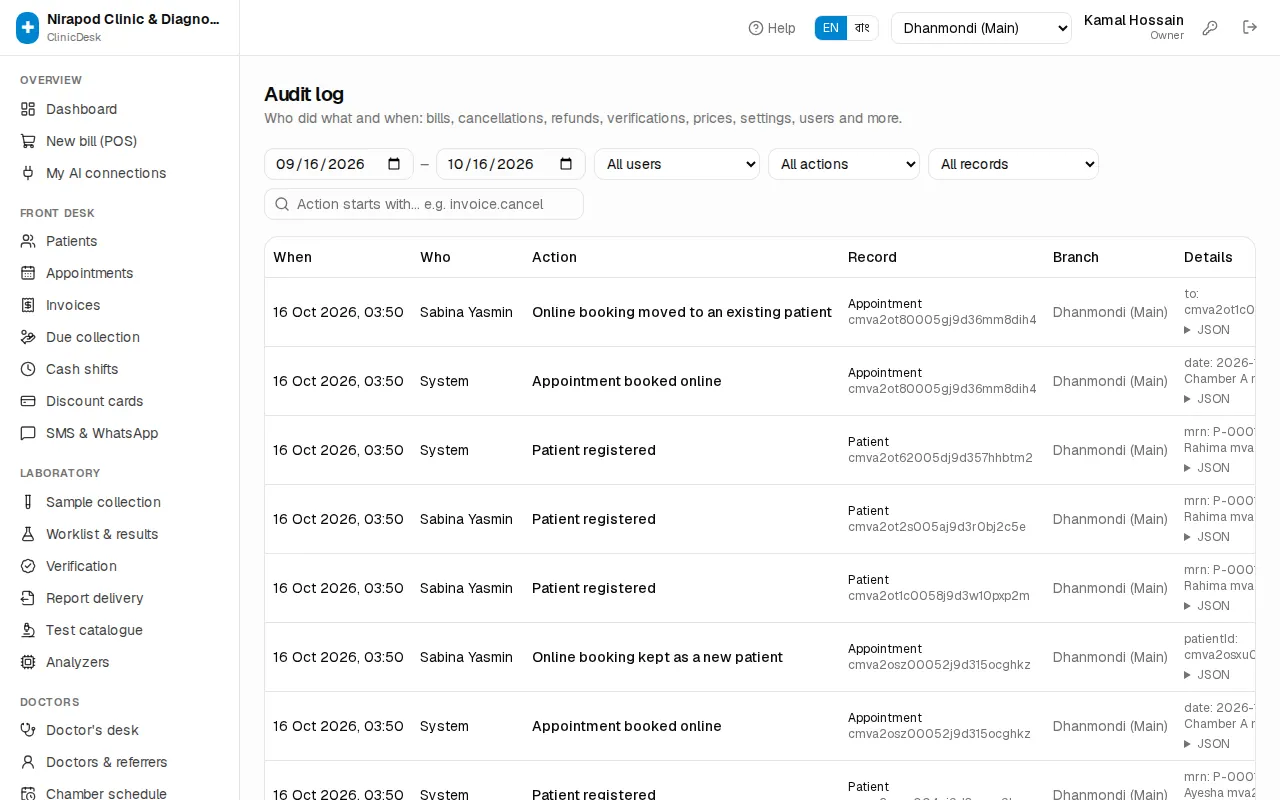
- Filter by date, All users, All actions and All records.
- Type the start of an action in the search box, for example
invoice.cancel. - Click a number in the Record column to see all activity on that bill or patient.
- The Details column shows the value of each field before and after.
Chapter 3 · Owner & setup
Payments, licence & AI
Online bill payment gateways (your own account or JonakiSoft central), licence status and sync, features not in your plan, integrations and AI assistants
This chapter is mainly for the owner: how patients pay their bills online, what your JonakiSoft licence includes and what happens when it ends, and how to connect AI apps such as Claude or ChatGPT to the clinic's data. Only the owner can change the payment and AI settings; every staff member can use My AI connections.
Online payments
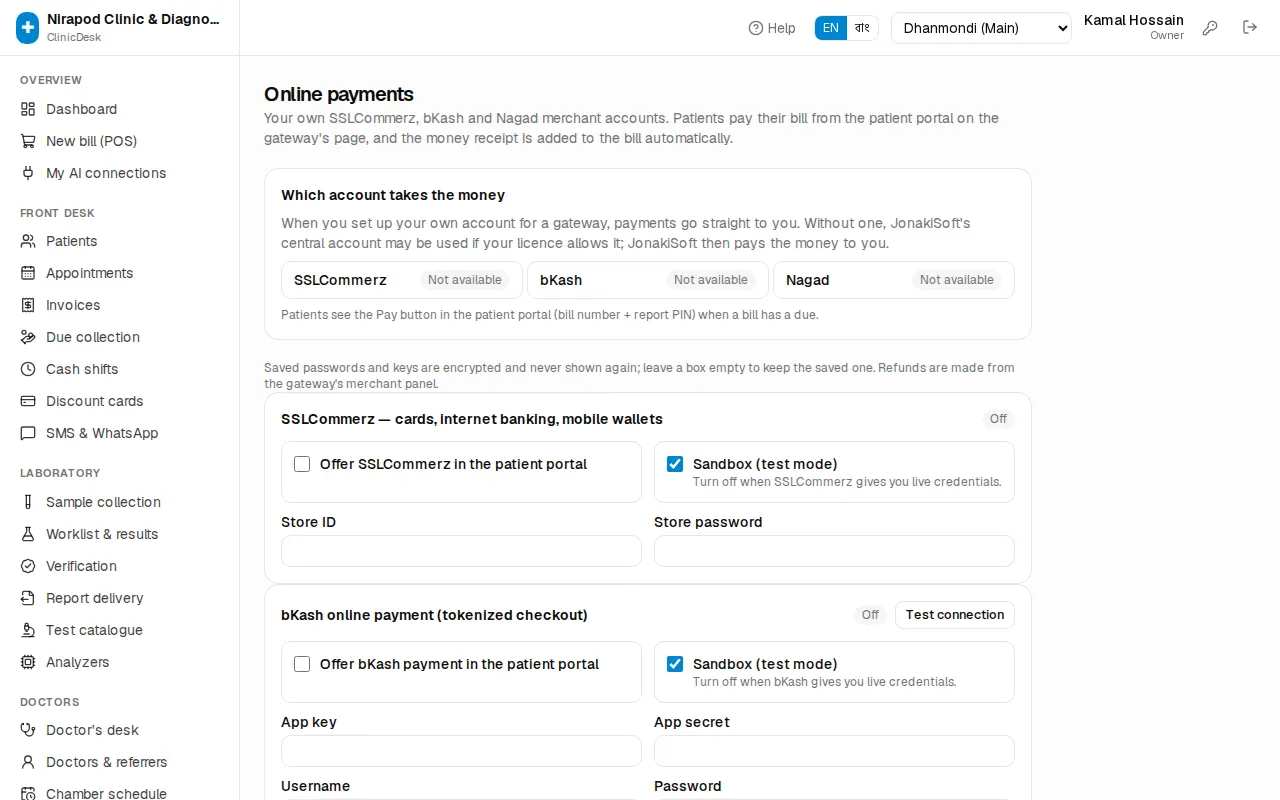
Patients can open the patient portal with their bill number and report PIN and pay the due with SSLCommerz, bKash or Nagad. When the money arrives, the money receipt is added to the bill automatically. The patient's side is shown step by step in Patient portal.
Press Online payments at the top of Settings.
Which account takes the money
The Which account takes the money box shows a label next to each gateway:
- Your account — you have set up your own merchant account; the money goes straight to you.
- JonakiSoft central — you have no account of your own, but your licence allows the central one. The money goes into JonakiSoft's account and JonakiSoft then pays it to you.
- Not available — patients cannot pay with this gateway.
Setting up your own gateway
When SSLCommerz, bKash or Nagad opens a merchant account for you, they give you some details. Enter them here:
- Tick Offer … in the patient portal for the gateway you want, for example Offer bKash payment in the patient portal.
- Fill in the details:
- SSLCommerz: Store ID and Store password.
- bKash: App key, App secret, Username and Password.
- Nagad: Merchant ID, Merchant number, Merchant private key and Nagad public key.
- Keep Sandbox (test mode) on while you test; turn it off when the gateway gives you live credentials.
- Press Save payment settings.
- For bKash and Nagad, Test connection checks that the gateway answers.
The label next to each gateway tells you its state: Off, Credentials missing (details incomplete), On · sandbox or Live.
Money collected by JonakiSoft
At the bottom, Payments collected by JonakiSoft lists every payment taken with the central account: Date, Gateway, Transaction and Amount. When JonakiSoft sends a settlement summary, it shows what was collected, the gateway fees, what has been settled to you and what is still payable. Pending in the Reported column means the payment has not been reported to JonakiSoft yet; this happens by itself later.
Licence and features
The Licence & features box on Admin › Settings shows what your JonakiSoft licence includes:
- Licence status, Plan, Valid until (with the grace date, if any) and Last synced.
- Each module on its own line: a green tick means it is on; grey lines say "(not in plan)".
The licence is checked once a day and updated at once when JonakiSoft changes it. To see a renewal straight away, press Sync licence now; you see "Licence synced". If a sync fails, "Last sync failed: …" appears and ClinicDesk keeps working with the stored licence.
When the licence ends
- Grace days: for a few days after the licence ends everything still works. A yellow banner at the top of every page says "Your licence has expired. ClinicDesk keeps working until (date); please renew." Details opens the licence page.
- Locked: when the grace days are over, or the licence is suspended or revoked, every page goes to the licence page. It says, for example, "Your licence has expired" or "Your licence is suspended", with the support phone, WhatsApp and email.
Nothing is lost while locked: "All your patients, bills, lab reports and accounts are saved. They open again as soon as the licence is active. The patient portal and online booking are paused until then." After renewing, press Sync licence now and everything opens again.
Features not in your plan
When a module (for example In-patient, HR or corporate billing) is not in your licence, its menu disappears from the sidebar. Anyone who opens it by a direct link sees this page:
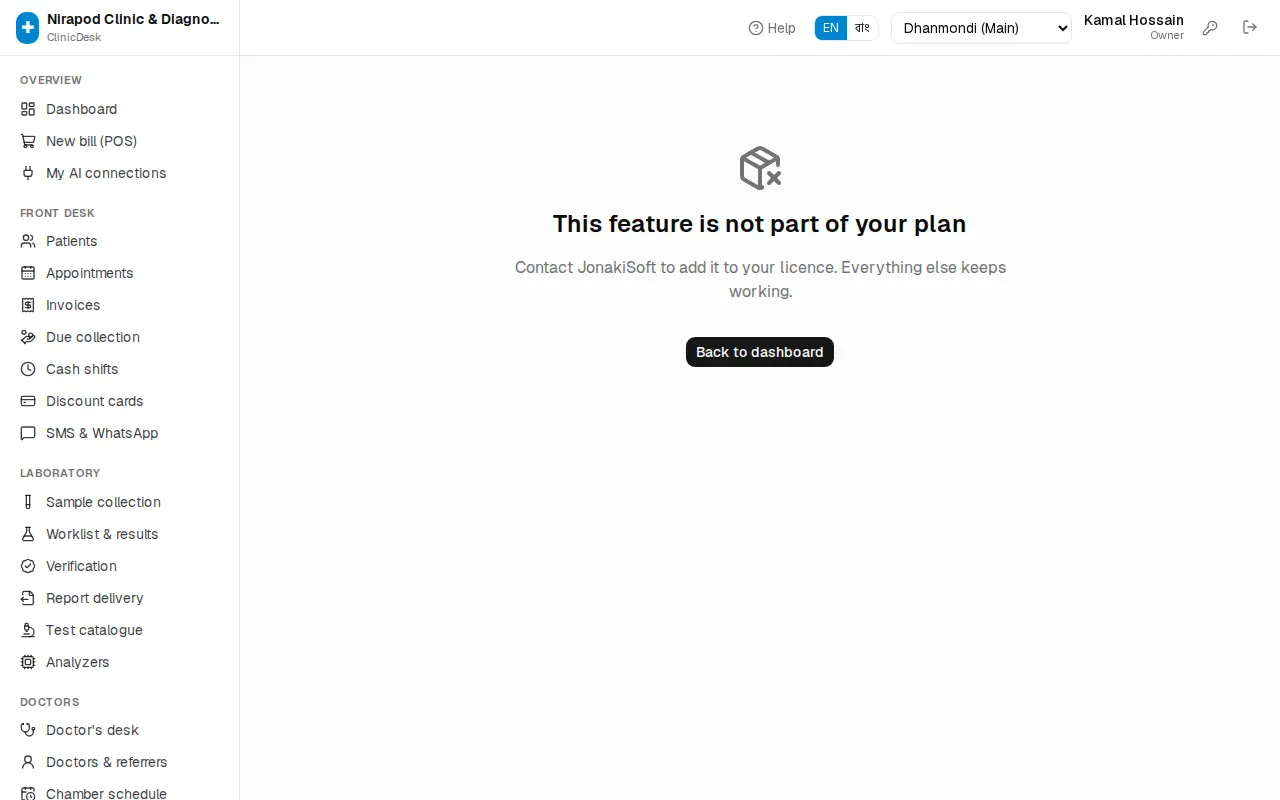
The owner sees "Contact JonakiSoft to add it to your licence. Everything else keeps working."; other staff see "Ask the clinic owner, or contact JonakiSoft to add it to the licence." Back to dashboard takes you back to work.
Integrations
Admin › Integrations connects outside systems to the clinic. Only the owner can open it.
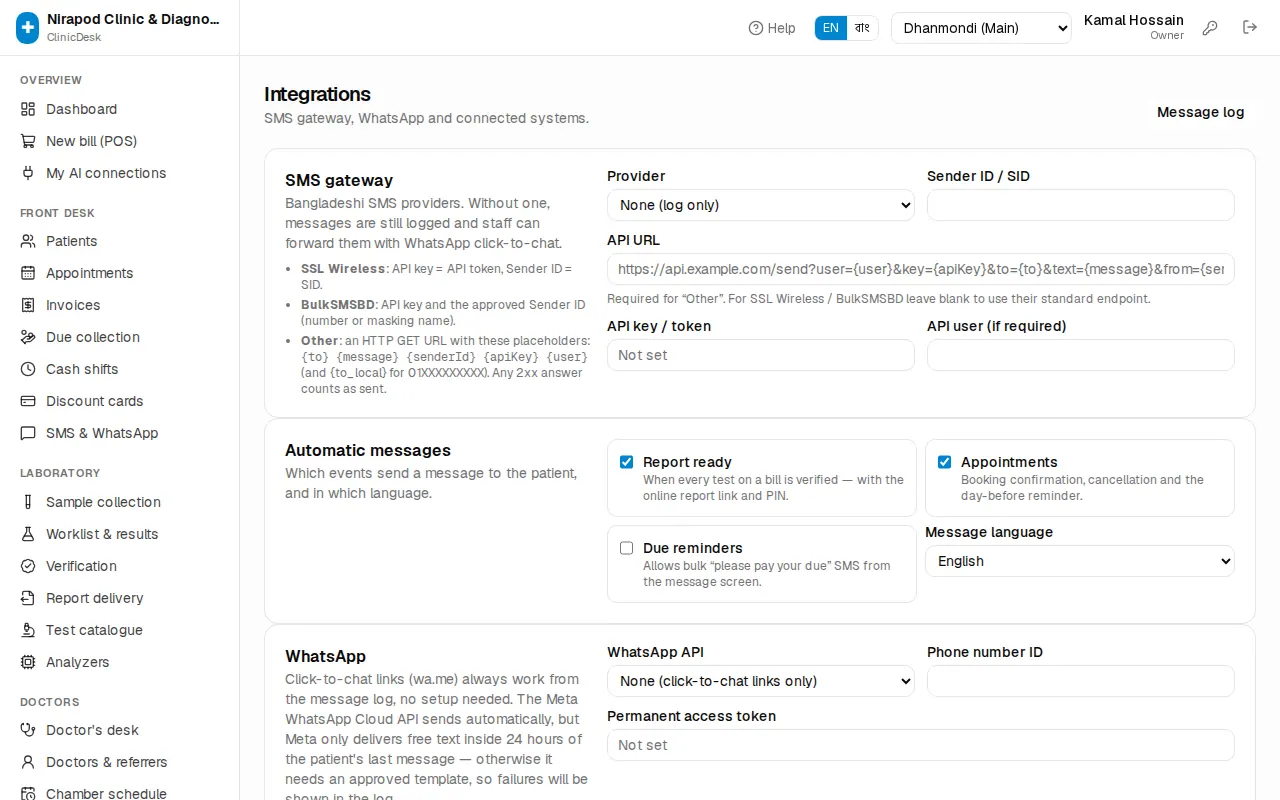
- SMS gateway, Automatic messages and WhatsApp — which provider, which events send the patient a message and in which language. The details are in SMS & WhatsApp.
- Send a test — after saving, send a test SMS to check the gateway.
- Pharmacy link (PharmaDesk) — doctors' prescriptions go straight to your pharmacy, and medicines sold to admitted patients land on their running bill. How to link is in Pharmacy link.
Connecting lab analyzers is covered in Laboratory.
AI assistants (MCP)
ClinicDesk can be connected to Claude, ChatGPT and other AI apps. You can then ask the AI questions in Bangla or English and it answers from the clinic's data — "How many patients did we see today?" or "Which tests were most common this month?".
Open Admin › AI assistants (MCP).
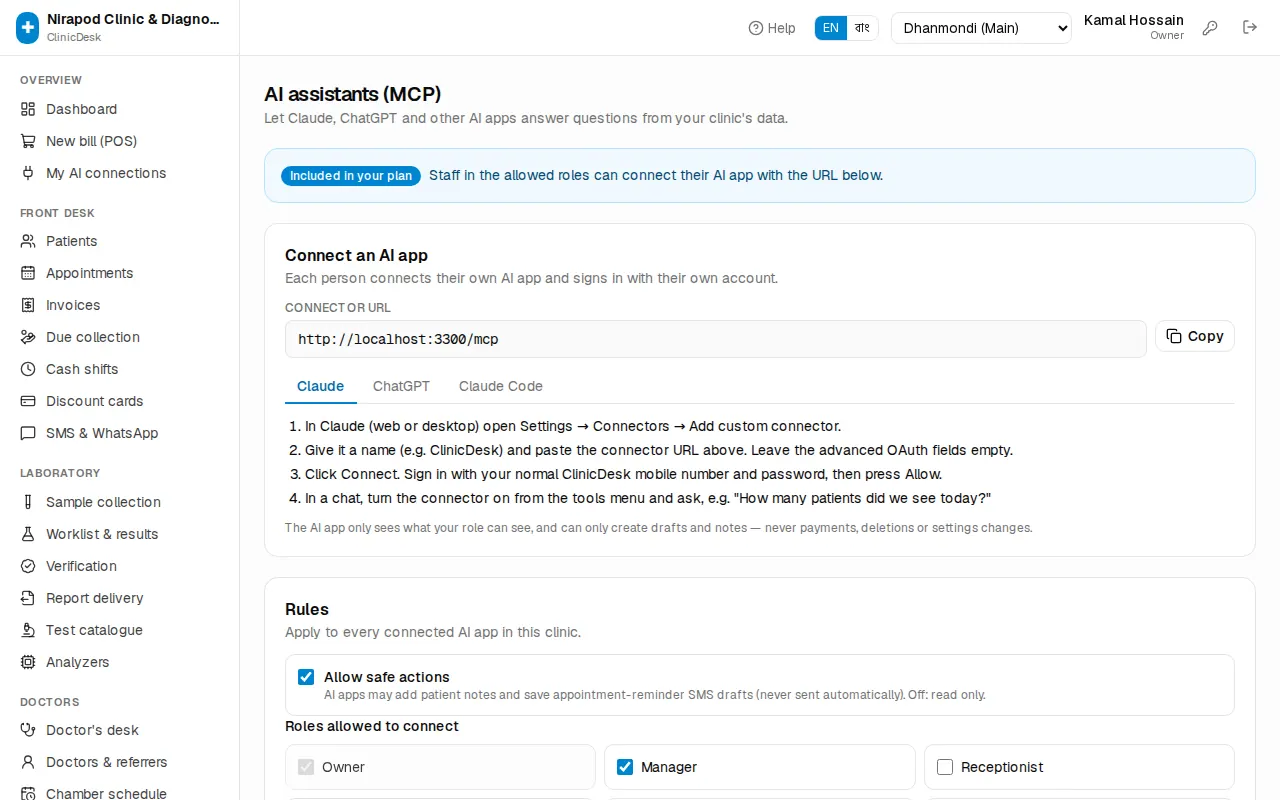
The coloured box at the top says whether the connector is Included in your plan or Not in your plan. It is sold separately; ask JonakiSoft if it is not in your plan.
Setting the rules
- Allow safe actions — when on, AI apps may add patient notes and save appointment-reminder SMS drafts (never sent automatically). When off, they can only read.
- Roles allowed to connect — tick the roles whose staff may connect an AI app. The owner always can.
- Press Save.
Each person still only sees what their role can see in ClinicDesk. Lab result values are never shared with AI apps, and AI apps can never take payments, delete anything or change settings.
Connected apps lists every AI app connected in the clinic; Revoke cuts one off. Recent activity shows the last 50 requests from AI apps — who, which tool and the result.
Connecting your own AI app
Each person connects their own AI app and signs in with their own account. Open Overview › My AI connections in the sidebar.
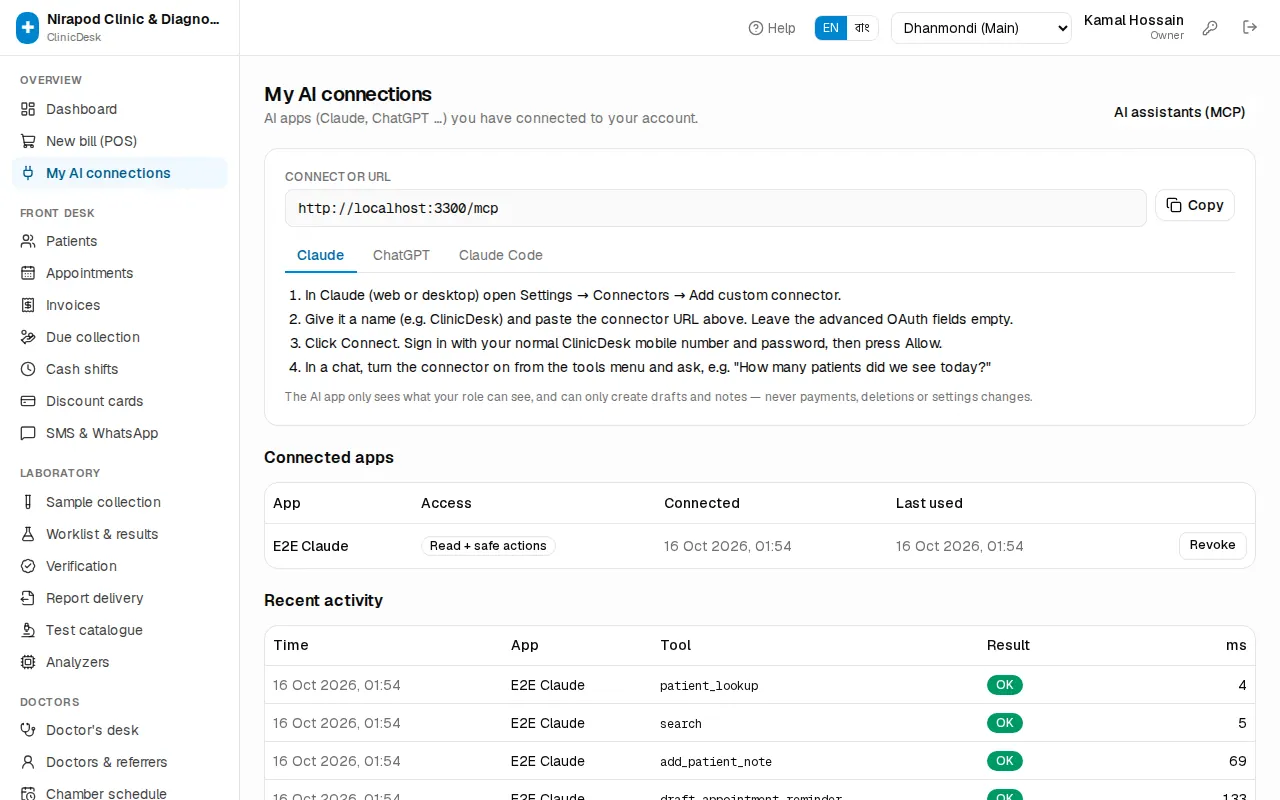
- Press Copy next to the Connector URL.
- Choose the tab for your app — Claude, ChatGPT or Claude Code. The steps are written right there; in Claude, for example, open Settings → Connectors → Add custom connector and paste the URL.
- Press Connect. ClinicDesk's sign-in page opens: sign in with your normal mobile number and password, then press Allow.
- Turn the connector on in a chat and ask your question.
Your connected apps are listed under Connected apps on the same page. If you lose your phone or no longer need an app, press Revoke; the app will have to sign in again.
Chapter 4 · Front desk & billing
Reception & appointments
Finding and registering patients, the patient profile, booking doctor serials, online bookings, check-in, tokens and the queue board.
Reception work starts with the patient. Every patient has one permanent number, the MRN (for example P-000012). All their bills, tests, consultations and admissions hang off that number. This chapter shows how to find or register a patient, book a doctor's serial, and check the patient in when they arrive so they join the doctor's queue.
In the sidebar these screens are under Front desk: Patients and Appointments.
Find a patient
Always search before you register someone new. Two MRNs for the same person split their history in two.
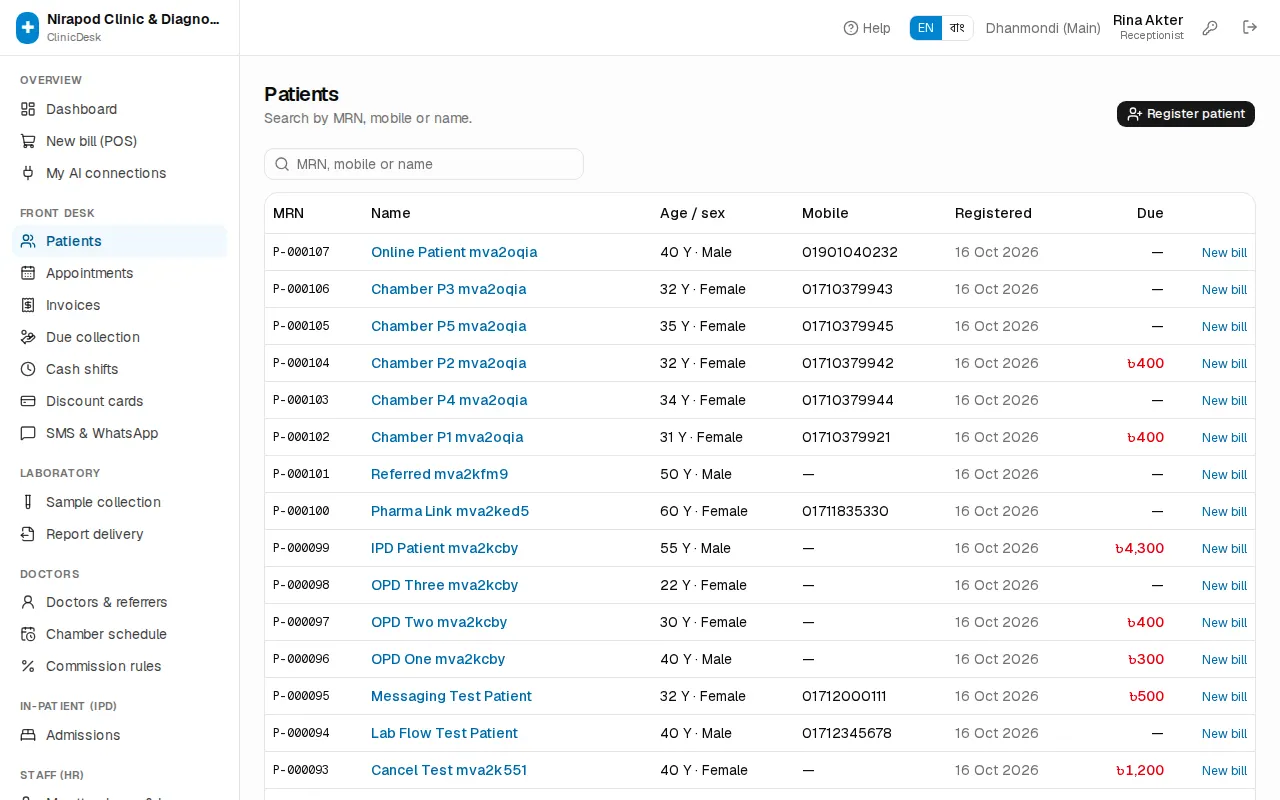
- Open Front desk › Patients in the sidebar.
- Type in the search box (MRN, mobile or name). Any one of these works:
- the full MRN (
P-000012) or just the number (12); - at least 4 digits of the mobile number;
- any part of the name.
- the full MRN (
- The list shows MRN, Name, Age / sex, Mobile, the Registered date and Due. A red due amount means one of the patient's bills still has money to collect.
- Click the name to open the patient profile. The New bill link on the right starts a bill for that patient straight away.
If nobody matches you see No patient found — Try the MRN or the mobile number.
Register a new patient
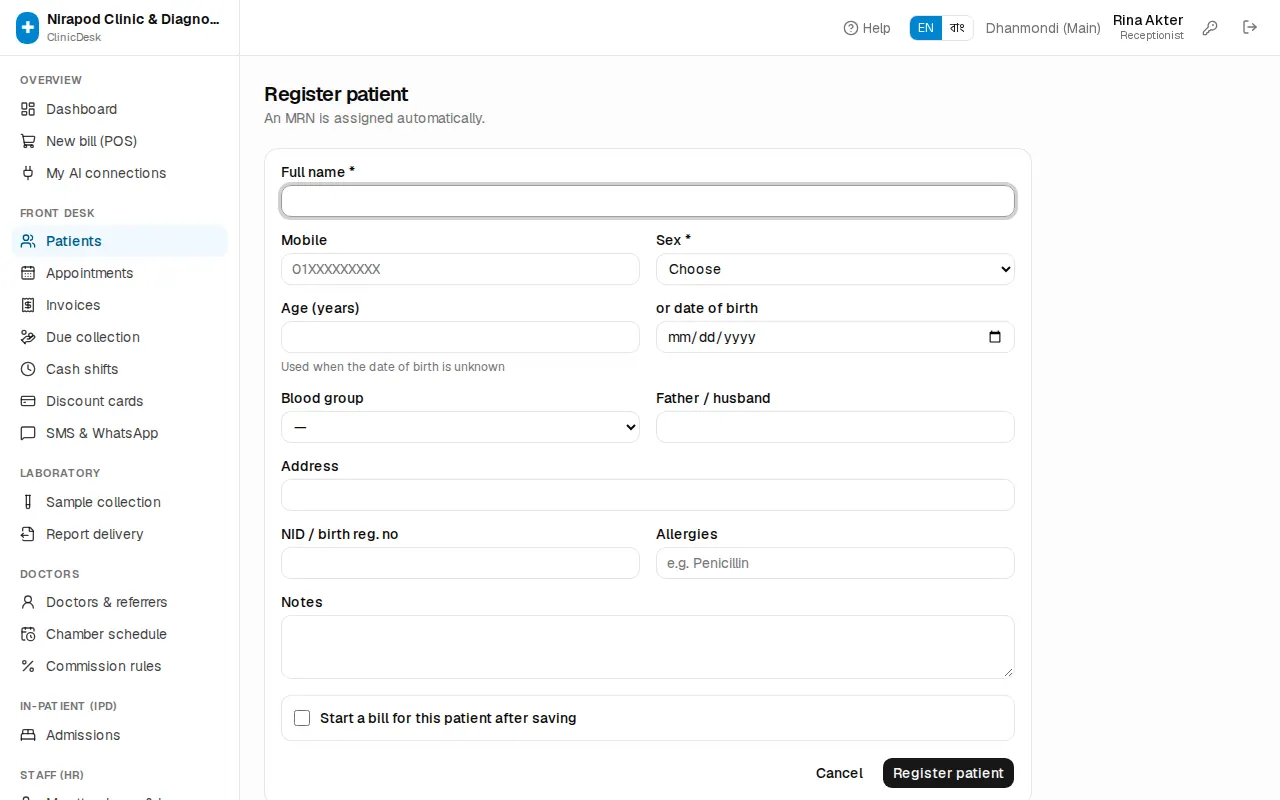
- On the Patients page press Register patient (top right).
- Type the Full name (at least 2 letters) and choose Sex — these two are required (\*).
- Enter the Mobile number (
01XXXXXXXXX). Report-ready SMS and online reports go to this number, so type it carefully. - Give the age: Age (years) or or date of birth. If the date of birth is unknown, the age alone is enough; it moves forward with time automatically.
- If useful, fill Blood group, Father / husband, Address, NID / birth reg. no, Allergies (e.g. Penicillin) and Notes. Allergies are shown in red on the bill page.
- If the patient's employer or insurer pays their bills, pick it under Bills to (corporate / insurance) and enter the Employee ID / policy no. (These two fields only appear once companies have been added.)
- To bill right away, tick Start a bill for this patient after saving.
- Press Register patient. You see "Registered P-0000xx" — the MRN is assigned automatically.
To correct details, open the profile, press Edit, change what is wrong and press Save changes.
The patient profile and history
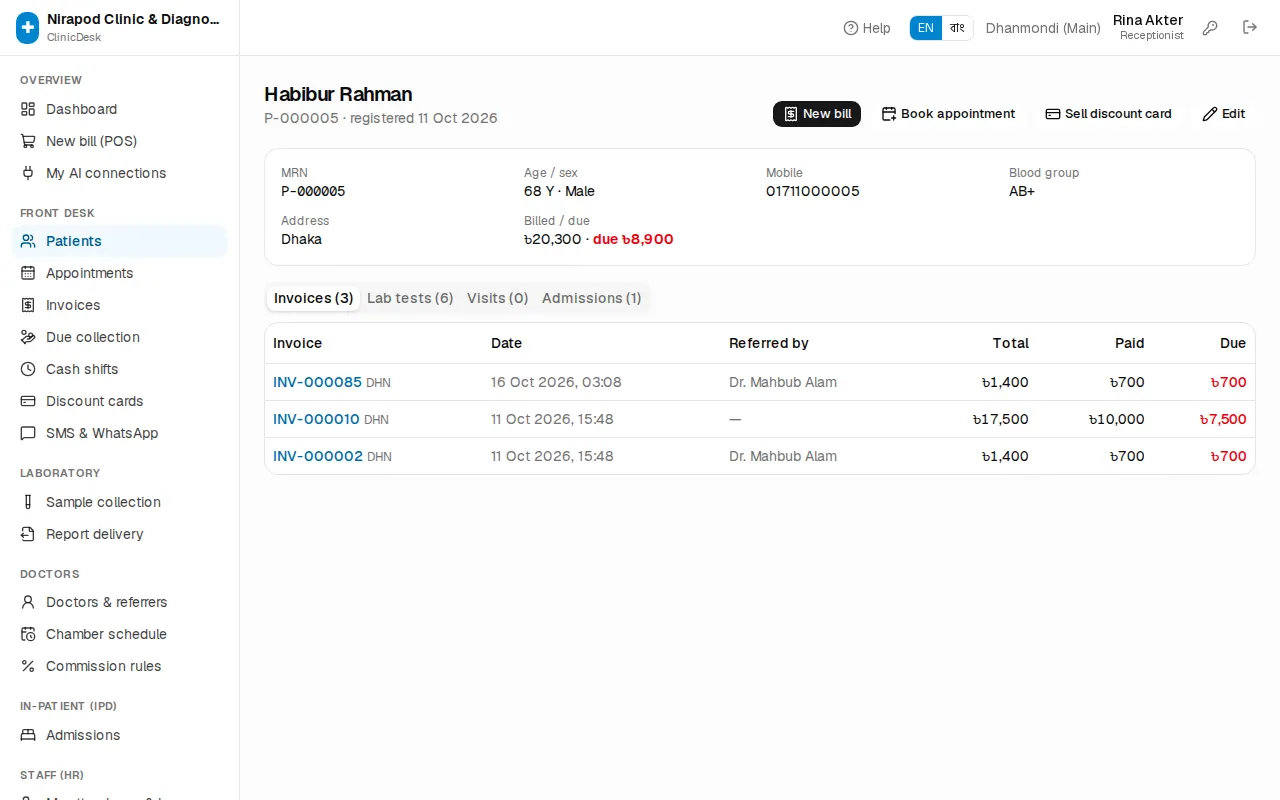
The top of the profile shows the name, MRN and registration date. The buttons next to it:
- New bill — opens the billing counter for this patient.
- Book appointment — opens the booking form with this patient already chosen.
- Sell discount card — shown when the patient has no valid card. See Memberships & corporate billing.
- Edit — change the details.
Below, the full history in sections:
- Invoices — every bill with Billed / due. Click a bill number to open it.
- Lab tests — the status of every test. When a report is ready, the Report link prints it.
- Visits — consultations with the Diagnosis and a Prescription print link. If the doctor advised tests, Bill tests (n) puts those tests on a new bill for you.
- Admissions — in-patient stays.
If the patient belongs to a company, Bills to is shown; if they hold a discount card, Discount card with its validity.
Book a doctor's serial
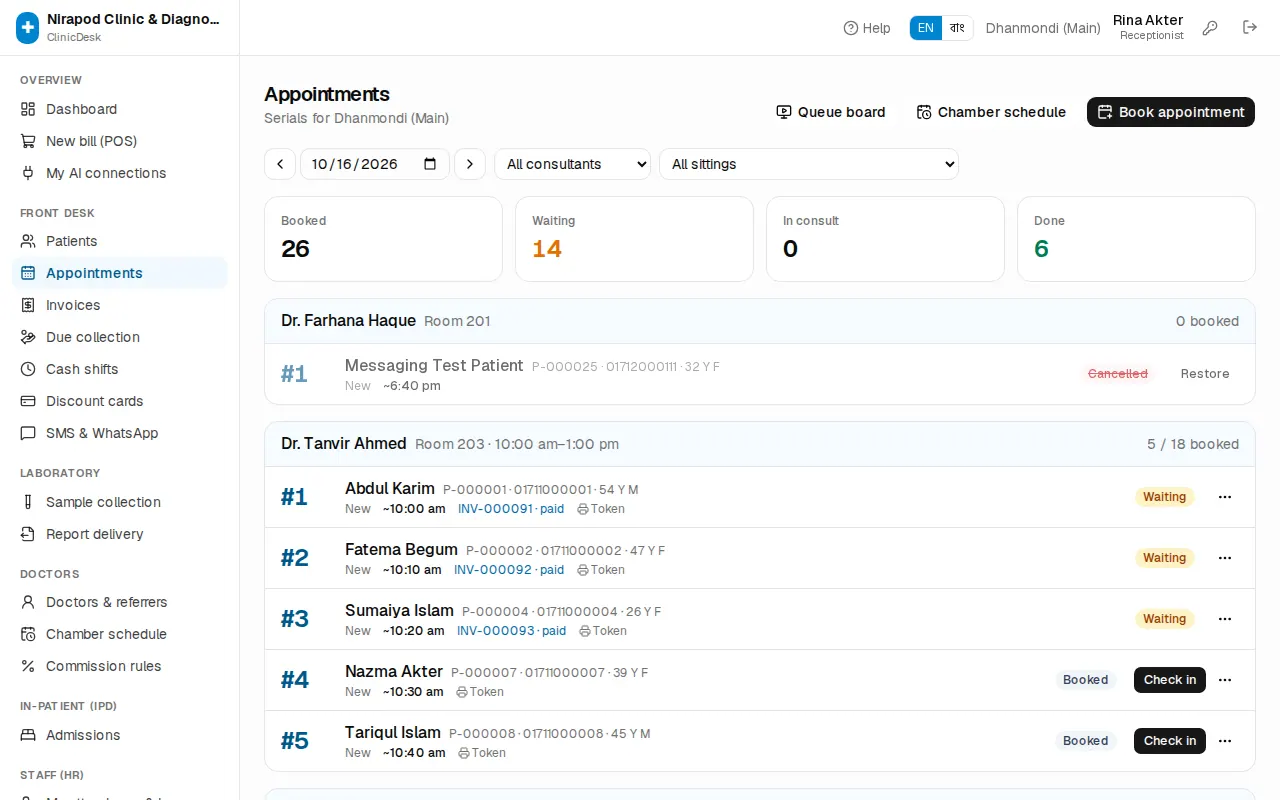
Front desk › Appointments lists the day's serials grouped by doctor and sitting. The four boxes at the top count Booked, Waiting, In consult and Done. Change the day with Previous day / Next day or Today, and filter by doctor with All consultants.
To book a serial:
- Press Book appointment.
- In Patient \* type an MRN, phone or name and pick the patient. For someone new, press New and register them right there.
- Choose the Consultant \ and the Date \ (today or a later day).
- Under Sitting \* pick the sitting for that day. Each shows how many are booked, e.g. "12/20 booked"; a full sitting says "full". If the doctor is on leave or does not sit that day, a yellow message appears instead, such as No sitting that day.
- Choose the Type: New, Follow-up or Report show. If the patient saw this doctor before, the form says how many days ago; within the follow-up window it picks Follow-up for you. The Fee is shown below.
- Add a Note if needed. For a phone booking tick Booked by phone.
- With Print token ticked, the token print page opens as soon as the serial is booked.
- Press Book serial. You see, for example, "Serial #7 booked for Rahima · around 10:30 AM".
When a sitting is full the system asks Book anyway (overbook)? — say yes only if the doctor agrees.
Online bookings
When the clinic has online booking switched on, patients can take a serial themselves on the clinic's booking page (/book/<clinic-name>). How that looks for the patient is in Patient portal.
What reception needs to know:
- Online serials appear in the Appointments list like any other, with a purple Online tag. Phone bookings carry a Phone tag.
- The patient books with a mobile number, name, sex and age. ClinicDesk looks up the mobile number first (written any way — 01…, +880…, with spaces) and links the booking to the patient on that number whose name and age fit, even if the name is spelled a little differently ("Md. Karim" and "Karim"). A new MRN is created only when nobody has that number.
- When the number belongs to patients but none clearly fits (for example a child booked on the father's number), ClinicDesk never merges them. The booking goes to a new record and shows an amber Check patient tag. Click it, ask the patient, then press Use this patient next to their existing record, or Keep new patient if it really is someone else.
- When the patient arrives, Check in as usual (see below). The fee is normally taken at the counter.
Online booking is switched on or off by the owner in Admin › Settings with Allow online booking, and per sitting with the Online booking tick in the chamber schedule.
Check in when the patient arrives
Check the patient in when they reach the clinic. Check-in puts them in the doctor's queue as Waiting.
- On Appointments, press Check in on the patient's row.
- The small form offers two ways:
- Bill fee now — shows the Consultation fee. Check the amount in Received (৳) and pick the Method (Cash, bKash, Nagad, Rocket, Card, Bank). For anything but cash, enter the Transaction ref.
- Already paid — the fee was taken earlier at the counter. Optionally type the Bill no. (optional) (e.g.
INV-000123); this links the consultation to that bill.
- Press Check in. You see "#7 Rahima is waiting · INV-000123".
Doctors who collect their own fee are marked Doctor collects fee. Checking in their patient makes no clinic bill; the form says so and the patient simply joins the queue.
After check-in the row shows the bill number and due or paid. Once the doctor has seen the patient and advised tests, a Bill advised tests (n) link appears — press it to open a bill with the patient, the tests and the referring doctor already filled in.
Tokens and the queue board
Token: print it from the Token link on the row, or Print token in the More (⋯) menu. The token shows the serial number, doctor, sitting time and expected time.
Queue board: for the TV in the waiting area.
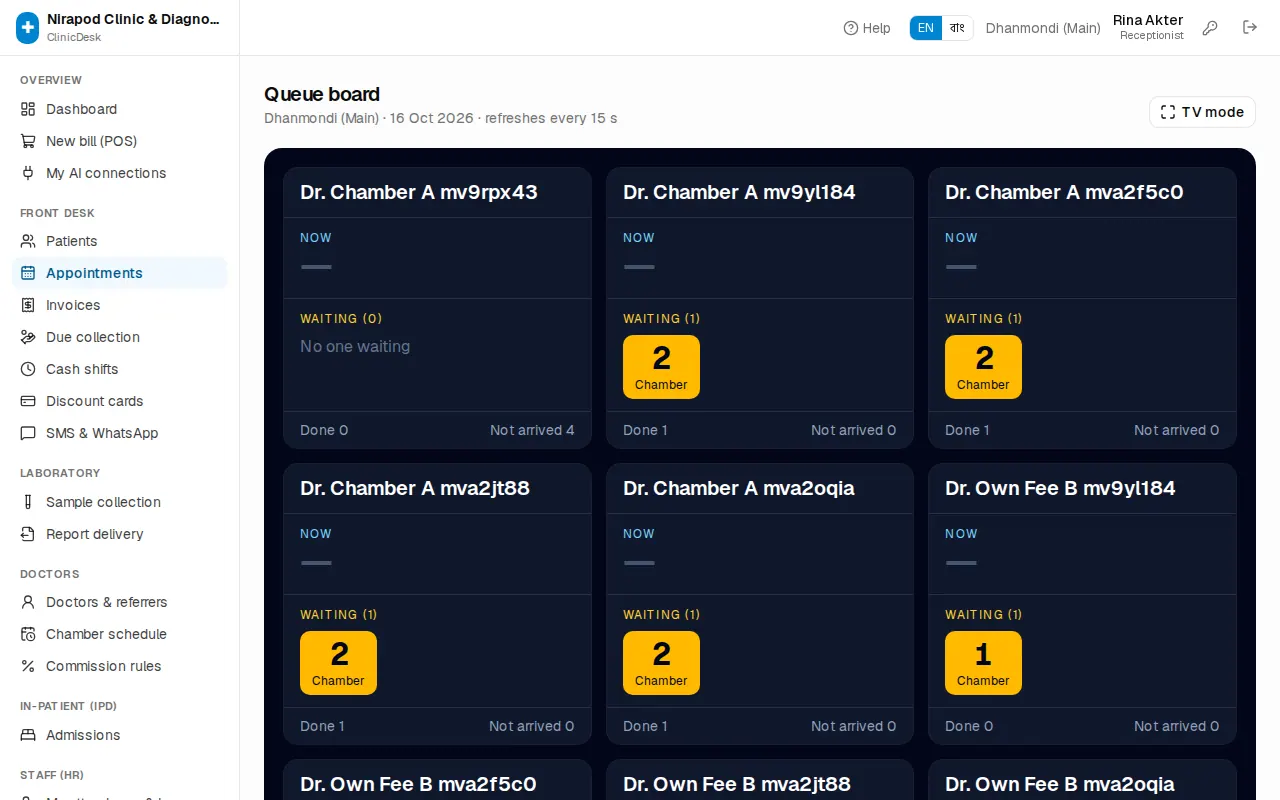
- On Appointments press Queue board.
- Each doctor has a column: Now (the patient with the doctor), Waiting (n) (the next one highlighted in yellow), and at the bottom the Done and Not arrived counts.
- Press TV mode for full screen. The board refreshes itself every 15 seconds; nobody needs to touch it.
The board shows only the patient's first name — never the full name or phone number.
Cancel, no-show and restore
In the More (⋯) menu at the right of a row:
- Mark no-show — the patient did not come.
- Cancel appointment — asks to confirm: "Cancel serial #7 (Rahima)?".
Cancelled and no-show serials are greyed out and get a Restore button — use it if you cancelled by mistake.
With SMS switched on, booking, cancellation and the day-before reminder go to the patient's mobile automatically. See SMS & WhatsApp.
Common mistakes
Chapter 5 · Front desk & billing
OPD billing & payments
Opening a cash shift, billing tests, consultations and services at the counter, referrers, discounts, payment methods, receipts and sample labels, due collection, cancellations and refunds, and closing the shift.
All of a patient's money goes through the billing counter — tests, doctor's fees, procedures and packages on one bill. Receptionists land on this screen as soon as they sign in. This chapter walks through a whole day: open the shift, make bills, collect dues, cancel or refund when something goes wrong, and close the shift at the end of the day.
In the sidebar: Overview › New bill (POS), and under Front desk: Invoices, Due collection and Cash shifts.
Open a cash shift at the start of the day
A shift is the account of your cash drawer. Money you take is counted in your drawer only while a shift is open.
- Open Front desk › Cash shifts, or use the button next to the yellow message on the billing counter.
- Press Open shift.
- Count the cash in the drawer and type it in Opening cash (৳).
- Press Open shift. You see "Shift opened".
Without a shift the billing counter shows a yellow message: You have no open cash shift — payments won't be counted in a drawer. You can still bill, but the drawer cannot be reconciled at the end of the day.
A new bill, step by step
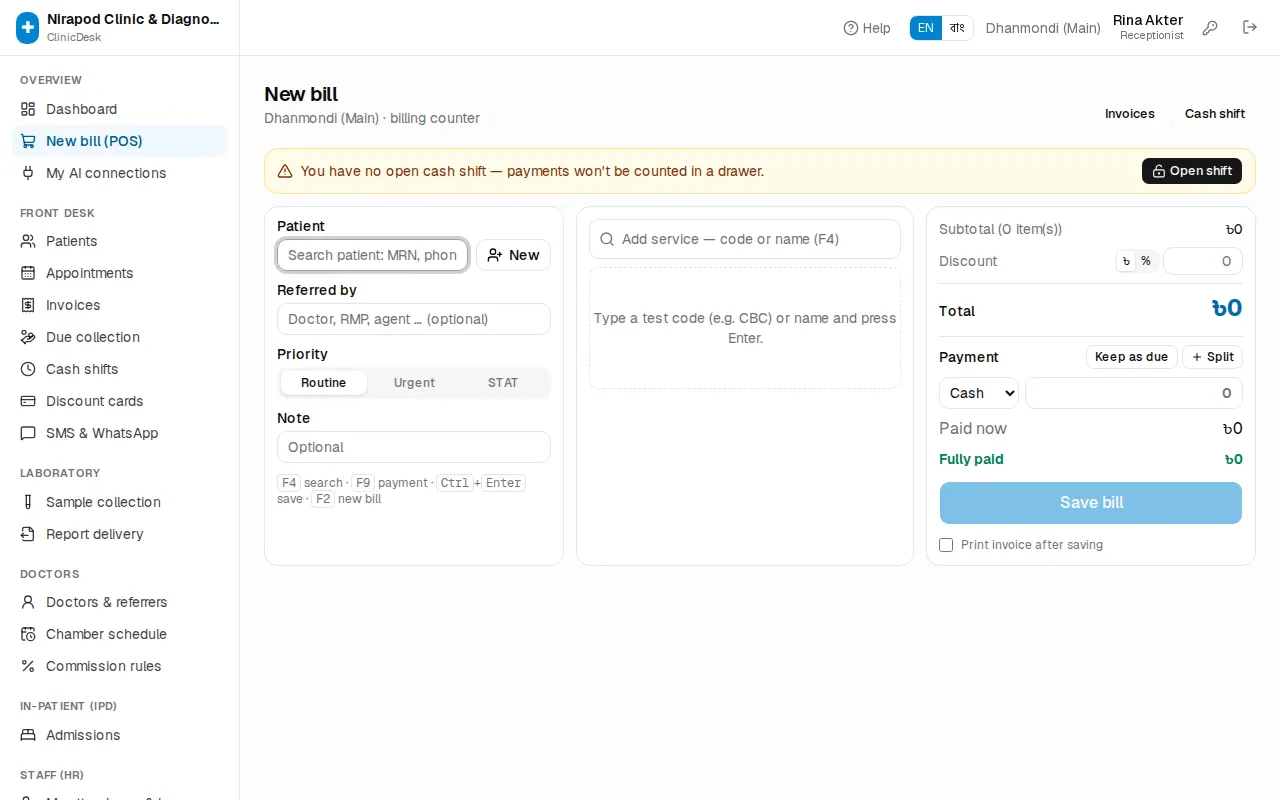
The screen has three parts: patient and referrer on the left, the services in the middle, totals and payment on the right.
- In Patient type an MRN, phone or name and pick the patient. For a new patient press New and register them right there. (See Reception & appointments.)
- In the middle box Add service — code or name (F4) type a test code (e.g.
CBC) or name and pressEnter. When a list appears, use the arrow keys andEnter. Add every service the same way. - When you add a Consultation, a Choose consultant… box appears under it — pick the doctor and their fee fills in. If the patient saw the same doctor recently, Follow-up is ticked for you and the lower fee applies.
- Bed, procedure, medicine and similar lines have a Qty box (Days for a bed). The same test cannot be added twice — you see "… is already on the bill".
- To drop a line, press the bin icon next to it.
- Check the Total on the right. The payment amount follows the total automatically.
- Press Save bill & receive ৳… (or
Ctrl+Enter).
Keyboard shortcuts: F4 service search, F9 payment box, Ctrl+Enter save, F2 new bill.
On a small screen (phone or tablet) the three parts stack one below the other:
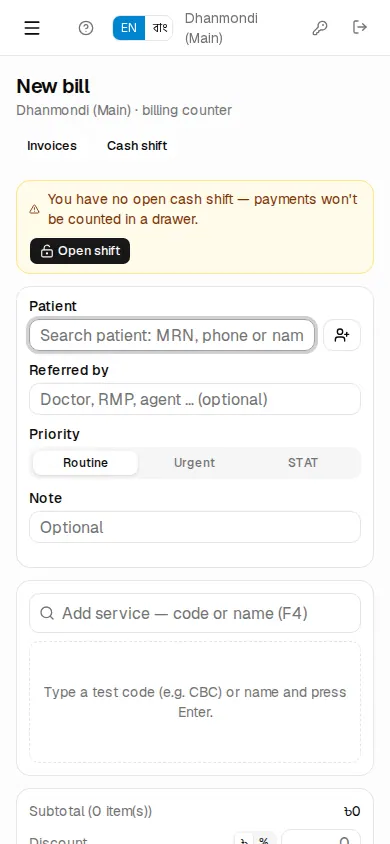
Referrer, priority and note
- Referred by — the doctor, RMP or agent who sent the patient. Referral commission is worked out from this. Leave it empty if nobody referred.
- Priority — Routine, Urgent or STAT. Urgent tests come to the top of the lab worklist with a badge.
- Note — any remark on the bill (optional).
If the patient belongs to a company or holds a discount card, a Payer box appears under the patient. Details: Memberships & corporate billing.
Giving a discount
There are two kinds of discount:
- Line discount: in Disc ৳ under each service, in Taka.
- Bill discount: in Discount on the right. The ৳ / % switch next to it chooses Taka or percent.
A bill discount opens a box for the reason — Discount reason (e.g. poor patient, staff). The bill will not save without one (Give a reason for the discount).
Who may give how much: the owner sets the Receptionist discount cap (%) in Admin › Settings. If a receptionist goes above it, a red line says "Total discount …% is above your limit of …% — a manager must bill this." and the save button stays off. Managers and the owner can go above the cap.
Card and company contract discounts are applied automatically (incl. card discount / incl. contract discount) and do not count against this cap.
Taking payment
In the Payment part on the right:
- Pick the method: Cash, bKash, Nagad, Rocket, Card or Bank.
- Check the amount. For anything but cash, type the TrxID / reference (for cards, Card last 4 / approval code).
- For a split payment (some cash, some bKash), press Split — a second row appears.
- Patient will pay later? Press Keep as due — the amount goes to zero and Due shows in red below.
- For cash, type what the patient handed over in Cash given — the Change to give back is shown.
If you type more than the bill, a red line says Payment is more than the total. — correct it.
After saving: receipts and labels
When the bill is saved you see a green tick, Bill saved and the bill number in large type (e.g. INV-000123), with Total, Paid and Due below.
If the bill has lab tests, two more things are shown:
- Report PIN — a 6-digit PIN. With the bill number and this PIN the patient can download reports online. The PIN is also printed on the invoice.
- Reports expected — when the reports will be ready.
The buttons:
- Print invoice — the bill/receipt for the patient.
- Sample labels — barcode labels for the tubes (for a 50 × 25 mm label printer). Only shown when the bill has tests that need a sample.
- View bill — opens the bill page.
- New bill (
F2) — the next patient.
Tick Print invoice after saving and the print page opens by itself after every bill. The choice is remembered on this computer.
When there is a referrer and you are allowed, a Referral commission box appears here with Pay commission now — to pay the referrer in cash at the counter. That cash is taken out of your shift. Commission rules: Accounting, commission & HR.
The invoice list and the bill page
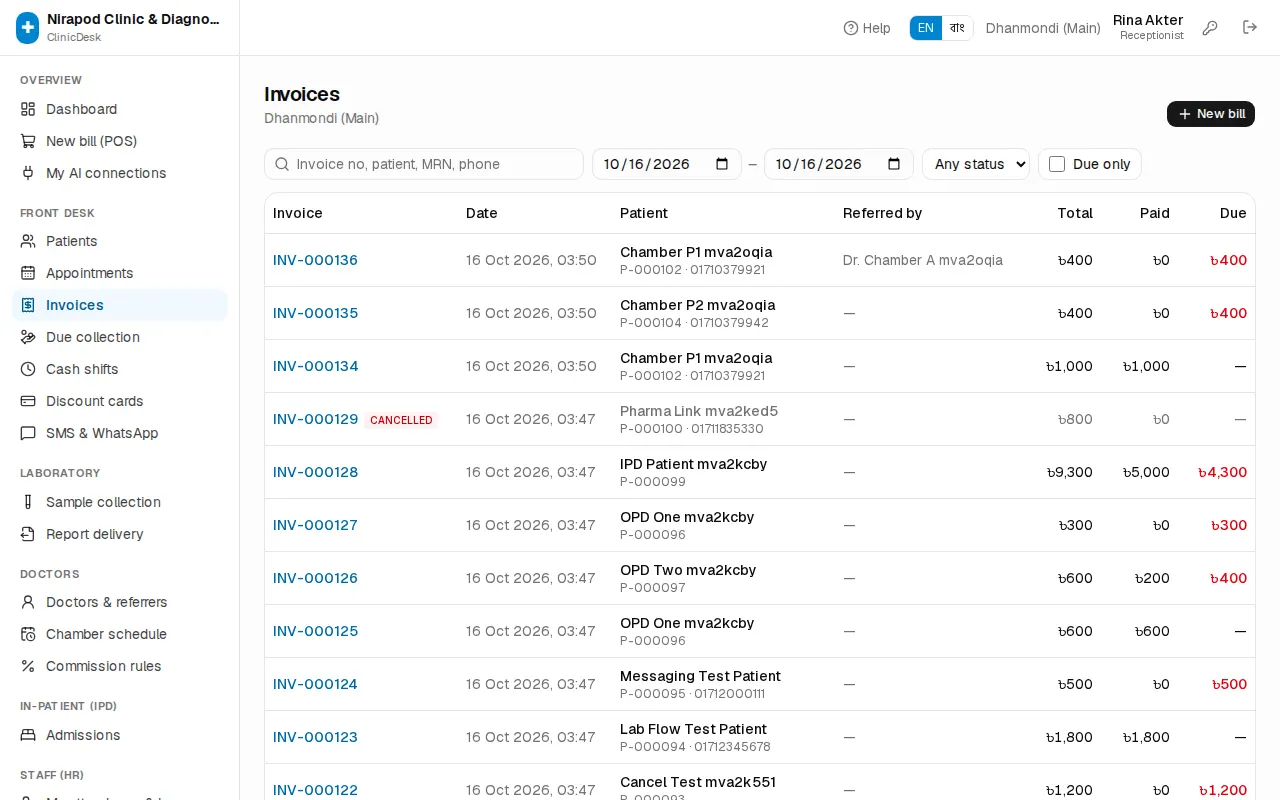
Front desk › Invoices lists the bills. Search by Invoice no, patient, MRN, phone (a search looks across all dates), change the date range, filter Active or Cancelled, or tick Due only. Totals are at the bottom.
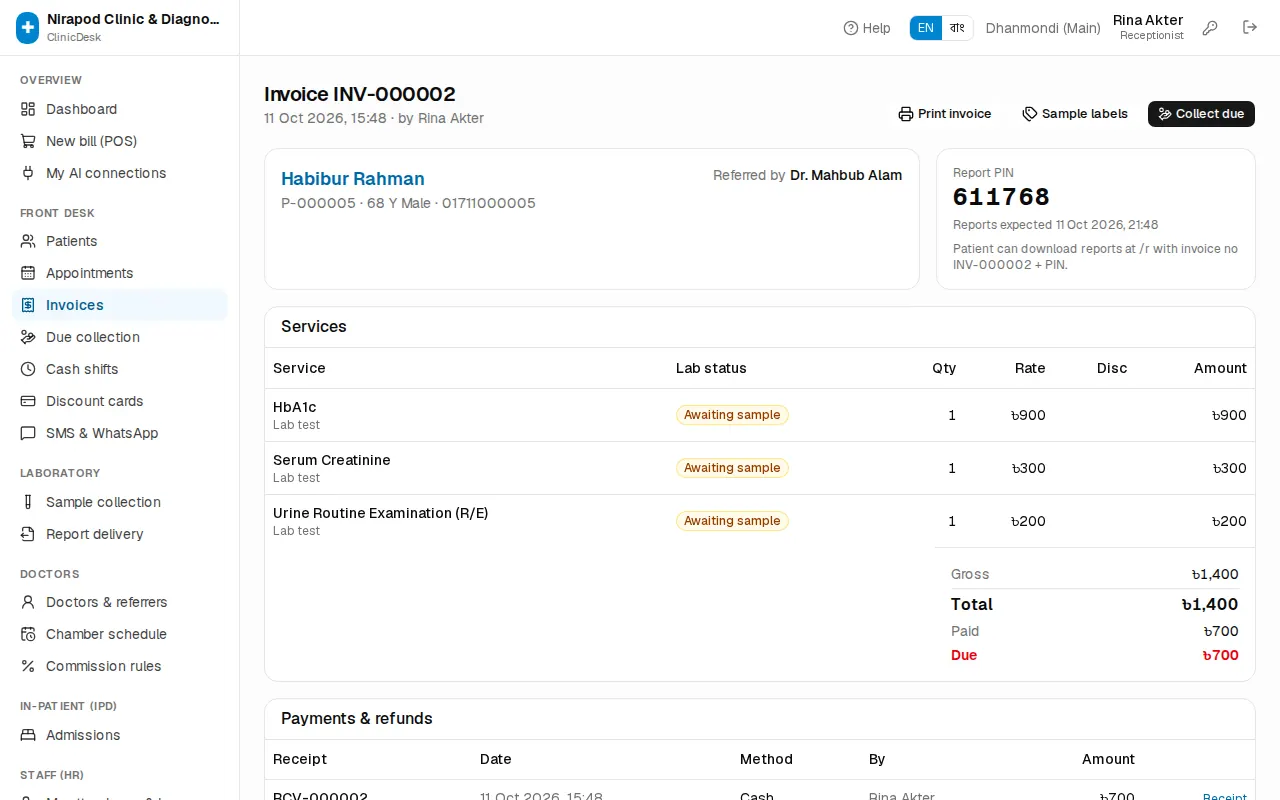
Click a bill number to open it. The buttons at the top: Print invoice, Sample labels, Lab report once reports are ready, and Collect due when money is outstanding. In the middle each service shows its Lab status (Awaiting sample, Collected, Processing, Resulted, Ready, Delivered). At the bottom, Payments & refunds lists every receipt, with a Receipt link to reprint it.
Collecting dues
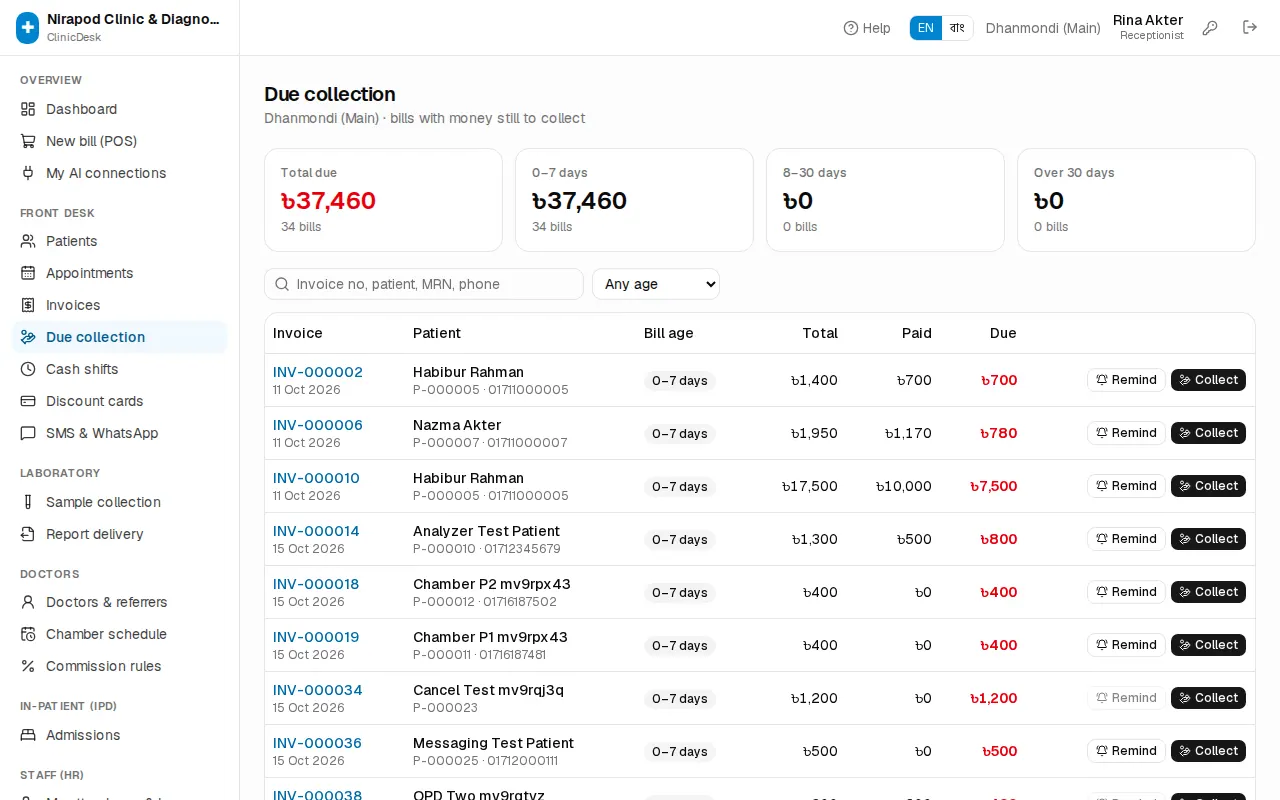
Front desk › Due collection lists every bill with money still to collect. At the top: Total due and the split by age — 0–7 days, 8–30 days, Over 30 days; click a box to see just those bills.
- Search by patient or bill number.
- Press Collect on the row (on the bill page the button is Collect due).
- Check the Amount (৳) — type less for a part payment. Choose the Method; for anything but cash add the Reference / TrxID.
- With Print money receipt ticked, the receipt opens.
- Press Receive. You see "Received … · RCV-…".
The Remind button on a row texts the patient a due reminder (if a mobile number is on file). To remind many patients at once see SMS & WhatsApp.
Cancellations and refunds
Only the manager and the owner can cancel bills and refund money. On the bill page the buttons are above the Services table:
- Cancel tests — cancel some tests/services on the bill. Tick the ones to cancel. Lab work for the chosen items is cancelled and the bill is recalculated.
- Cancel bill — the whole bill. All lab work on this bill is cancelled.
Both need a Reason (e.g. patient not fasting, wrong test). If the patient had paid, tick Refund the excess paid now via and pick the method. Then press Cancel selected or Cancel bill.
If the patient paid more than the bill, Refundable shows and a Refund button appears next to Payments & refunds. Enter the amount, method and a Reason, then press Refund — a refund voucher prints (RFD-…). Every cancellation and refund is kept in the audit log.
Close the shift at the end of the day
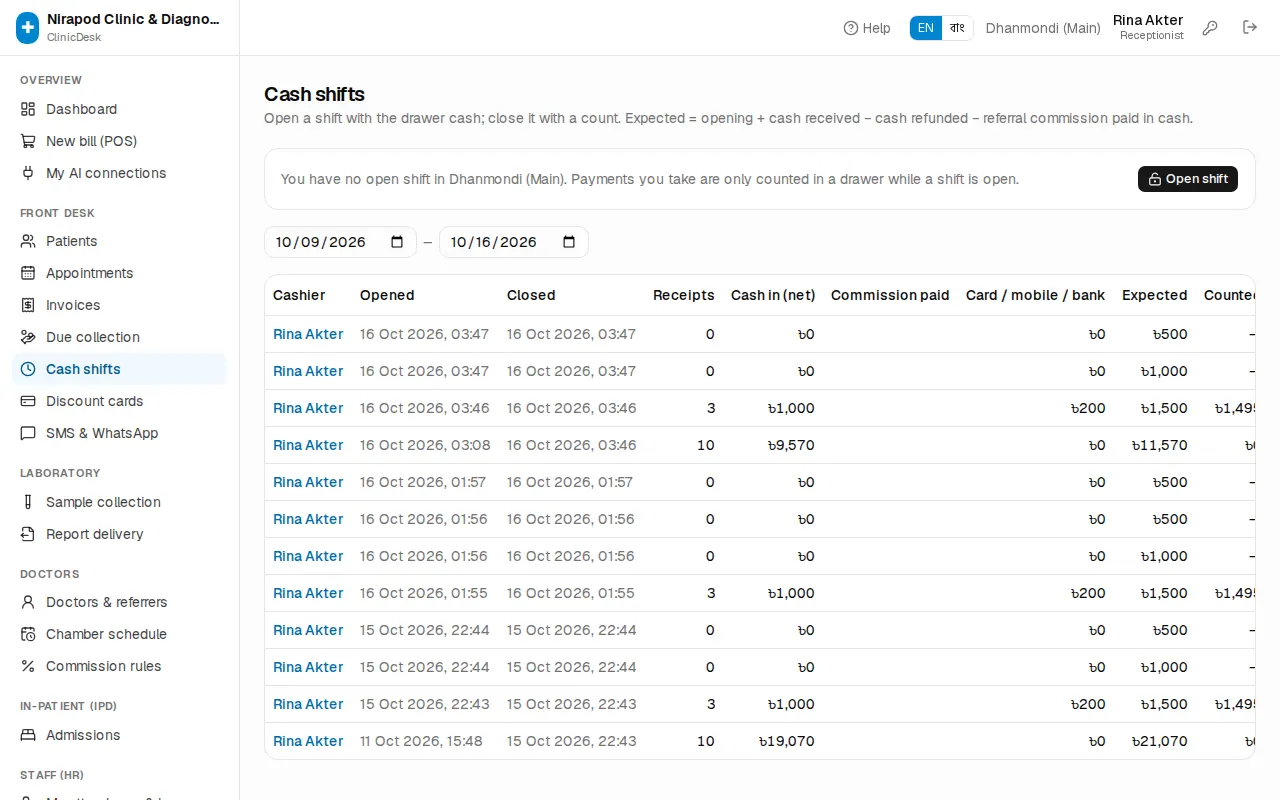
On Cash shifts, your open shift shows Opening cash, Cash (net), Other methods (bKash, card and so on) and Expected in drawer: opening cash + cash received − cash refunded − referral commission paid in cash. View payments lists every payment in the shift.
- Count all the cash in the drawer.
- Press Close shift.
- Type the Counted cash (৳). It shows at once Matches exactly, or by how much it is Over / Short.
- If there is a difference, write why in Note.
- Press Close shift.
The table below lists past shifts with Expected, Counted and Difference (OK when it matches). Managers and accountants (anyone who can see reports) see everyone's shifts here; others see only their own.
Common mistakes
Chapter 6 · Front desk & billing
Memberships & corporate billing
Discount card plans, selling, renewing and printing cards, card discounts on bills; corporate and insurance clients, contract prices, billing to a company, statements and settlements.
Many patients do not pay the full price themselves. Some buy the clinic's discount card (health card / family card) and get a discount on every bill. Others have their employer or insurer pay, settled in one go at the end of the month. The first half of this chapter covers cards, the second half companies.
- Selling cards: receptionist, manager and owner. Setting up card plans: manager and owner.
- Adding companies, contract prices and settlements: manager, accountant and owner. Receptionists bill to a company at the counter.
Set up card plans
You need at least one plan before you can sell cards. A plan says what the card costs, how long it lasts, how many people it covers and the discount on each kind of service.
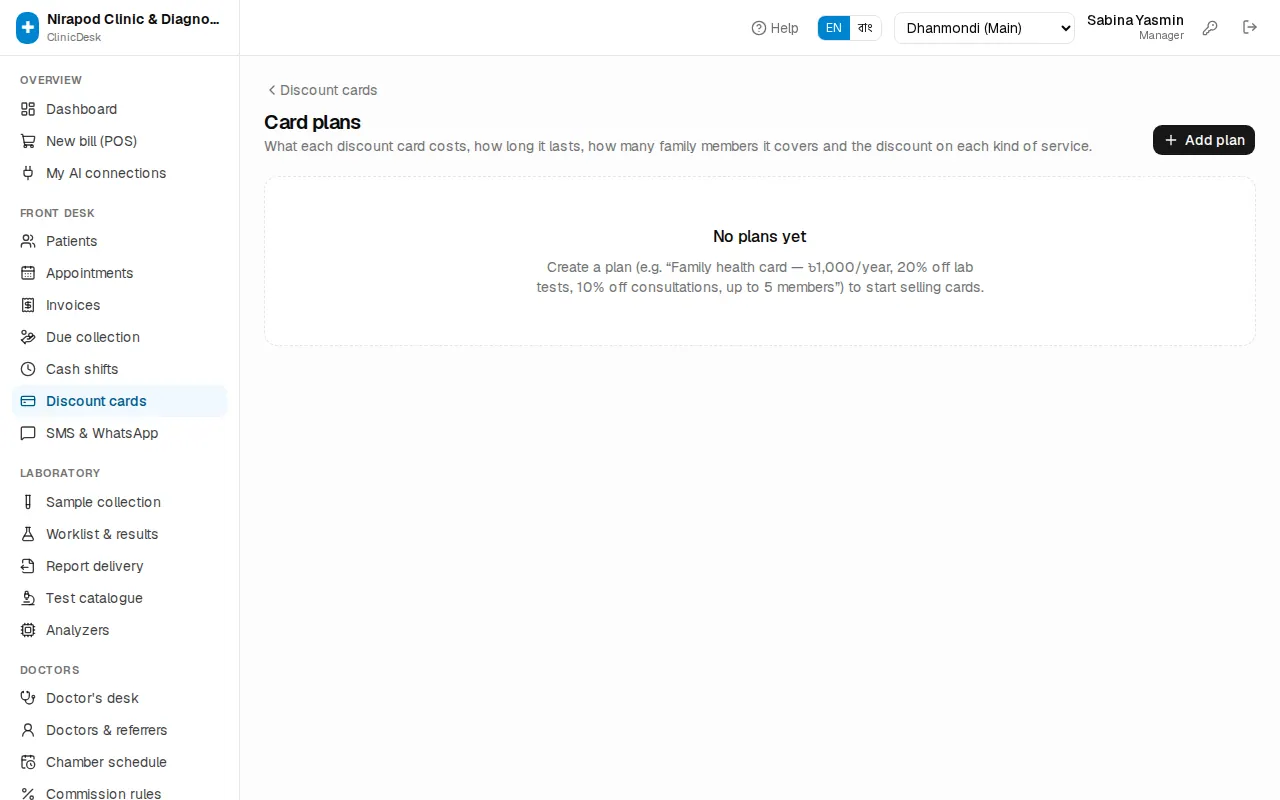
- Open Front desk › Discount cards and press Plans.
- Press Add plan.
- Fill in:
- Plan name \* — e.g. "Family health card".
- Card fee (৳) and Valid for (days) — usually 365.
- Lab / imaging discount % — lab tests, imaging, packages.
- Consultation discount %.
- Other discount % — procedures, bed, other (not medicine).
- Members per card — more than 1 for family cards.
- Save. You see "Plan added".
To stop selling a plan, edit it with the pencil icon and untick On sale.
Sell a card
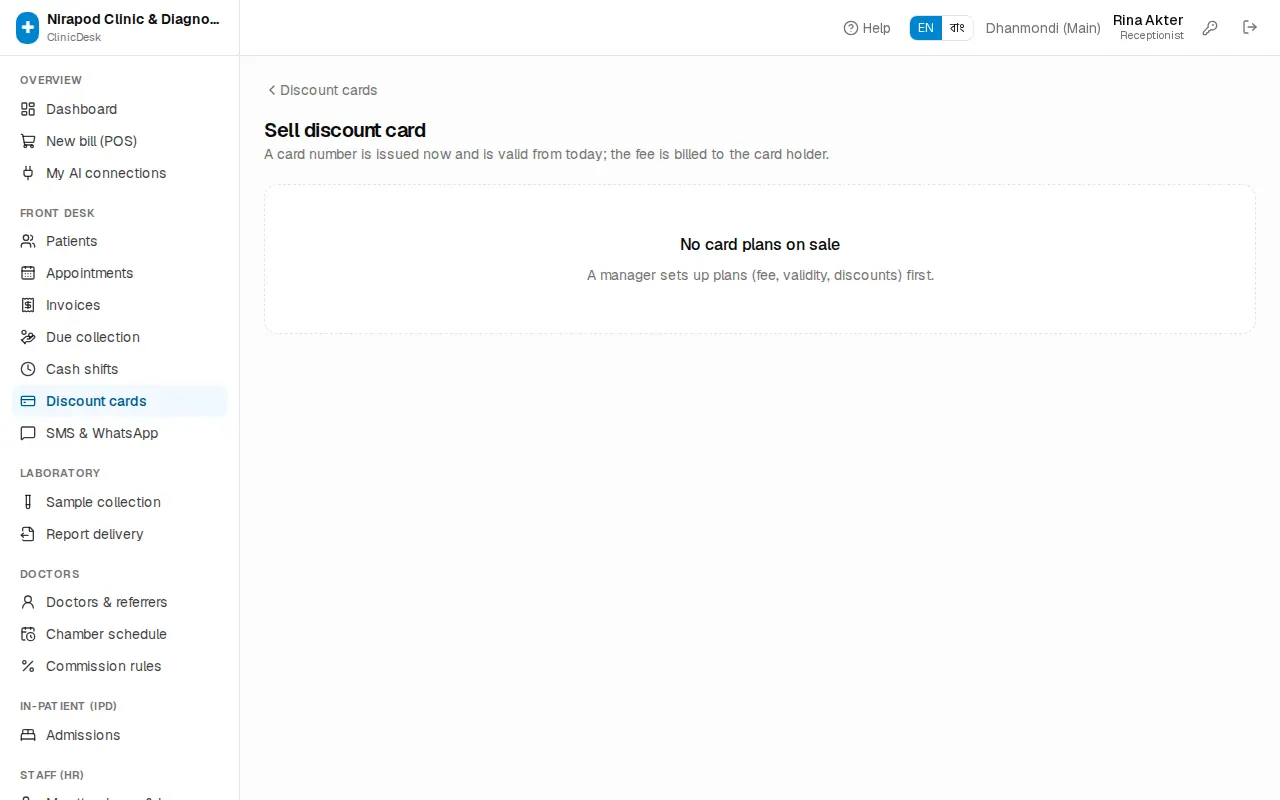
- On Discount cards press Sell card. (The Sell discount card button on a patient profile leads here too.)
- Pick a Plan — each shows its validity and the maximum members.
- Card holder — search and pick the patient (press New to register someone new).
- With Collect the fee (…) now ticked, pick the payment method (for anything but cash add the TrxID / reference). Untick it and the fee bill is saved as due; collect it later from the bill.
- Press Sell card · ৳…. You see "Card MEM-000012 sold · bill INV-…".
The card is valid from today, and the fee becomes an ordinary bill in the card holder's name — it shows in invoices and in your cash shift.
The card page: members, renewal, printing
On the Discount cards list search by Card no, member name, MRN, phone…. The top shows the number of Valid cards and those Expiring in 30 days.
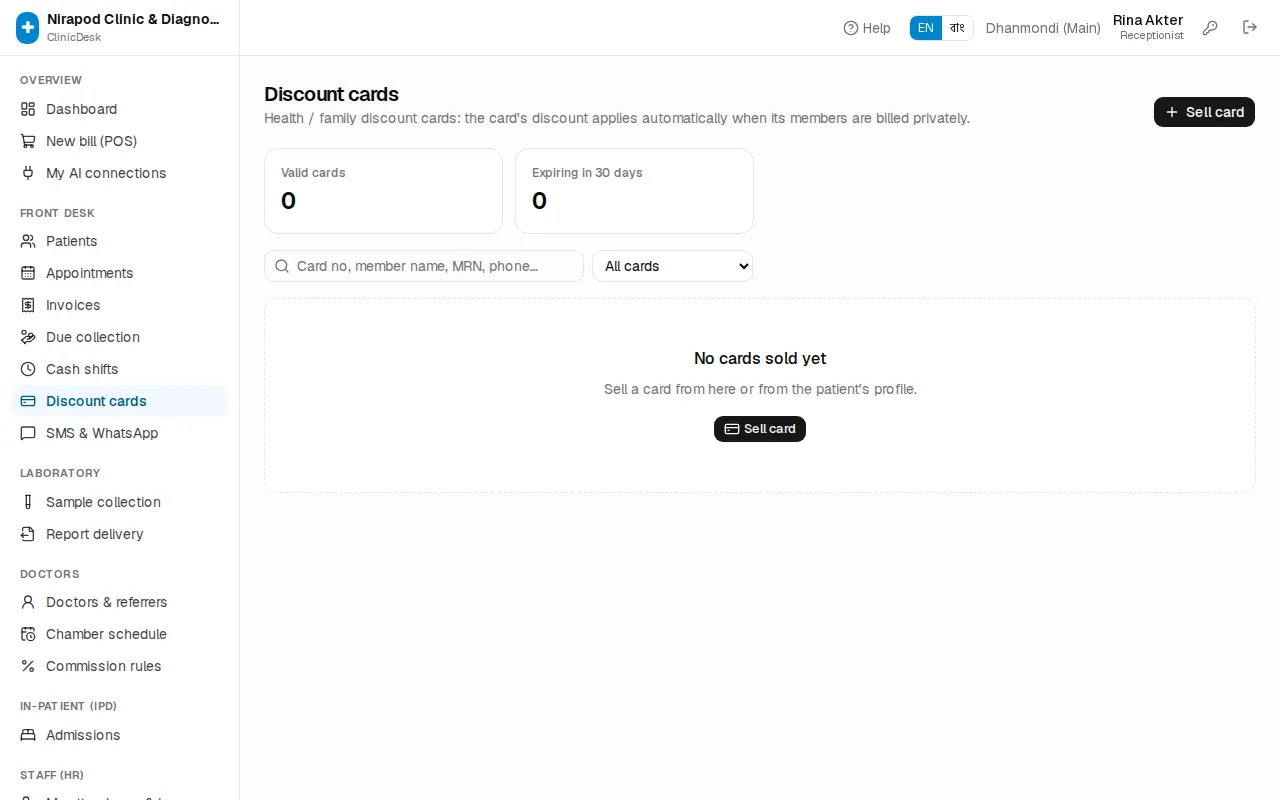
Click a card number to open the card page with its Status, Valid from, Valid to and Members. The buttons:
- Print card — the card to hand to the patient.
- Add member — another family member on a family card. Same card number and validity; no extra fee.
- Renew — sets a new validity and makes a new fee bill for the first member. Press Renew card.
- Cancel card — needs a Reason. All members lose the discount.
The icon on a member's row removes that person from the card. Fee bills at the bottom lists all the card's fee bills.
Card discount on a bill
The card discount applies by itself — nothing to type.
- At the billing counter pick a card member as the patient.
- A green box under the patient says "Card MEM-… applied:" and the discount on each kind of service.
- Each line shows "card −৳…" and the right side shows incl. card discount.
- Don't want the card on this bill? Untick the green box — it then says "Card … not applied".
The card discount only works on Patient (private) bills, not on bills to a company. Expired or cancelled cards give no discount.
Corporate and insurance clients
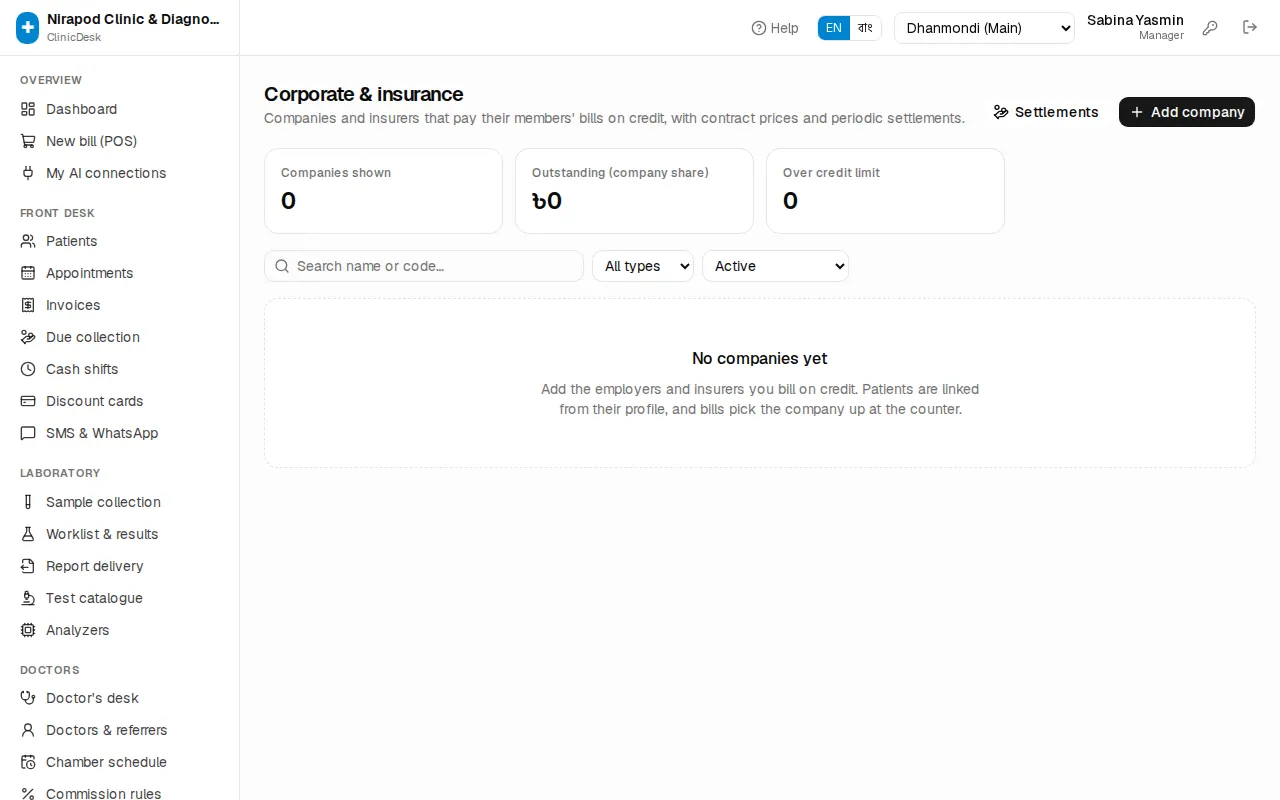
Add the employers and insurers that pay their members' bills on credit.
- Open Finance › Corporate & insurance in the sidebar.
- Press Add company.
- Fill in:
- Name \*, Type (Corporate (employer) or Insurance), Short code.
- Contact person, Phone, Email, Address.
- Discount % — on catalogue prices where no contract price is set.
- Company pays % — e.g. 80 means the patient pays the other 20% (co-pay). 100 if the company pays everything.
- Credit limit (৳) — how much may stay unsettled; empty means no limit. A manager may exceed it.
- Needs authorisation / claim no. on every bill — usually ticked for insurers.
- Save.
The list shows each company's Terms, Members, Open bills, Outstanding and Credit limit use. At the top: the total Outstanding (company share) and how many are Over credit limit.
Linking a patient to a company: on the patient profile press Edit, choose the company under Bills to (corporate / insurance) and enter the Employee ID / policy no. The Members tab on the company page lists linked patients.
Contract prices
When a company has agreed special prices for some tests:
- On the company page press Contract prices (n).
- Type the price in Contract price (৳) on the service's row and press the save icon next to it. Difference shows the gap to the catalogue price.
- To enter many at once press Import CSV: one service per line,
CODE,price(price in Taka). A blank price or-removes the contract price.
A contract price replaces the catalogue price, with no further discount. Zero-priced services such as consultation or bed keep their own fee (priced at billing).
Billing to a company
- At the billing counter pick the patient. If they are linked to a company, the Payer box already shows "… (patient's company)". You can also choose another company or Patient (private).
- A blue box shows Company pays …% and any contract discount.
- If the company needs an authorisation number, type it in Authorisation / claim no. \*. The bill will not save without it.
- Add the services. Under Total you see Company pays (…) and Patient pays.
- Take payment only for the patient's share — more than that gives Payment is more than the patient's share.
- Save. The saved screen shows "Company pays … · patient …".
The company's share is not part of the patient's due; it stays as the company's Outstanding until a settlement comes in.
Settlements: money from a company
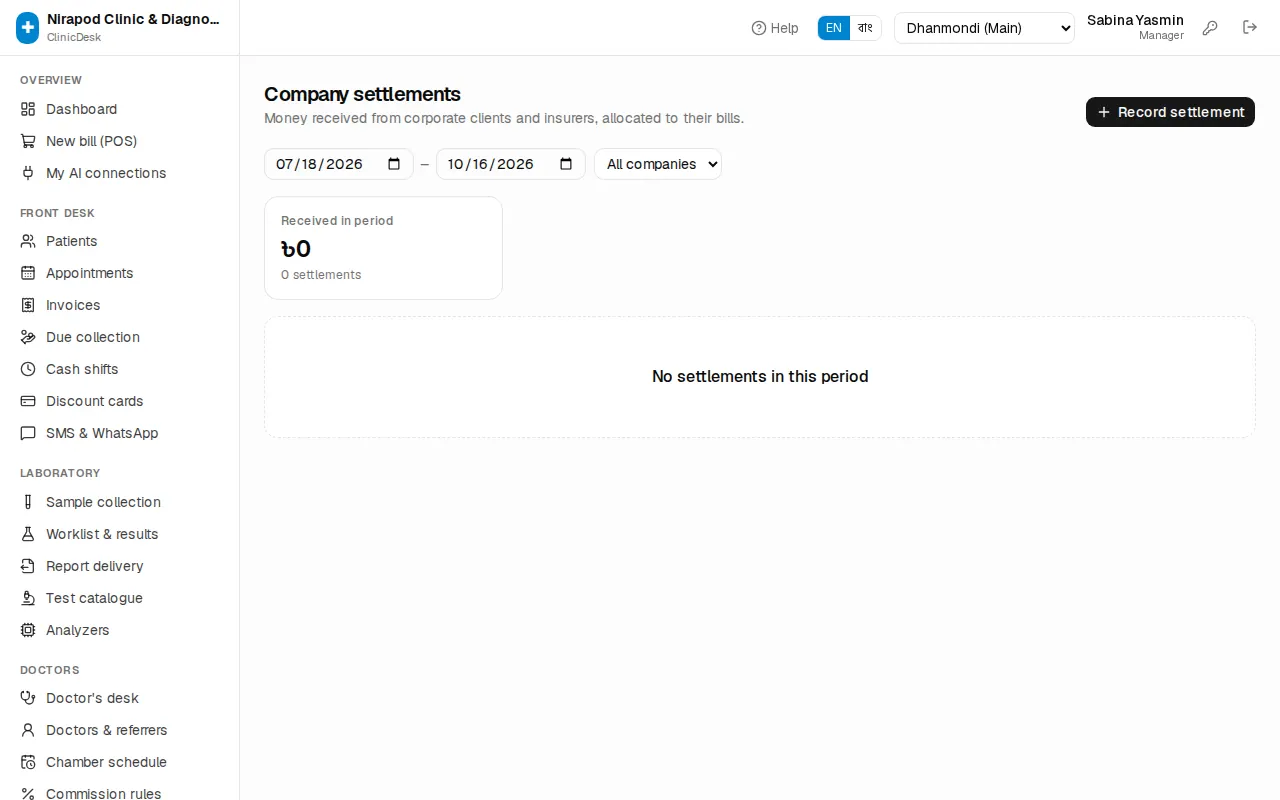
When the company pays by cheque or bank transfer:
- On the company page press Record settlement (or Corporate & insurance › Settlements › Record settlement and pick the company).
- Enter the Date received, Amount (৳) \*, Method, Cheque / transfer ref. and a Note.
- The company's open bills are listed below. Choose how to allocate:
- Oldest first — the money fills the oldest bills automatically.
- Bill by bill — type the amount in Settle now for each bill (full fills the whole outstanding).
- Check Allocated and Unallocated at the bottom. Unallocated money stays on account — you are asked to confirm.
- Press Save settlement ৳…. The number is CST-….
From the settlement page you can print a Receipt. If money is unallocated, Allocate remaining puts it on the oldest open bills. If something was wrong (e.g. a bounced cheque), press Reverse, give a Reason \* and press Reverse settlement — the bills become outstanding again, and it is recorded in the audit log.
Company statement
On the company page press Statement. Choose a date range — it shows the bills from all branches, the company share, money received in the period and what is outstanding. Print statement prints a copy to send to the company, or use the export buttons to download a file.
The Open bills tab on the company page shows how many Days old each unsettled bill is. For an ageing report see Reports.
Chapter 7 · Front desk & billing
SMS & WhatsApp
Which messages go to patients automatically, the SMS gateway, the message log, retrying, writing your own message, bulk due reminders and WhatsApp links.
ClinicDesk sends patients the news they need by SMS or WhatsApp — report ready, serial booked, money due. Every message is kept in a log, so you can always see what went to whom and when.
In the sidebar: Front desk › SMS & WhatsApp. Receptionists and managers can see the log and send messages; the owner sets up the gateway.
What is sent automatically
| Event | When it goes |
|---|---|
| Report ready | When every test on a bill is verified — with the online report link and PIN |
| Appointment booked | When a serial is booked — doctor, date, serial and expected time |
| Appointment reminder | The evening before the appointment |
| Appointment cancelled | When a serial is cancelled |
| Due reminder | Only when you send it (to one patient or many at once) |
Nothing is sent to a patient without a mobile number. Which events send a message, and in which language (English or Bangla), is set by the owner in the Automatic messages part of Admin › Integrations: Report ready, Appointments, Due reminders and Message language.
The SMS gateway
The gateway is your account with an SMS company (for example SSL Wireless or BulkSMSBD). The owner fills in Provider, Sender ID / SID and API key / token in the SMS gateway part of Admin › Integrations and presses Save messaging settings. Then Send a test to your own number to check it. Details: Payments, licence & AI.
Without a gateway nothing stops: messages are still written to the log (Not sent (no gateway)), and you can send them by hand through the WhatsApp link. The messages page then shows a yellow note: No SMS gateway is set up, so messages are logged but not sent.
The message log
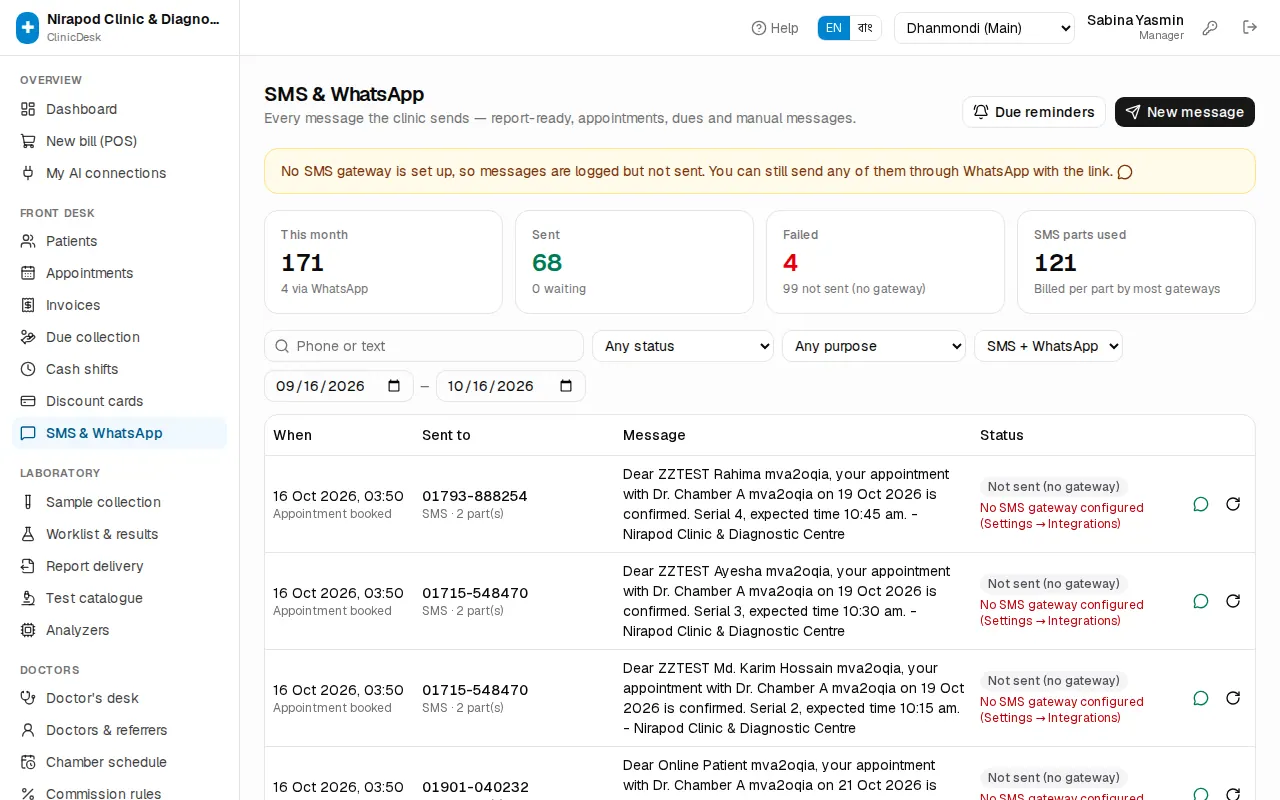
The top shows this month: This month (total), Sent, Failed and SMS parts used (billed per part by most gateways).
To search and filter:
- Phone or text — a number or any word in the message.
- Any status — Queued, Sending, Sent, Failed, Not sent (no gateway), Draft (not sent), Discarded.
- Any purpose — Report ready, Appointment booked, Due reminder, Manual and so on.
- SMS or WhatsApp, and the date range (the last 30 days by default).
Each row shows When, Sent to (number of parts, and a bill or patient link), the full Message and the Status. Failed messages show the reason in red.
Retrying a failed message
When the gateway has a problem, the system retries failed messages by itself after a while. To retry straight away:
- Choose Failed in the status filter.
- Press the Retry now icon at the right of the row. You see "Sent" when it works.
Messages written with an AI assistant arrive as Draft (not sent) — they never go out until a person sends them. Use the icons next to them: Send this draft now or Discard this draft.
Sending your own message
- Press New message.
- Choose Patient (search and pick) or Any number. A wrong number shows Not a valid Bangladeshi mobile number.
- Write the Message — in English or Bangla. Below it you see the number of characters and SMS parts.
- Choose SMS or WhatsApp (API) (when the WhatsApp API is set up).
- Press Send. Or press Open in WhatsApp to open WhatsApp on this computer or phone with the text filled in — no API needed.
Due reminders in bulk
- Press Due reminders.
- Enter the Minimum due (৳) and Bill older than (days).
- The dialog shows how many patients and how much due, how many have no mobile number, and how many were already reminded today.
- Press Send … reminder(s).
Each patient gets one SMS with their total due on this branch's open bills. Patients reminded in the last 24 hours are skipped. To remind one patient, use the Remind button on the Due collection page (OPD billing & payments).
WhatsApp links
The green WhatsApp icon on every log row (Open in WhatsApp with this text) opens a chat to the patient's number with the same text filled in. When there is no gateway, or an SMS failed, send it this way by hand — no setup needed.
Chapter 8 · Doctors, lab & IPD
Doctors & prescriptions
Calling today's patients from the Doctor's desk, vitals, writing and printing prescriptions, sending them to the pharmacy; adding doctors and referrers, the chamber schedule and doctor leave.
This chapter has two parts. The first is for doctors: calling, seeing and prescribing from the Doctor's desk in the chamber. The second is for reception and managers: the list of doctors and referrers, their fees, chamber days and hours, and leave.
The Doctor's desk
Open Doctors › Doctor's desk in the sidebar. A doctor's login lands here straight after sign-in, and the title reads My patients today. When a nurse or manager opens the page, they first pick the doctor in Choose consultant at the top.
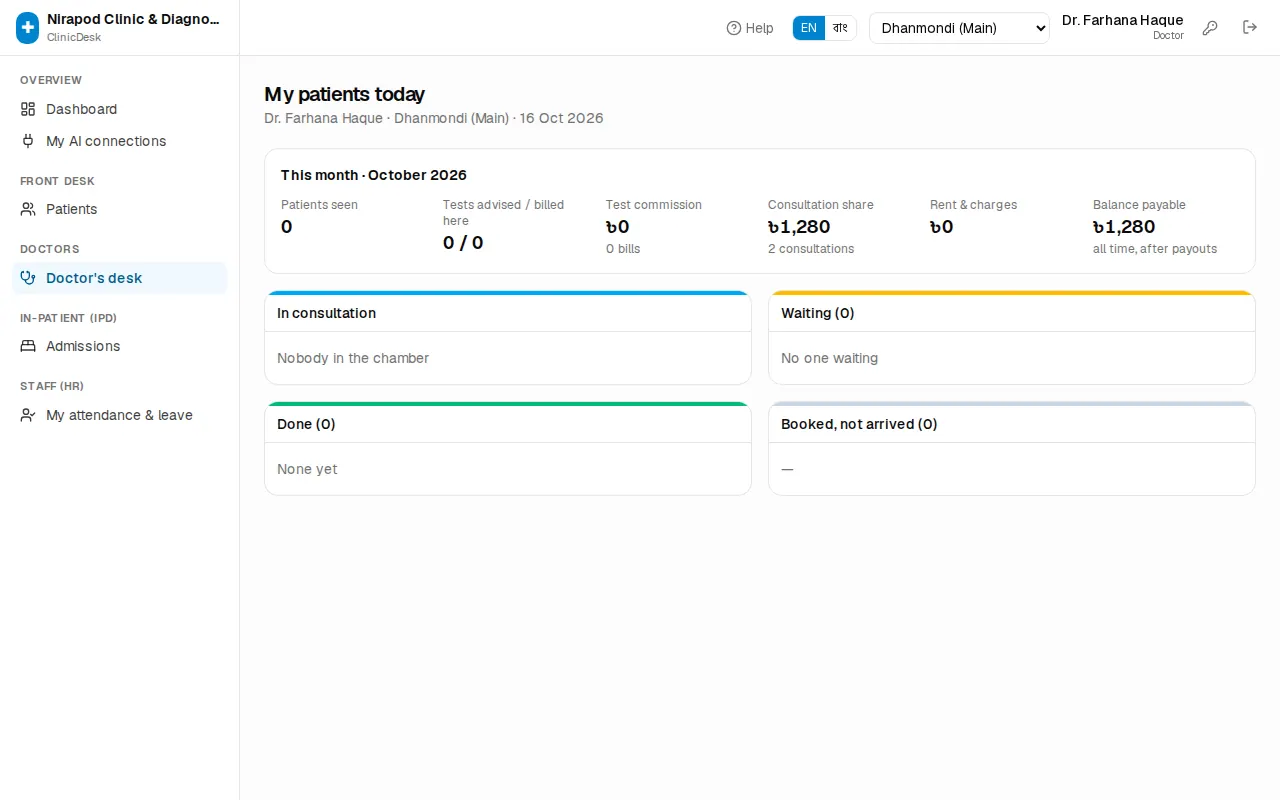
The page has four columns. It refreshes itself every 20 seconds, so a patient checked in at reception shows up here within moments.
| Column | What it holds |
|---|---|
| In consultation | The patient in the chamber now. Open opens their prescription page. |
| Waiting (n) | Checked in at reception and waiting, in serial order. |
| Done (n) | Seen today. The Rx button reprints the prescription. |
| Booked, not arrived (n) | Has an appointment but has not checked in yet. |
Each row shows the serial number, the patient's name, ID (MRN), age and sex, new or follow-up, and the expected time.
This month at a glance
When doctors sign in themselves, a small This month panel shows at the top: Patients seen, Tests advised / billed here, Test commission, Consultation share, Rent & charges and Balance payable. It is read-only; payments to doctors are made by accounts (see Accounting & commission).
Calling the next patient
- When someone is waiting, a blue Call next (#serial) button appears at the top. Press it.
- The next patient by serial moves to In consultation and their prescription page opens at once.
- To call someone out of turn, press Call on their row in Waiting.
Writing a prescription
The top of the patient's page shows name, serial, age, sex, blood group and phone. If the patient has allergies recorded, a red Allergies: box appears — always read it before prescribing. If the patient is currently admitted, a purple admission-number link shows too.
Two lists on the right help you decide:
- Recent lab results — the patient's verified reports. Values outside the normal range show in red (high ↑) or blue (low ↓). Click a test name to open the full report.
- Past visits — earlier prescriptions, blood pressure, weight and diagnosis. Notes written while admitted show as Ward note.
Step by step:
- Under Vitals, enter BP (systolic/diastolic), Pulse, Temp, SpO₂, Weight and Height. BMI is worked out from weight and height.
- Fill Chief complaints, History, On examination and Diagnosis.
- In Investigations advised, type a test name (for example CBC, RBS, X-ray) and pick it from the list. Each test is added as a blue chip; press the chip's × to remove a wrong one.
- Write advice in Advice, such as plenty of water or rest.
- For a return visit, pick a Follow-up date, or press 7 days, 14 days or 1 month. Clear removes the date.
- Under ℞ Medicines, type the medicine in the first row (for example Tab. Napa 500 mg). Medicines you have prescribed before are suggested as you type.
- In the next boxes enter the dose (such as
1+0+1), duration (such as 7 days) and instruction (such as after meal). Under the row you are working on, small buttons offer the common doses, durations and instructions — one press fills the box. - Press Add medicine for more lines. The bin icon removes a line.
- Press Save to keep your work part-way. When you have finished with the patient, press Save & finish — "Consultation finished" shows, you return to the desk, and the patient moves to Done.
Whenever something has changed, the bottom bar shows Unsaved changes in orange. Do not leave the page without saving.
Printing the prescription
- After the first save, the bottom bar shows Print Rx. It opens the printable prescription in a new tab.
- The prescription carries the clinic name, the doctor's name, degrees and BMDC number, the patient's details, vitals, investigations, diagnosis, medicines, advice and follow-up date.
- Choose the printer in the browser's print window and print.
To reprint later, press Rx in the Done column of the desk.
Billing the advised tests
When the doctor advises tests, the bottom bar shows Bill advised tests (n). It opens a new bill (POS) with the patient, the tests and the referring doctor already filled in, so the referral commission goes to the right doctor. The rest — discount, taking the money — works as in Billing & payments.
Sending to the pharmacy
If your clinic is linked to a PharmaDesk pharmacy (set-up: Pharmacy link), a Send to pharmacy button appears in the bottom bar once the prescription is saved.
- Save the prescription.
- Press Send to pharmacy. The medicine list goes to the pharmacy counter, ready to sell.
- When it has been sent, the button reads Sent to pharmacy ✓. Pressing it again asks "Already sent. Send again?"
Without a pharmacy link the button does not appear.
Doctors & referrers
Open Doctors › Doctors & referrers. Two kinds of people live here:
- Consultants — doctors who sit at this clinic, take appointments and earn consultation fees.
- Referrers — people who send patients and earn commission on tests: outside doctors, village doctors (RMP), agents, hospitals / clinics, ambulance drivers, and the clinic's own marketing officers.
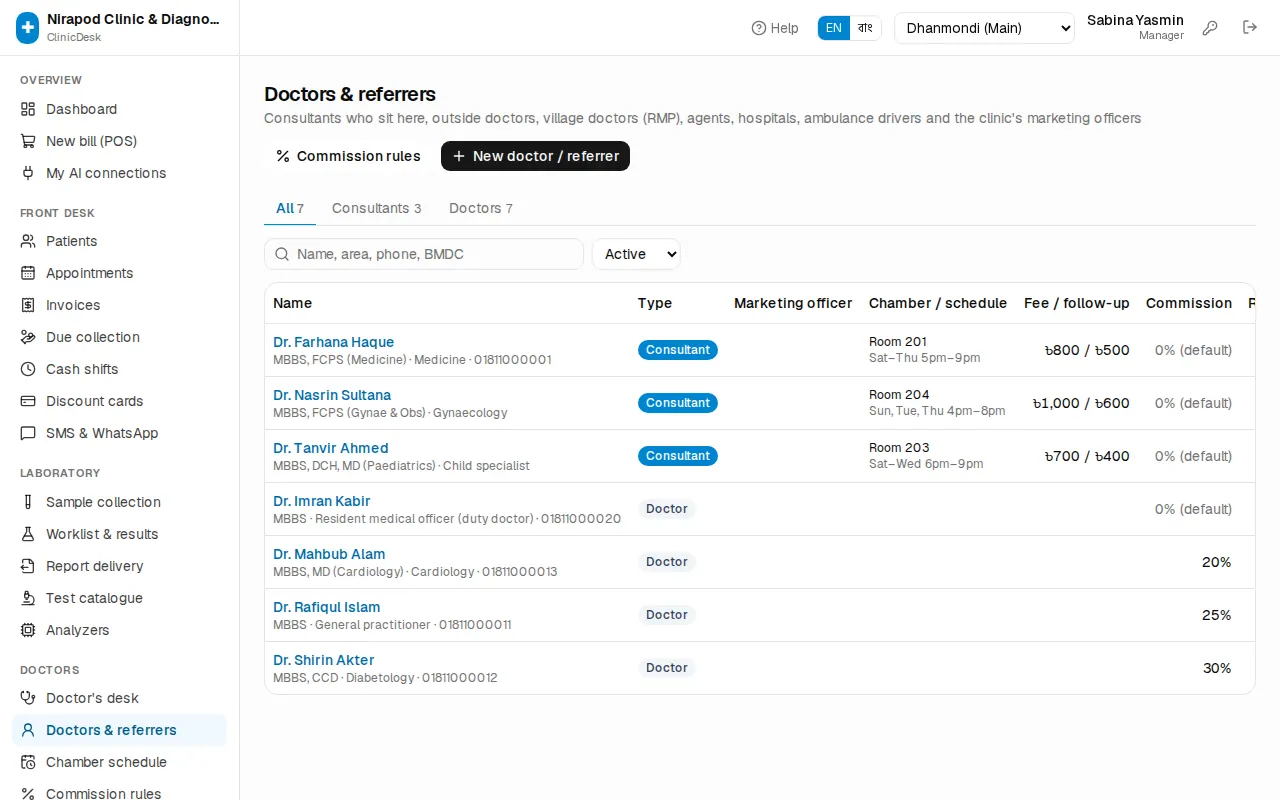
The tabs at the top (All, Consultants, Village doctors, Agents …) filter by type. Search by name, area, phone or BMDC number. Switch the Active box to Inactive to see people who have been switched off.
The table shows each person's Type, Marketing officer, Chamber / schedule, Fee / follow-up, Commission and Referred this month (bills, amount and commission). Click a name for the full page: earnings this month, referrals, chamber sittings, commission rules and upcoming appointments.
Adding a doctor or referrer
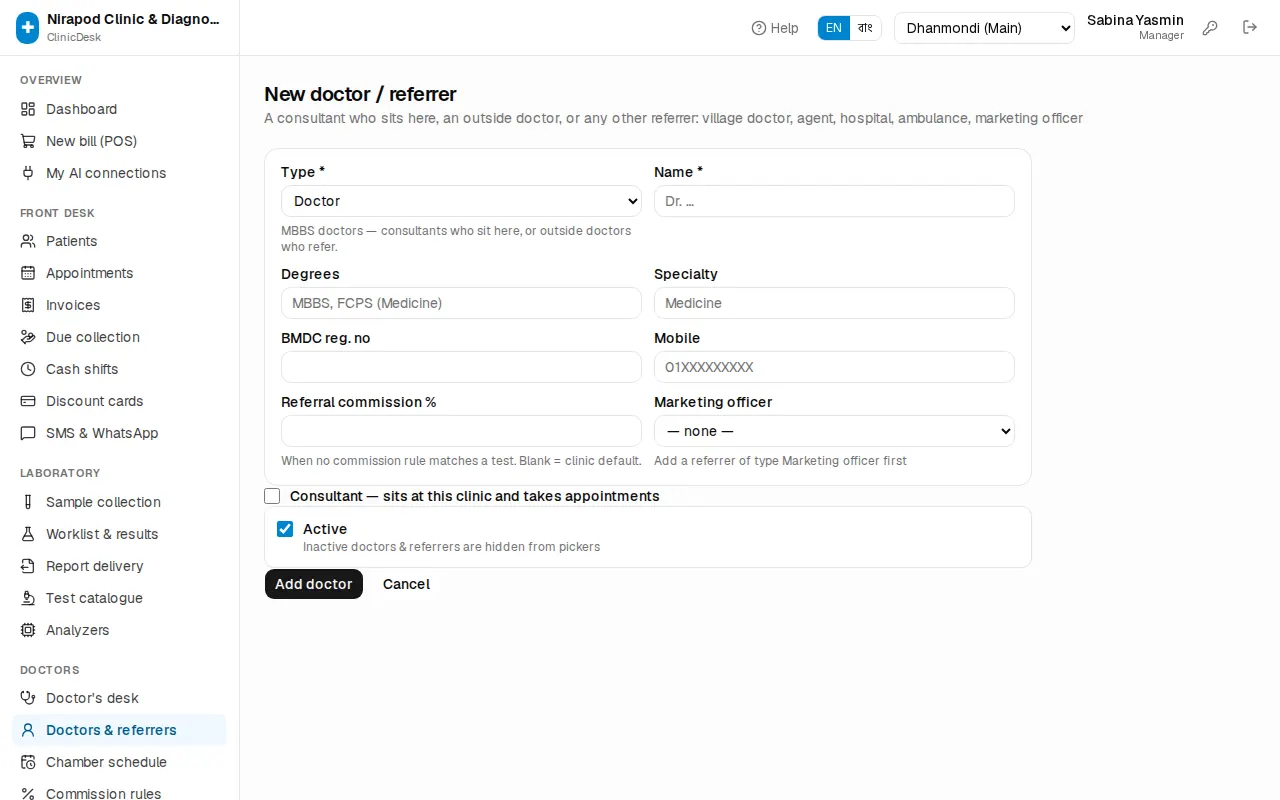
- Press New doctor / referrer.
- Choose the Type \*: Doctor for MBBS doctors; village doctor, agent and so on for others.
- Enter the Name \*. For a doctor add Degrees, Specialty and BMDC reg. no; for other referrers the area or organisation.
- Enter the Mobile number.
- Referral commission % — used when no commission rule matches a test. Leave it blank for the clinic default.
- To place a referrer under a marketing officer, pick the Marketing officer.
- If the doctor sits at this clinic, tick Consultant — sits at this clinic and takes appointments. More boxes open:
- Consultation fee (৳) and Follow-up fee (৳) (the follow-up fee is also used for report show).
- Doctor's share of fee % — the rest stays with the clinic.
- Chamber rent / month (৳) — deducted every month from what the clinic owes the doctor.
- Chamber / room and Schedule note (free text only; the bookable days and hours come from the chamber schedule).
- Doctor collects his/her own fee — check-in then records the visit without a clinic bill.
- Press Add doctor (or Add referrer).
To change something later, press Edit in the list and then Save changes. When someone stops working with you, do not delete them — untick Active. Inactive doctors and referrers disappear from the pickers, while old bills and accounts stay correct.
Chamber schedule
Open Doctors › Chamber schedule. Here you record which days, from what time to what time and in which room each consultant sits. Appointments can only be booked into these sittings; a doctor without sittings cannot be booked.
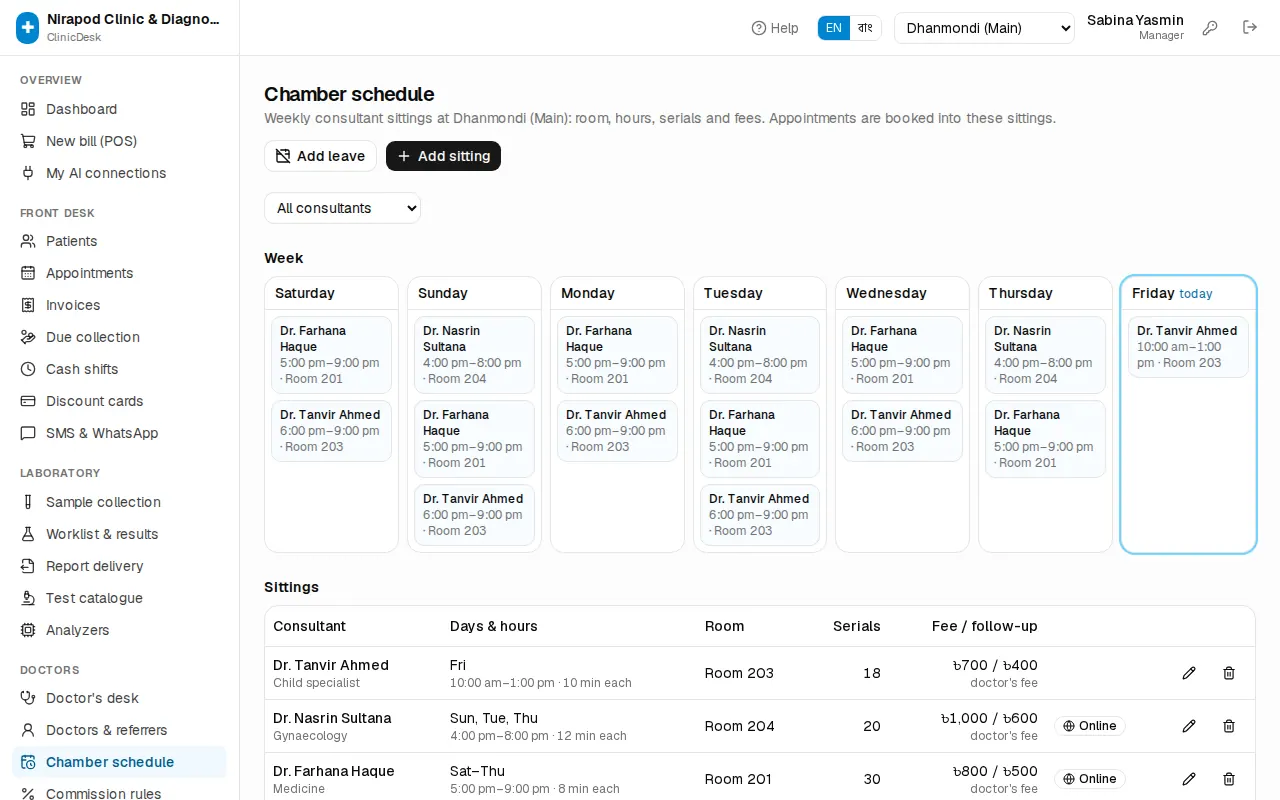
The Week section shows a card for each day, today ringed in blue. The Sittings table below has the details of each sitting.
Adding a sitting
- Press Add sitting.
- Choose the Consultant \*.
- Days \* — tick the days the doctor sits (for example Saturday to Thursday).
- Set Starts \ and Ends \.
- Enter the Room (for example Room 201).
- Minutes per patient — used for the expected time on the token.
- Max patients — leave blank to use hours ÷ minutes per patient.
- If this sitting has its own fee, fill Fee for this sitting (৳) and Follow-up fee (৳). Blank means the doctor's own fee.
- With Online booking ticked, patients can take a serial for this sitting from the clinic's public booking page (see Patient portal).
- Save. "Sitting added" confirms it.
The pencil icon in the table edits a sitting and the bin icon deletes it. To pause one, untick Active — inactive sittings cannot be booked.
Doctor leave
Record leave in advance so nobody is booked on days the doctor is away.
- On Chamber schedule, press Add leave.
- Fill Doctor \, From \ and To \*. Optionally add a Reason (for example a conference).
- Press Save leave.
- If patients are already booked on those days, a warning appears: Patients are booked on those days, with how many are booked and how many have already checked in and paid.
- Notify & cancel (followed by the number of patients) sends an SMS to everyone with a mobile number and cancels all those appointments.
- Only record leave keeps the appointments; you phone the patients yourself.
The Leave (today onwards) list shows all upcoming leave. The bin icon removes leave — but appointments that were cancelled are not restored. On a leave day the week card shows On leave today.
Who can do what
| Task | Who |
|---|---|
| See the Doctor's desk, record vitals | Doctor, nurse, manager, owner |
| Write prescriptions and finish the consultation | Doctor only (own patients) |
| Add and edit doctors / referrers | Receptionist, manager, owner |
| Chamber sittings and leave | Receptionist, manager, owner |
Booking appointments and checking patients in is covered in Reception & appointments.
Chapter 9 · Doctors, lab & IPD
Laboratory
Sample collection and barcode labels, receiving at the lab, the worklist, result entry, pathologist verification, printing and delivering reports, the test catalogue and analyzer connections.
From the moment a lab test is billed until the report is in the patient's hand, it passes five steps. ClinicDesk has a page for each step, under Laboratory in the sidebar:
| Step | Page | Usually done by |
|---|---|---|
| 1. Take the blood / urine | Sample collection | Reception, nurse, lab technologist |
| 2. Accept the sample at the lab | Sample collection › Receive at lab | Lab technologist |
| 3. Run it and enter the results | Worklist & results | Lab technologist |
| 4. Review and approve | Verification | Pathologist |
| 5. Hand the report over | Report delivery | Reception, lab technologist |
Each test shows its stage as a coloured badge: Awaiting sample → Sample collected → Processing → Awaiting verification → Ready → Delivered.
A lab technologist lands on Worklist & results after signing in; a pathologist lands on Verification.
Collecting samples and labels
When a bill contains lab tests, ClinicDesk creates the samples by itself — one accession number per tube (for example S-000123). Tests that go in the same tube share one sample. Right after billing, the Bill saved window has a Sample labels button to print the labels.
Open Laboratory › Sample collection. The To collect tab shows a card for every patient whose sample has not been taken — STAT and urgent first, then by billing time.
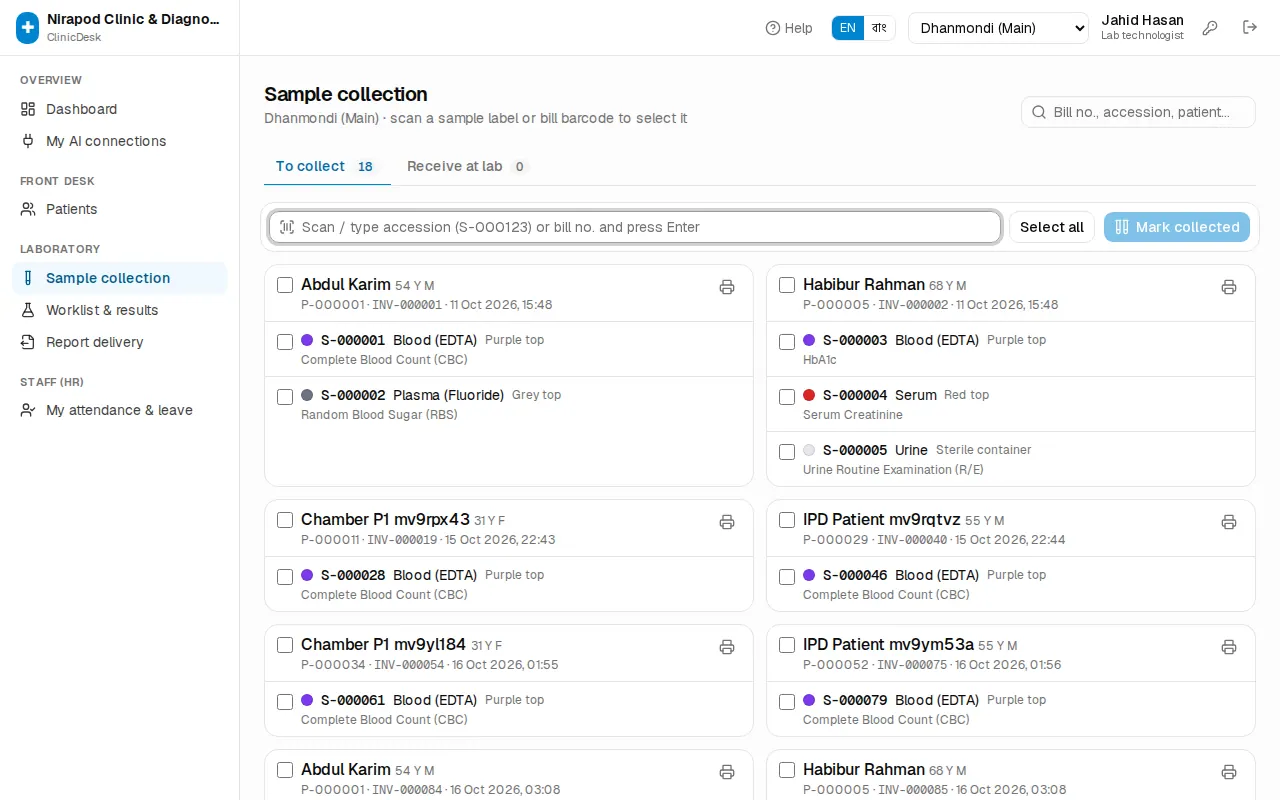
Each card shows the patient's name, age and sex, ID, bill number, and every sample below: a dot in the tube colour, the accession number, the sample type (for example Blood), the tube name and the tests on it.
- Call the patient. Press the printer icon (Print labels) at the card's top right. The label page opens and starts printing by itself (label printer paper: 50 × 25 mm).
- Stick each label on its own tube — match the tube colour.
- Take the blood or other sample.
- Scan the label's barcode in the box at the top (or type the accession number and press Enter). The sample is selected and turns blue. Scanning the bill's barcode selects all samples of that bill at once.
- Without a scanner, tick the checkboxes instead; Select all selects the whole list.
- Press Mark collected. The samples leave this list and move to the Receive at lab tab.
Receiving samples at the lab
When collection and the lab are in different places (for example, samples arrive from a collection point), accepting them at the lab matters.
- On Sample collection, open the Receive at lab tab.
- Scan the tubes as they arrive.
- Press the Receive at lab button. A message like "2 sample(s) received — now on the worklist" confirms it; the tests are now on Worklist & results.
Rejecting a sample
If a sample is unusable (haemolysed, clotted, insufficient quantity, wrong container …), do not receive it:
- In the Receive at lab tab, press the red Reject on that sample's row.
- Pick a reason or type one in Reason.
- Press Reject & recollect.
A new sample with a new accession number is created and its tests go back to the To collect queue. Call the patient back, take a fresh sample and use the new label.
The worklist
Laboratory › Worklist & results is the lab's to-do list for the day: STAT and urgent tests first, then whichever is due soonest.
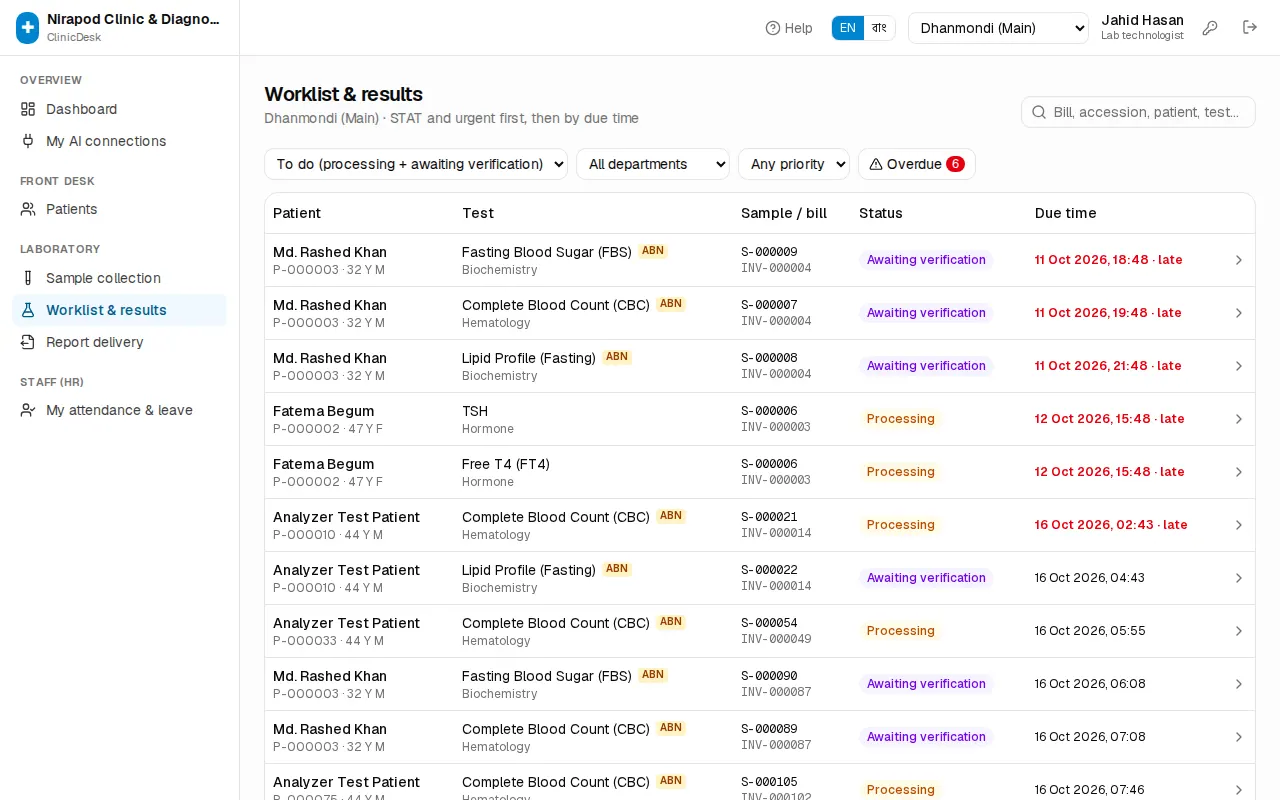
Filters at the top:
- Status — starts at To do (processing + awaiting verification). Other choices: Processing, Collected, not received, Awaiting verification, Rejected — awaiting recollection, Verified (today).
- All departments — show only haematology, biochemistry and so on.
- Any priority — only STAT, urgent or routine.
- Overdue — the red button; tests past their due time, with a count.
The table shows the patient, the test (with a CRITICAL or ABN mark), the sample and bill numbers, the status and the Due time. Late tests show the time in red with "late". Click any row to open result entry.
Entering results
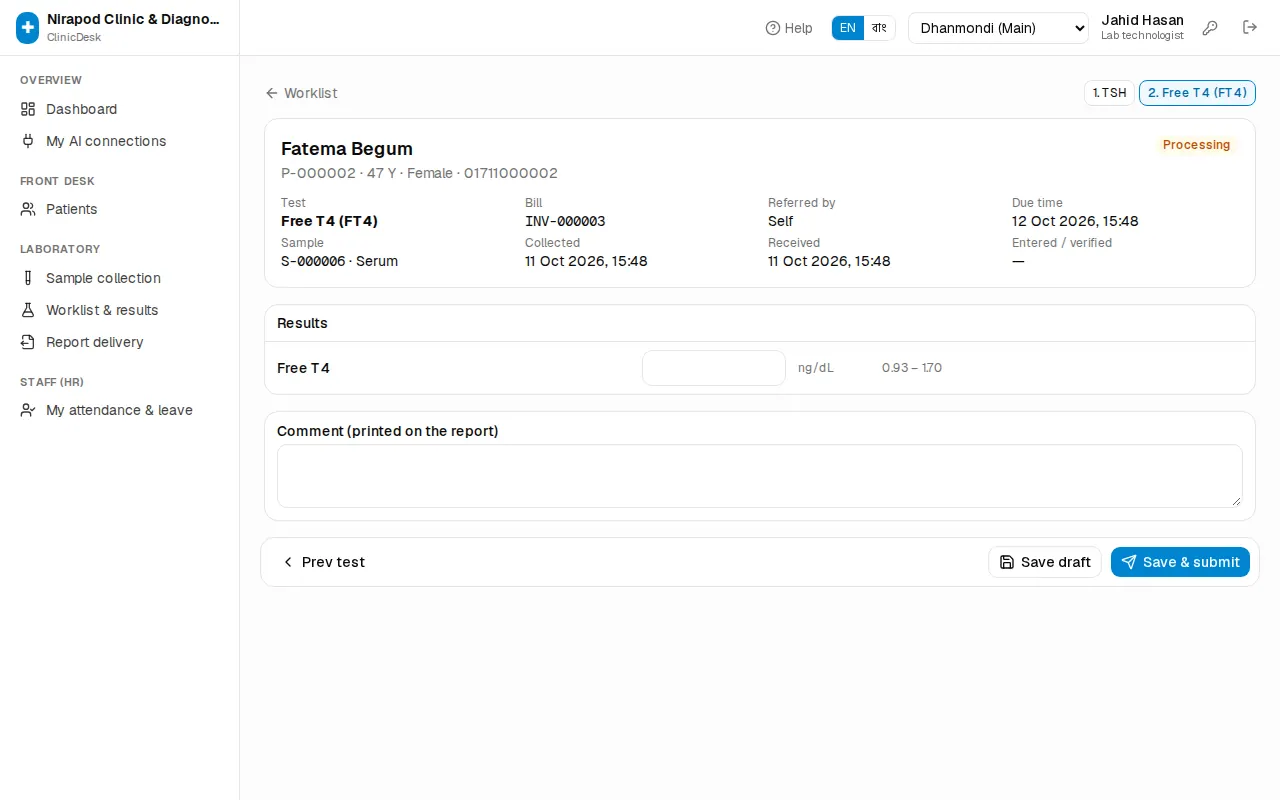
The top of the page shows the patient, test, bill, referring doctor, due time, the sample, and when it was collected and received. When the bill has several tests, small buttons at the top list them all; finished ones have a ✓.
- Under Results, type the value next to each parameter. Enter moves to the next box.
- For parameters with set answers (such as Positive/Negative), pick from the drop-down.
- Calculated values (from a formula) are grey and fill themselves — "Calculated: …" shows under the name.
- Each value shows its unit and the reference range for the patient's age and sex. As soon as a value is out of range a flag appears: Low, High, Abnormal (yellow) or Critical low, Critical high (red). The header counts the critical and abnormal values.
- If the patient has an earlier result, the previous value shows alongside ("prev …"), so big changes stand out.
- Add an Impression and a Comment (printed on the report) if needed. Narrative tests (for example an ultrasound) have the Report box pre-filled with the template; just edit it.
- The buttons at the bottom:
- Save draft — keep part-done work; the report does not go for verification yet.
- Save & submit — the report goes to the pathologist as Awaiting verification.
- Save & verify — pathologists only; enter and approve in one go.
- Prev test / Next test — move to the next item on the list.
When verification is not required (see Settings below), Save & finalise replaces Save & submit and the report becomes Ready straight away.
Pathologist verification
On Laboratory › Verification the pathologist reviews submitted reports and approves them. Only verified reports can be printed and delivered.
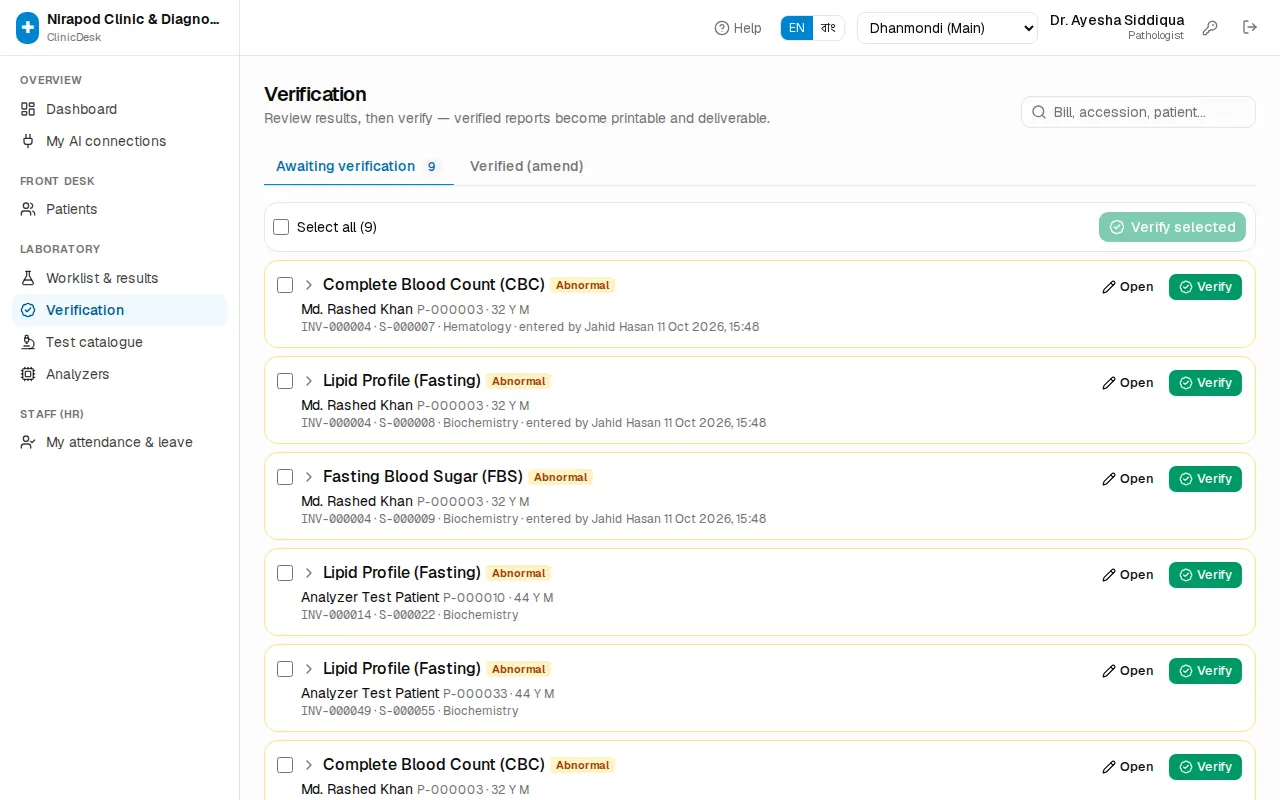
In the Awaiting verification tab each test card shows all values with their flags, the impression and comment, and who entered them when — no need to open another page.
- Read each card. Pay special attention to CRITICAL or Abnormal marks.
- If it is right, press the card's Verify button. To approve several at once, tick them and press Verify selected.
- To correct a value, press Open to go to result entry, fix it, then press Save & verify.
When every test on a bill is verified and the patient has a mobile number (and the "report ready" SMS is switched on), the patient gets an SMS automatically with the online portal link and PIN (see SMS & WhatsApp).
Amending a verified report
After verification the values are locked. If a mistake is found:
- On Verification, open the Verified (amend) tab and search by bill number or patient (or go to the result entry page).
- Press Amend and give a reason.
- The report opens again — correct the values and verify again.
The old values stay in the audit log and the report shows how many times it was amended. Only pathologists can amend.
Printing and delivering reports
Laboratory › Report delivery starts with reports verified today and not yet delivered. If older ready reports are still waiting, a link appears at the top: "… older ready report(s) not delivered — show all".
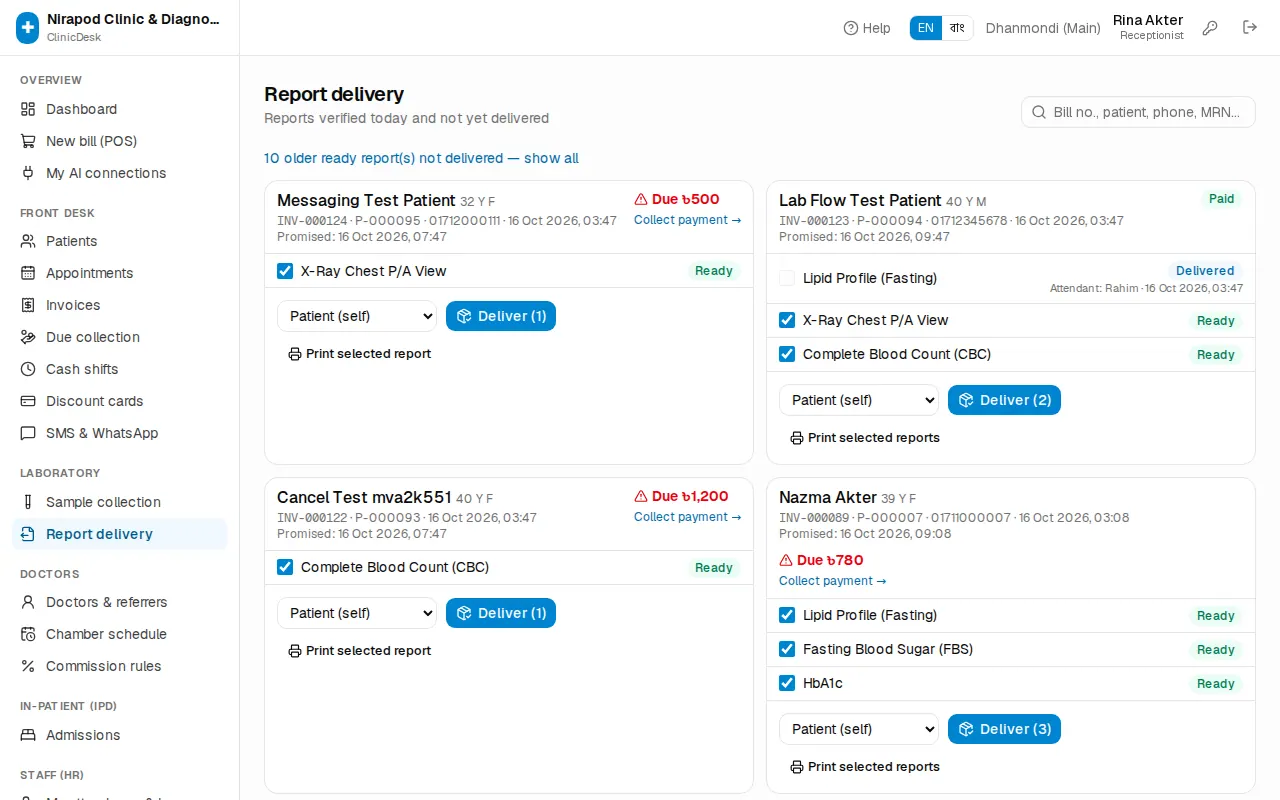
When the patient comes with the receipt:
- Type the bill number, patient name, phone or MRN in the search box.
- Check each test's status on the bill's card. Ready ones can be selected.
- If the bill has a due, it shows in red with a Collect payment → link. Take the money first (Billing & payments).
- Press Print ready reports (or Print selected reports after selecting). On the report page press Print report.
- Choose who is taking it: Patient (self), Attendant… (type the name) or Online / WhatsApp.
- Press Deliver. The tests become Delivered and leave the list.
Reports online (PIN)
Every bill has a 6-digit Report PIN, printed on the money receipt as "Online report PIN". With the online report portal on, patients download their verified reports at home with the bill number and PIN. How patients do this is in Patient portal.
The test catalogue
Laboratory › Test catalogue (managers, pathologists and the owner) lists every test by department with its code, sample and tube, number of parameters, turnaround (hours) and price.
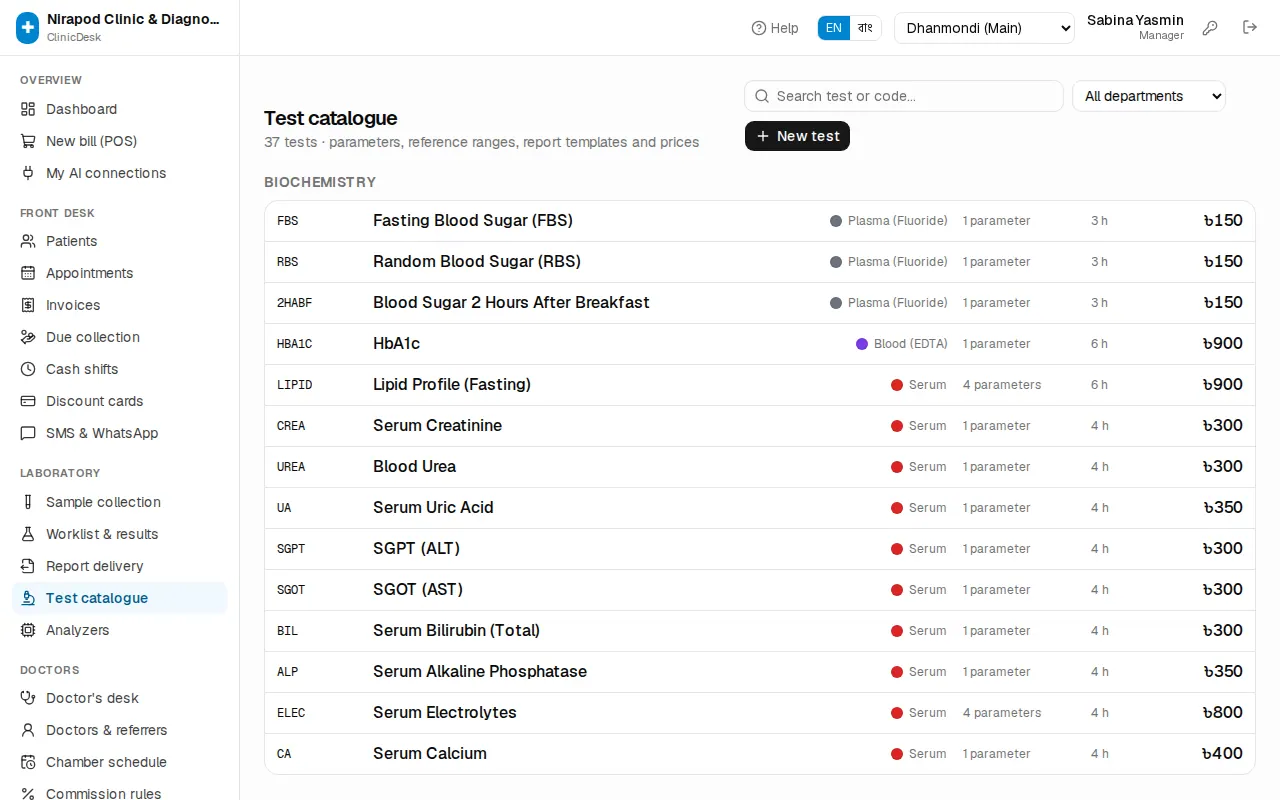
A new test
- Press New test.
- Enter the Test name \, Code \ and Department \*.
- Kind — Lab test or Imaging / ECG (no specimen).
- Report type — Parameters (values & ranges) for numbers with ranges, Text report (narrative) for written reports.
- Fill Sample type, Container / tube (for example Purple top — the colour identifies the tube), Turnaround (hours) and Price (৳) \*.
- Press Create test. Then add parameters on the test's page.
Parameters and reference ranges
Click a test to open its page: Test & price at the top (change and press Save test), Parameters below.
- Press Add parameter. Enter the Name \*, a Code (used in formulas, for example HB), the Unit and a Group heading (for example Differential count).
- Result type: Number, Choice (options) or Free text. For a choice, list the Options (one per line) and set the Normal answer — any other answer is flagged abnormal.
- For numbers, set Decimals. For a value calculated from other parameters, write a Formula (calculated).
- After saving, use the Range button next to the parameter to add reference ranges: Sex, Age from, Age up to (below), low and high limits, critical low and high limits. To print something other than low–high on the report, use Printed text (optional).
- For different ranges for men, women and children, add separate ranges. Result entry picks the right one for the patient's age and sex automatically.
The up and down arrows change the order of parameters. Deleting a parameter that already has results only deactivates it — old reports stay intact.
Connecting analyzers
Connect your haematology or chemistry machine to ClinicDesk and results no longer need typing. A small program (the bridge) runs on the lab PC next to the machine; the machine sends results in ASTM or HL7, and the bridge forwards them to the clinic. If the internet drops, the bridge keeps the results and sends them later.
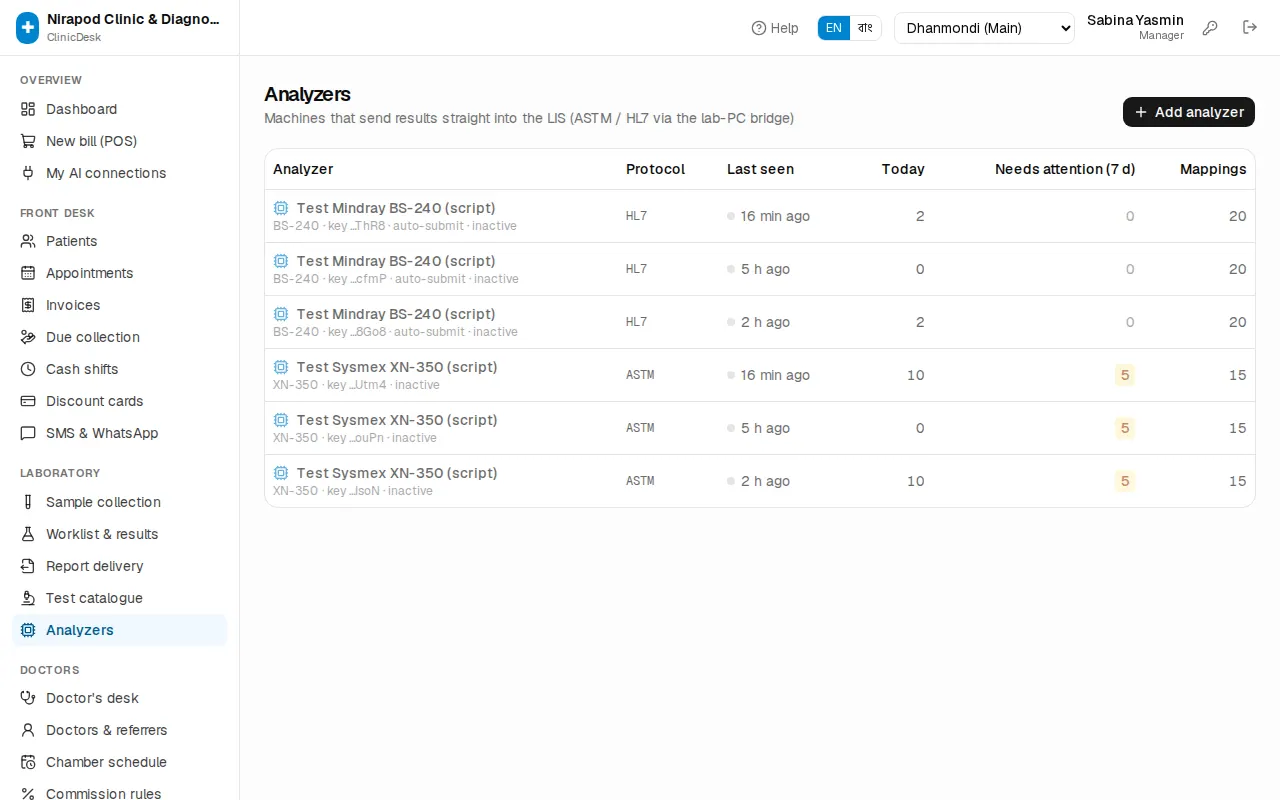
Set-up (manager or pathologist):
- Open Laboratory › Analyzers and press Add analyzer.
- Enter the Name, Model (for example XN-350 — helps auto-mapping) and Protocol. Tick Submit results automatically to send machine results straight to verification; otherwise they stay a draft for the technologist to submit.
- Press Create & show key. An API key and the command to run on the lab PC appear. Copy the key now — it is shown only once.
- Press I've copied it — set up mappings.
- On the Code mapping tab, choose which parameter each machine code (for example HGB) goes to. Auto-map matches the usual codes — then check every row. Use Factor to convert units (for example 1000 for 10³/µL → /µL).
- Get the bridge installed on the lab PC: contact JonakiSoft support and give them the key and the command shown on the page — they install it and confirm the first result arrives. In the machine's LIS/host settings, point it at this PC's port 5600. For a machine that exports result files, the second (folder) command is used instead.
- On the Test message tab, process a sample message with a test patient's accession to check everything works.
Day to day: the analyzer list shows Last seen, messages Today and Needs attention (7 d). In the Message log, map any unmapped codes of a problem message, then press Re-process. Values that came from a machine show a small blue "from …" (the machine's name) in result entry.
Lab settings
The owner sets these in Admin › Settings, section Lab reports:
- Pathologist verification required — reports cannot be printed or delivered until verified.
- Full payment before delivery — delivery is blocked while the bill has a due.
- Online report portal — patients download reports with bill no. + PIN.
- The report header and footer, and whether the letterhead is printed.
Details: Owner set-up.
Chapter 10 · Doctors, lab & IPD
In-patients (IPD)
Admitting a patient, the bed board, setting up wards and beds, bed transfer, daily charges, advance and payments, ward notes, discharge and the final bill.
Everything from admitting a patient to discharging them happens in the In-patient (IPD) part of the sidebar. The moment you admit someone, ClinicDesk opens a running bill in their name. Bed rent, medicines, tests and doctor visits all go on that bill, and at discharge it becomes the patient's final bill.
Who can do what:
| Task | Who |
|---|---|
| See the bed board and admission pages | Manager, receptionist, nurse, doctor, accountant, owner |
| Admit, add charges, transfer bed, discharge | Manager, receptionist, nurse, owner |
| Write ward notes | All of the above, and doctors |
| Set up wards and beds | Manager, owner |
| Cancel an admission | Manager, owner |
The bed board
In the sidebar open In-patient (IPD) › Admissions. The page is called In-patients and opens on the Bed board tab.
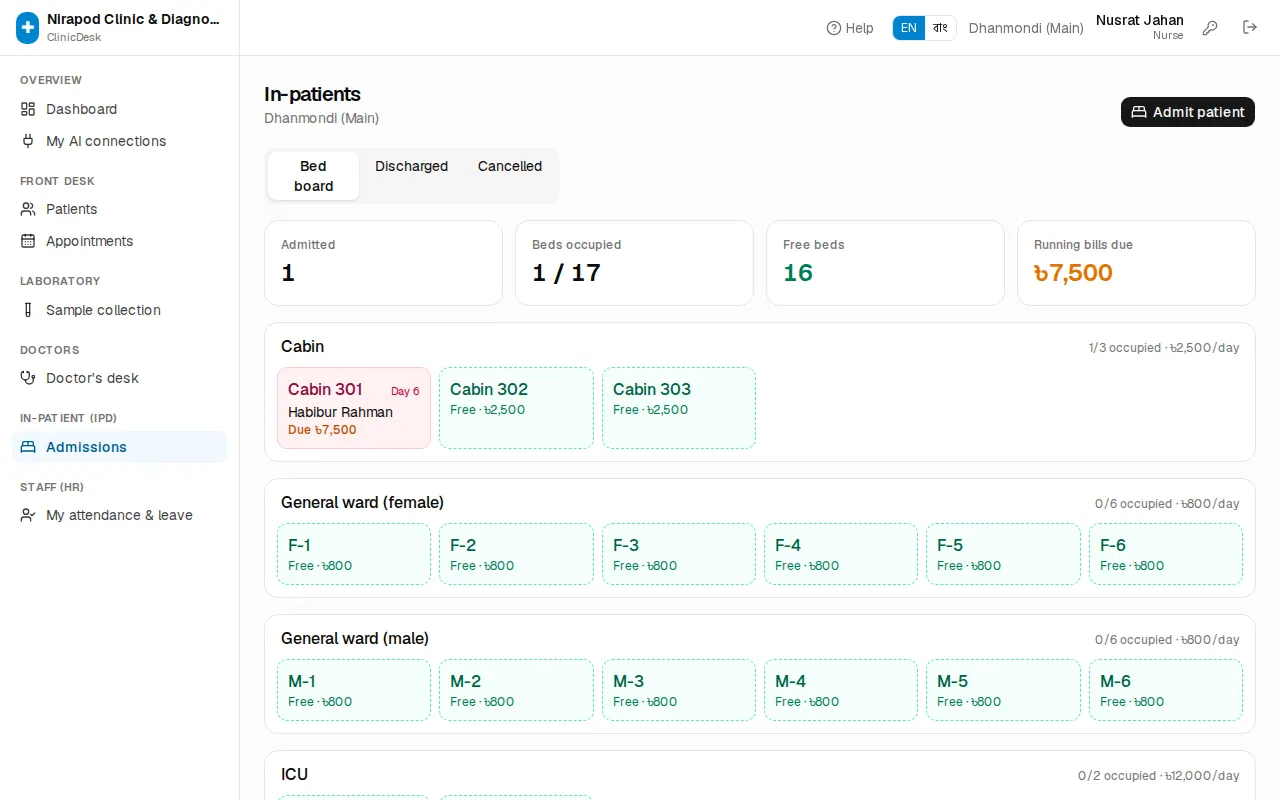
- The four boxes at the top show Admitted (how many patients are in now), Beds occupied (for example 7 / 20), Free beds and Running bills due (the total due of all admitted patients).
- Each ward has its own box, with how many beds are occupied and the daily rate.
- A green bed is free and says Free · ৳…. Click it to open the admission form with that bed already chosen.
- A red bed is occupied. It shows the bed label, the day of the stay (for example Day 3), the patient's name and Due ৳… or No due. Click it to open that admission.
- Below, Current admissions lists admission no., patient, bed, consultant, admission date, bill and due in one table.
The page refreshes itself every minute, so you can leave it open on the nurses' station screen.
To find past stays use the Discharged or Cancelled tabs. You can search by admission no., patient name, MRN or phone, and change the date range.
Setting up wards and beds
A manager or the owner does this once at the start. On the In-patients page press Wards & beds (or use Wards & beds in the sidebar).
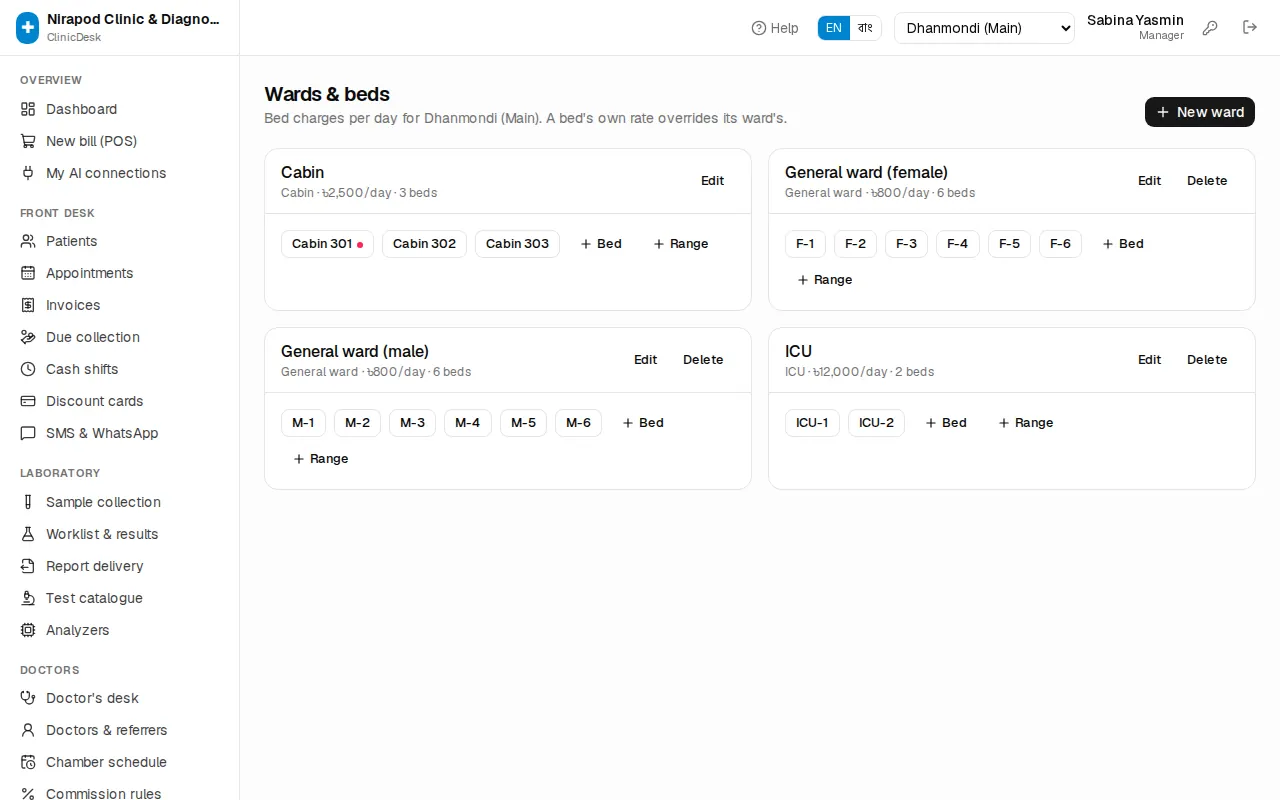
A new ward
- Press New ward.
- Type the Name, for example "Male ward" or "Cabin block 3rd floor".
- Choose the Kind: General ward, Cabin, ICU, NICU or HDU.
- Enter the Daily rate (৳). Every bed in the ward uses this rate unless it has its own.
- Save.
Adding beds
- One bed: press + Bed in the ward's box. Type the Label (for example
M-7orCabin 304). For a different price fill in Own daily rate (৳); leave it blank to use the ward rate. - Many beds at once: press + Range. Give a Label prefix (for example
M-), From and To. 1 to 10 creates ten beds, M-1 to M-10. Up to 100 at a time.
Click a bed's button to change its label, rate or Active setting. A bed with a patient in it has a small red dot.
Admitting a patient
- On the In-patients page press Admit patient, or click a green free bed on the bed board.
- In Patient type a name, phone or MRN and pick the patient. A new patient must be registered first (see Reception & appointments).
- Choose the Admitting consultant.
- Pick a free bed in Bed. Each bed shows its daily rate.
- Optionally fill in Reason for admission, Provisional diagnosis, Attendant name and Attendant mobile. The attendant's number is very useful in an emergency.
- If you take an advance, enter it in Advance received (৳), choose the Method (Cash, bKash, Nagad, Rocket, Card, Bank) and, if needed, put the bKash TrxID in Ref..
- Press Admit patient.
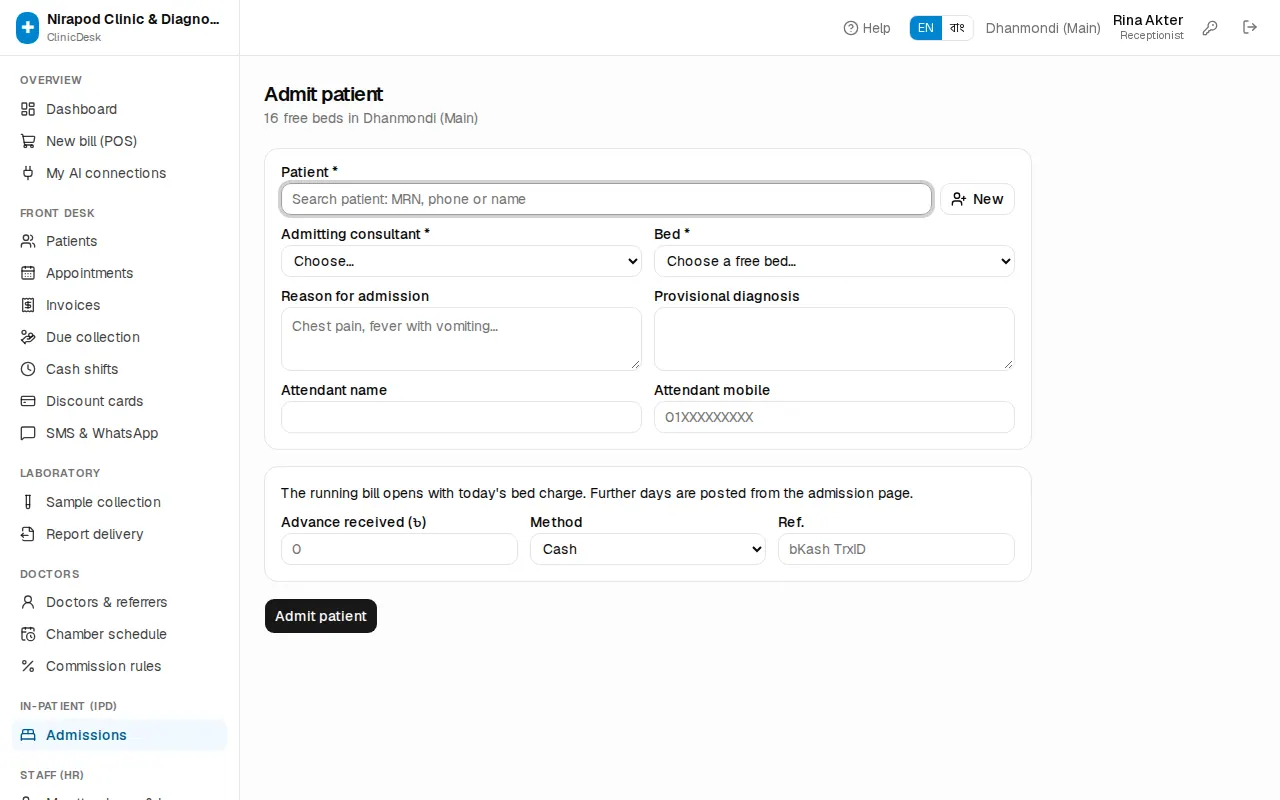
You will see "Admitted · ADM-000012" and the admission page opens. As the form says, the running bill opens with today's bed charge; each following day's bed rent is added automatically overnight.
The admission page
Click a red bed on the bed board, or an admission no. in Current admissions.
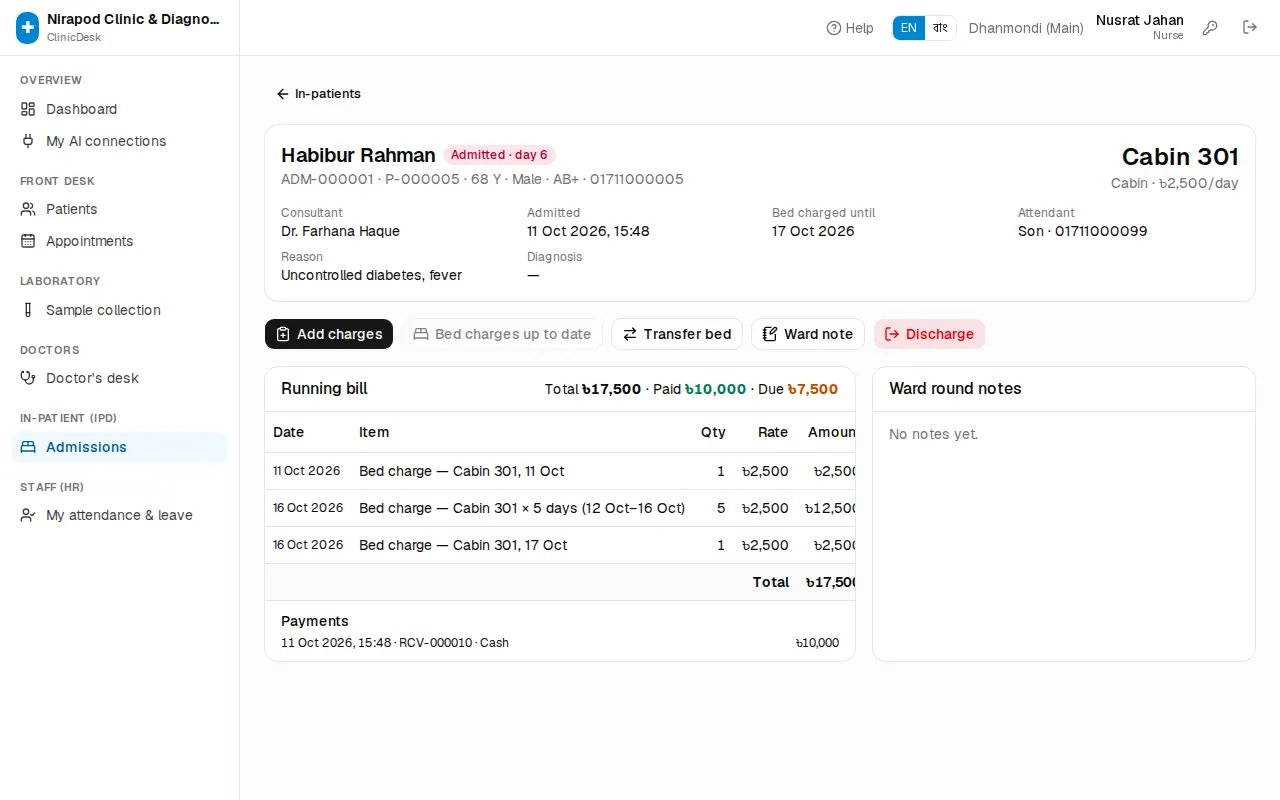
- At the top: the patient's name, an Admitted · day N label, admission no., MRN, age and phone. On the right, the bed label in large type with its rate.
- If the patient has allergies on record, a red line shows Allergies: — always check it before giving medicines.
- Consultant, Admitted, Bed charged until, Attendant, Reason, Diagnosis.
- Bottom left: the Running bill, every charge with its date, and above it Total · Paid · Due. Below that, the Payments list.
- Bottom right: Ward round notes.
- The bill-number button (INV-…) opens the normal invoice page, where you can print the bill.
Daily charges
Bed rent
Bed rent is added to the running bill automatically: every night, just after midnight, ClinicDesk posts the new day's bed charge for every admitted patient at the bed's daily rate. If a night was missed, the next run adds all the missing days in one line — no day is charged twice.
You can still post it yourself, for example before printing a bill in the evening:
- On the admission page look at the Post bed charges (N days) button. N is the number of days not yet on the bill.
- Press it. You will see "N bed-day(s) posted".
- When everything is posted the button reads Bed charges up to date and can't be pressed.
If the bed board shows a yellow box Bed charges not yet posted for N admission(s), the nightly posting hasn't run for those patients. Open each admission listed and press Post bed charges, and tell JonakiSoft support if the box keeps coming back.
Medicines, tests, procedures, doctor visits
- Press Add charges. The Add to running bill window opens.
- In the search box type a procedure, test, medicine, oxygen and so on, and pick it. You can add several items at once.
- Set the quantity on each line. If a service has a zero price in the catalogue, type the price.
- For a doctor's visit (a consultation) choose the doctor under the line and type the Doctor's fee.
- Press Add to bill.
Lab tests added here are sent to the lab automatically — there is no separate lab order. Sample collection to report is in the Laboratory chapter.
If your pharmacy is linked through PharmaDesk, medicines the pharmacy sells to an admitted patient land on the running bill by themselves as "Medicines — pharmacy …". Details: Pharmacy link.
Moving to another bed
- On the admission page press Transfer bed.
- In Transfer to another bed choose a free bed.
- Press Transfer. You will see a message like "Moved to M-3".
Unbilled days up to today are charged at the old bed's rate first; the new bed is charged from tomorrow. So if a patient moves from the general ward to a cabin, today stays at the ward price.
Ward round notes
Nurses and doctors can both write notes.
- Press Ward note.
- Enter the vitals you measured: BP sys, BP dia, Pulse, Temp °F, SpO₂ %, weight.
- Write the patient's condition in Note / findings.
- Write the next instructions in Orders / plan (for example "Continue IV fluid, repeat CBC tomorrow").
- Press Save note.
The note appears at the top of the list on the right with the time. Notes written by a nurse show "(nurse)" after the name. You can't save a note that has neither text nor vitals.
Advance and payments
You can take an advance while admitting (see above). To take money later:
- On the admission page press Collect payment. It is greyed out when nothing is due.
- Amount (৳) is filled in with the full due. Change it for a part payment.
- Choose the Method. For anything other than cash, type the Transaction ref..
- Press Receive. A message shows the money-receipt number and the payment is added to the list.
Only staff allowed to collect money see this button (usually the front desk and managers). Cash you receive is counted in your cash shift.
Discharge and the final bill
- Collect the remaining due first (Collect payment).
- Press the red Discharge button. The Discharge patient window opens.
- Fill in the Final diagnosis (the admission diagnosis is already there).
- Optionally fill in Treatment given / hospital course, Condition at discharge, Follow-up, Medicines on discharge and Advice.
- Check the bottom of the window: how many unbilled bed-days will be posted first, and the Current due.
- Press Discharge & print.
Unbilled bed rent is posted automatically, the bed is freed, and the Discharge summary opens in a new tab for printing. It has the patient's details, what you wrote, and the whole bill (items, discount, total, paid, due) — this is the patient's final bill.
To print it again later, open the stay from the Discharged tab and press Discharge summary.
Cancelling a wrong admission
If the wrong patient was admitted, or the patient left before treatment started, a manager or the owner can cancel the admission.
- On the admission page press Cancel admission.
- Type the Reason (for example "wrong patient").
- If money was taken, Refund ৳… via is ticked — choose the refund method.
- Press Cancel admission.
The running bill and its lab orders are cancelled and the bed is freed. The stay remains on the Cancelled tab with its reason.
Common problems
- No free beds: if the admission form says "No free beds", discharge someone first or ask a manager to add beds.
- I can't see the buttons: Add charges, Discharge and the others only show for an admitted patient and for staff with permission. Doctors and accountants can only view the page (doctors can write notes).
- The due looks too high: check that the advance was entered with the right method and appears in the payments list.
- Figures for management: the IPD admissions & bed occupancy report in Reports.
Chapter 11 · For patients
Patient portal & online booking
For patients — view and print your lab reports on your phone, pay a bill's due online, and book or cancel a doctor's serial from home.
This chapter is for patients and their families. Without coming to the clinic you can do three things from a phone or computer:
- See, download and print your lab reports.
- Pay a bill's remaining due with bKash, Nagad or a card (if the clinic offers it).
- Book a doctor's serial online, check it, and cancel it.
You don't need an account or a password. For reports you only need your money receipt; for a serial, your mobile number.
What to look for on your receipt
After you pay for tests, the money receipt you get at the counter has a box near the bottom with:
- Report delivery — when your reports should be ready.
- Online report PIN — a 6-digit number, for example
482913. - The web address for viewing reports.
Near the top of the receipt is the Bill number, for example INV-000123. You need both the bill number and the PIN to see your reports. Keep the receipt safe and don't share the PIN.
When all the tests on a bill are ready and checked, the clinic may send you an SMS with the report link and your PIN. Tap the link to open your clinic's report page, then enter the bill number and PIN.
Viewing your report online
- Open the address from your receipt or SMS in a browser. The page is called Your lab reports.
- You can switch language with EN / বাং at the top right.
- In Bill number type the number from your receipt, for example
INV-000123. Just the last digits (123) also work. - In Report PIN type the 6-digit PIN.
- Press Show my reports.
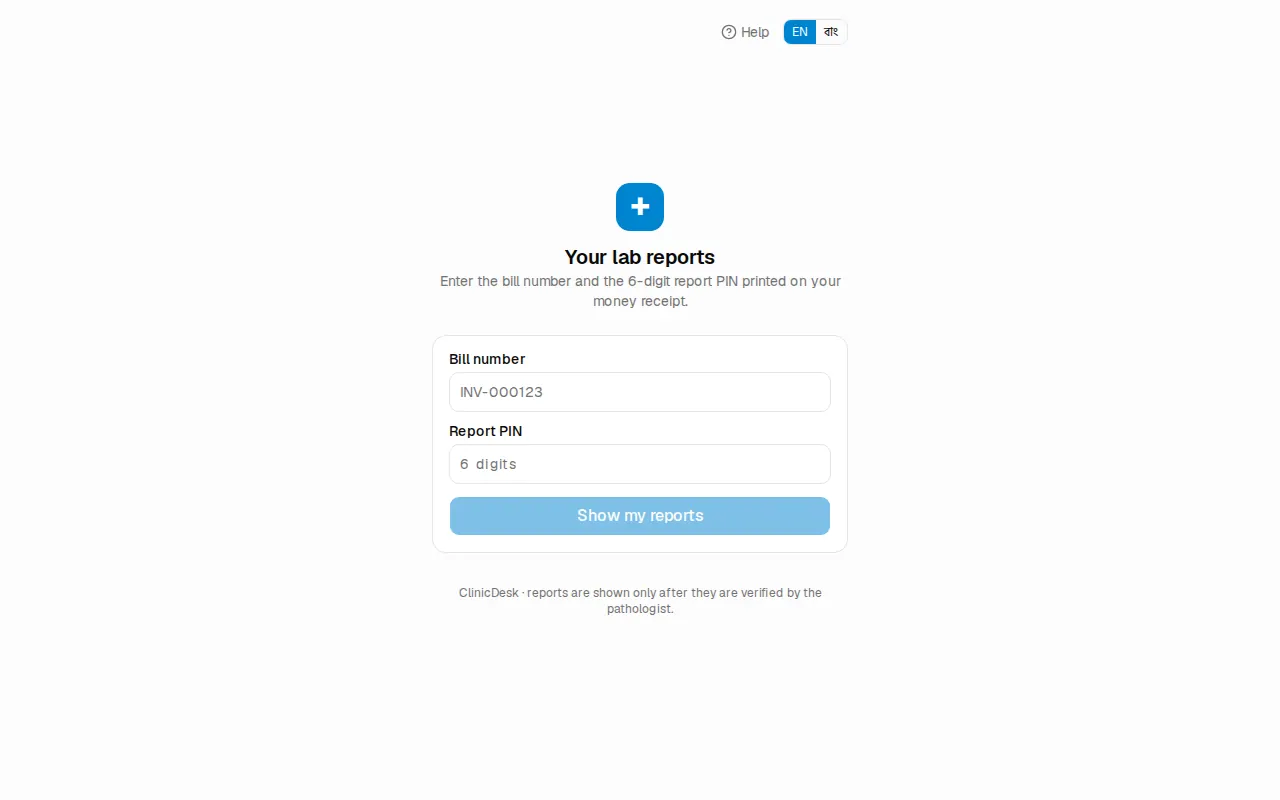
You will see your name, the bill number and the status of each test:
| It says | Meaning |
|---|---|
| Awaiting sample | The blood, urine etc. has not been taken yet |
| Sample collected | The sample has been taken |
| Processing | The test is running in the lab |
| Awaiting verification | The result is entered but the doctor (pathologist) hasn't checked it yet |
| Ready | The report is ready to view and print |
As soon as at least one test is Ready, a View / print ready reports button appears. Press it to open the full report.
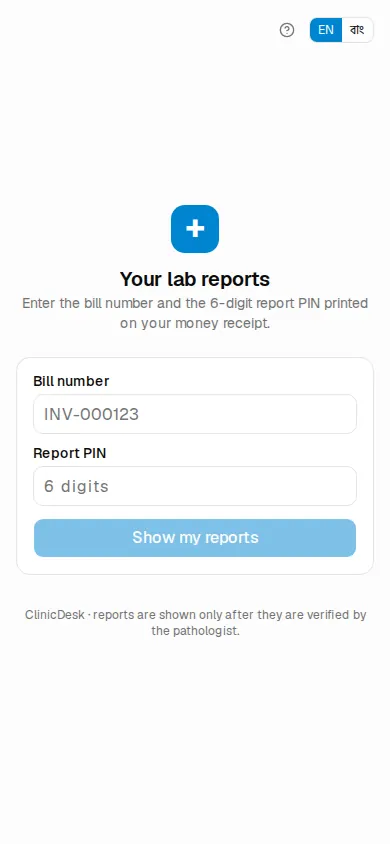
Printing or saving as PDF
- On the report page press Print / save PDF at the top.
- If you have a printer, choose it and print.
- To keep a file, choose Save as PDF instead of a printer. On a phone it usually says "Download" or "Save".
- Press Back to return.
The report looks exactly like the paper report, A4 size. On a phone, scroll sideways to see all of it, or save the PDF and open that. You can show this PDF or printout to your doctor.
If your report doesn't show
- "No report found for that bill number and PIN": check the bill number and PIN again. The PIN must be exactly 6 digits.
- "Your reports are not ready yet. Please check again later.": reports come online only after the pathologist has checked them. Try again after the Report delivery time on your receipt.
- A due on the bill: some clinics release reports only after full payment. You will then see "Please clear the due of ৳… at the counter to receive your reports." Pay online as described below, or at the counter.
- "Too many attempts. Please wait 15 minutes and try again.": after many wrong tries the page locks for a while, for your safety.
- "Online services paused": the clinic's online services are paused for now. Your reports and bills are safe; collect them from the counter.
Paying a due online
If the clinic offers online payment and the bill has a due, a blue box appears under the test list: Due on this bill: ৳….
- Press the way you want to pay: Pay with bKash, Pay with Nagad or Card / mobile banking. Only the ones your clinic offers are shown.
- The secure page of bKash, Nagad or the payment gateway opens. Finish the payment there with your number, OTP and PIN.
- You are brought back to the report page.
Back on the page you will see in green: "Thank you, your payment was received. The money receipt has been added to your bill." Press Show my reports again to see your reports.
If you cancel or the payment fails, a yellow message says "The payment did not go through. Nothing was charged to your bill. You can try again."
Booking a doctor's serial online
If the clinic has online booking turned on, it has a booking page (the clinic will give you the address; it ends in something like /book/clinic-name). The top shows the clinic's name, address and Hotline: number.
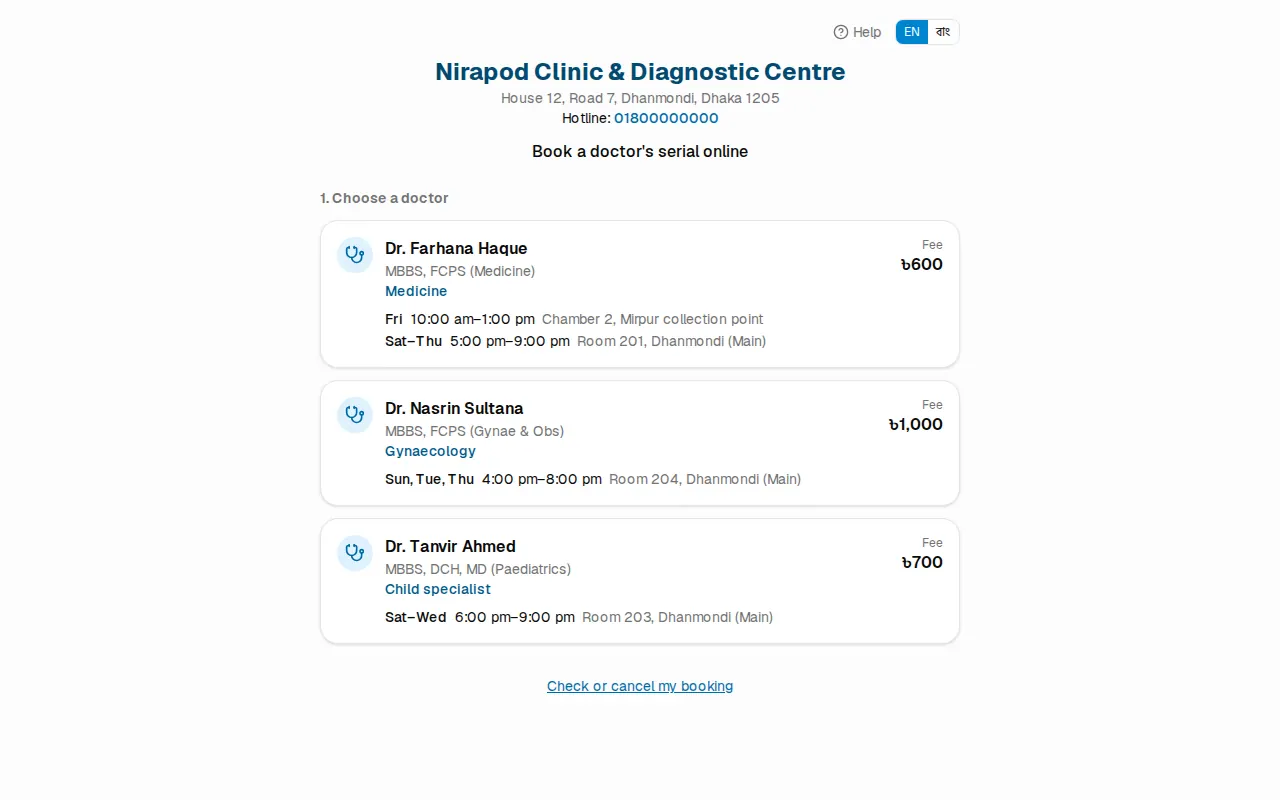
- 1. Choose a doctor — tap the doctor's name. Each doctor shows degrees, speciality, which days and times they sit, and the Fee.
- 2. Choose a day — the chamber days for the coming days are shown, each with the time, room and N serial(s) left. Days marked Full can't be chosen.
- 3. Patient details — fill in Patient's name, Mobile number, Sex (Male / Female) and Age (years).
- Choose the Visit: New patient, Follow-up or Show reports.
- Press Book serial · (day).
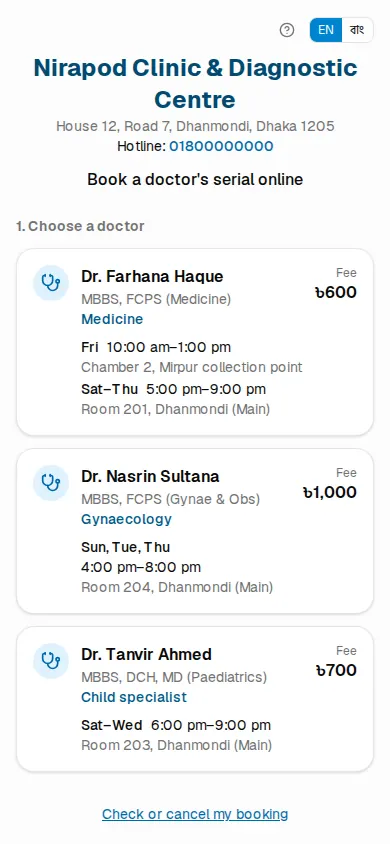
The Your serial is booked page shows your serial number in large type, with the doctor, date, Expected time, room and an 8-character Reference. Take a screenshot of this page. You will also get an SMS confirmation.
To book for someone else press Book another.
Checking or cancelling your booking
- At the bottom of the booking page press Check or cancel my booking (right after booking there is also a Check or cancel button).
- Type the Mobile number you booked with and the Booking reference.
- Press Find my booking.
You will see your serial number, the date and the status — Booked, Checked in, With the doctor, Done, Cancelled or Missed.
To cancel, press Cancel booking and confirm. The serial is released for another patient. Once you have checked in at the counter you can no longer cancel online — tell the counter instead.
If booking doesn't work
- "Today's chamber is already over. Please pick another day." — choose another day.
- "Enter a valid Bangladeshi mobile number (01XXXXXXXXX)" — use your 11-digit number.
- Too many bookings for the same number with the same doctor, or many tries in a short time, are blocked. Call the clinic instead.
- If it says "No doctors are taking online bookings right now" or "Online booking unavailable", call the hotline to book.
For reception: what to tell patients
- When you hand over a test bill, point to the Online report PIN and the address on the receipt: "You'll get an SMS when the report is ready; see it on your phone with this number and PIN."
- If a patient lost the receipt, open their bill and reprint it — the PIN is on it (OPD billing & payments).
- If a patient says "my report isn't showing", check in the lab whether the tests are verified (Laboratory). If there is a due, collect it or ask them to pay online.
- A patient who booked online is already on the appointment list; just check them in and take the fee (Reception & appointments).
- The portal, online booking and Full payment before delivery are switched on or off by the owner or manager in Settings (Owner setup). Payment gateways: Online payments, licence & AI.
Chapter 12 · Money, accounts & staff
Pharmacy link (PharmaDesk)
Linking a PharmaDesk pharmacy — sending prescriptions straight to the pharmacy, admitted patients' medicines landing on their running bill, and paying the pharmacy what it is owed.
If the hospital's own pharmacy, or the one next door, uses PharmaDesk, you can link it to ClinicDesk. Once linked, three things happen by themselves:
- Prescriptions go to the pharmacy. With one press at the doctor's desk, the prescription's medicine list reaches the pharmacy counter. Nobody has to read handwriting and hunt for medicines.
- Admitted patients' medicines go on the running bill. When the pharmacy sells medicines to an admitted patient as "Charge to clinic admission", the amount lands on the patient's hospital running bill. The patient pays everything together at discharge.
- The clinic pays the pharmacy. The clinic collects the medicine money from the patient, then pays the pharmacy from the Pharmacy payable page, and the accounts are written automatically.
Connecting
The owner connects the pharmacy. Each side needs a "key" (a secret code) — the clinic gives one to the pharmacy and the pharmacy gives one to the clinic.
In the sidebar open Admin › Integrations. The Pharmacy link (PharmaDesk) section is at the very bottom.
Step 1: the clinic's key for the pharmacy
- On the right, under Clinic key for the pharmacy:, press Create key.
- A long key appears in a yellow box. Press Copy.
- Give it to the pharmacy owner, who pastes it into PharmaDesk → Settings → Clinic link.
Step 2: the pharmacy's key for the clinic
- The pharmacy owner copies "Key for the clinic" from PharmaDesk's Clinic link page and gives it to you, with the pharmacy's web address.
- On the left, type the address in Pharmacy web address, for example
https://pharmacy.example.com. - Paste the key into Pharmacy's key for this clinic.
- Press Save.
With both steps done the link is live. The text at the top of the section, "(charges received so far: N)", shows how many medicine charges have come from the pharmacy.
To disconnect press Unlink. Both keys stop working.
Sending a prescription to the pharmacy
Doctors do this themselves at Doctors › Doctor's desk (the full steps are in Doctors).
- Write the prescription and press Save or Save & finish first.
- Then press Send to pharmacy (the button only shows when a pharmacy is linked).
- You will see "Sent to pharmacy" and the button changes to Sent to pharmacy ✓.
The prescription reaches the pharmacy's POS — patient name, age, doctor, and each medicine with dose and duration. The patient just gives their name at the counter and the pharmacy loads the medicines from the list.
- If you changed something without saving, it asks "You have unsaved changes. Send the last saved prescription?" — better to save first.
- To send it again it asks "Already sent. Send again?".
- A prescription with no medicines can't be sent.
Admitted patients' medicines on the running bill
For an admitted patient, the attendant usually goes to the pharmacy for medicines. Instead of taking cash, the pharmacy records the sale in PharmaDesk as "Charge to clinic admission", picking the patient from the list of admitted patients by name or admission no.
What you see in ClinicDesk:
- A line appears on the Running bill of the patient's admission page: "Medicines — pharmacy (pharmacy sale number)" with the full amount. Nothing else to do.
- If the pharmacy later voids the sale or takes medicines back, the line is cancelled automatically (shown struck through). For a partial return the old line is cancelled and a new line with the new amount appears, ending in "(after return)".
- Once the patient is discharged or the admission is cancelled, the pharmacy can no longer charge to that bill — the patient then pays the pharmacy directly.
The money is collected from the patient at the clinic counter (advance, Collect payment or at discharge). Admission and discharge: In-patients (IPD).
Paying the pharmacy
The clinic collects the pharmacy's medicine money from patients, so it pays that money to the pharmacy. A manager, accountant or the owner does this.
In the sidebar open Finance › Pharmacy payable.
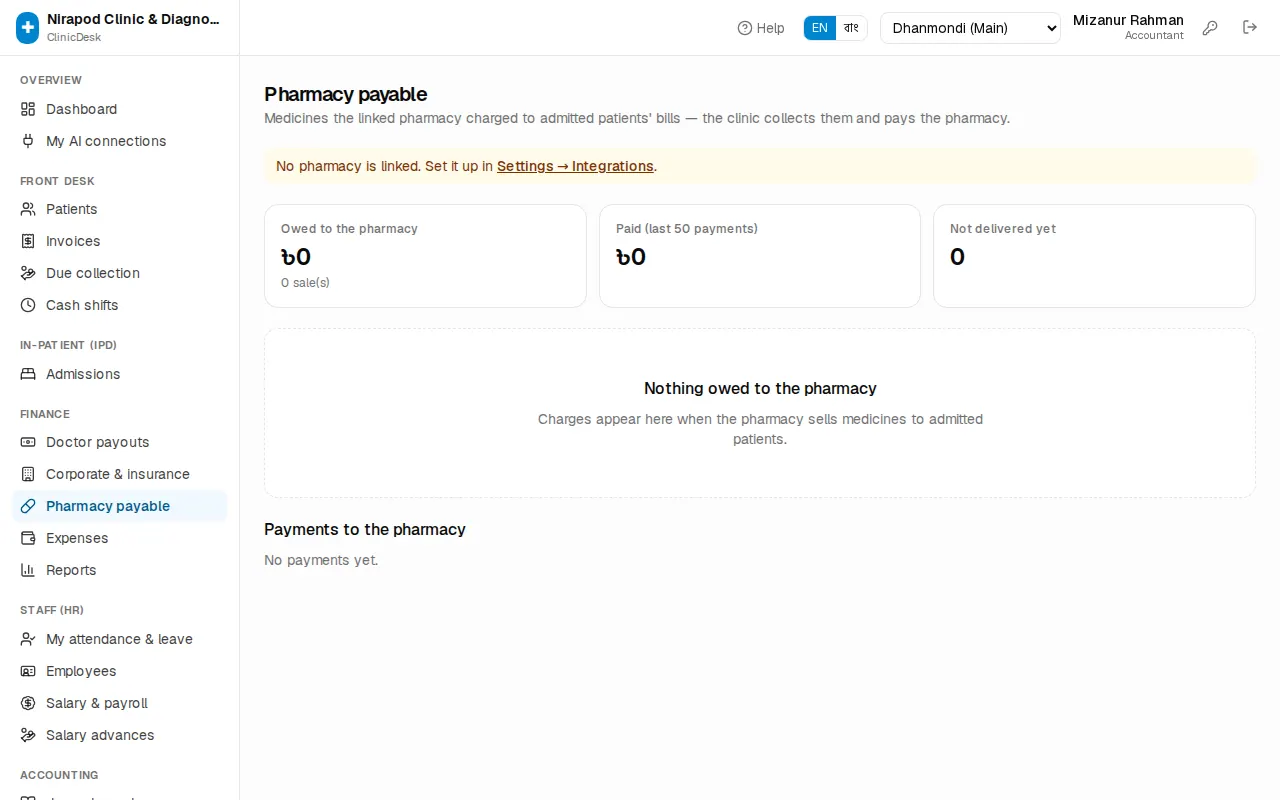
The three boxes at the top:
- Owed to the pharmacy — the total not yet paid to the pharmacy, and how many sales.
- Paid (last 50 payments) — what was paid to the pharmacy recently.
- Not delivered yet — payments whose news hasn't reached the pharmacy's software.
Steps to pay
- The list shows each sale: date, Pharmacy sale number, Admission no., patient and amount. A discharged patient shows "(discharged)".
- Tick the ones you are paying now. Tick the box in the header to pick them all (Select all).
- Check Selected and Total at the bottom.
- Choose the method (Cash, Bank, bKash, Nagad, Rocket, Card) and optionally write a Note (optional), such as a cheque number.
- Press Pay pharmacy and confirm.
A voucher (PPAY-…) is created, the accounting entry is made automatically, and the payment is sent to the pharmacy's PharmaDesk so the clinic's due goes down there.
Payments to the pharmacy
The Payments to the pharmacy list below shows each voucher's status:
| Status | Meaning | What to do |
|---|---|---|
| Received by pharmacy | The pharmacy's software has it | Nothing |
| Not delivered | Internet or pharmacy server problem | Press Retry; if it keeps failing, Cancel and pay again |
| Needs attention | The pharmacy received it but couldn't match it in its accounts | Talk to the pharmacy |
"৳… not applied there" means that amount didn't match any sale on the pharmacy's side — tell the pharmacy.
Cancel asks "Cancel this payment? Its charges become payable again." — the sales return to the payable list. A payment the pharmacy has already received can't be cancelled here.
Troubleshooting
- "Link a pharmacy first (Settings → Integrations)": the address or the pharmacy's key isn't saved — see Connecting.
- "Pharmacy not reachable" / "Pharmacy refused": the pharmacy's address is wrong, its server is down, or the key doesn't match. Ask the pharmacy owner for a fresh key.
- Pharmacy charges don't reach the patient's bill: check that the patient is still admitted, and that the pharmacy has the clinic's latest key. Creating a new key stops the old one.
- I can't see Pharmacy payable: the page is only for managers, accountants and the owner.
- Ledgers and reports: Accounting & commission.
Chapter 13 · Money, accounts & staff
Expenses, doctor commission & accounting
Recording expenses, referral commission rules, paying doctors and referrers, automatic journals, manual vouchers, ledgers, trial balance, income statement and balance sheet
The clinic's money work has three parts: day-to-day expenses, commission and payouts for doctors and referrers, and the full accounting books (journals, ledgers, statements). Bills, receipts, refunds, expenses, doctor payouts and salaries all post to the books automatically. The accountant only enters what nothing else records — the owner's capital or a cash deposit to the bank, for example — as manual vouchers.
Who can do what: the Accountant and Manager record expenses, pay doctors and see every accounting screen. Only the Accountant (and the owner) can post manual vouchers and change the chart of accounts. Only the Owner sees the Rebuild books button.
Recording expenses
Go to Finance › Expenses in the sidebar. The page header says which branch new expenses go to — switch branch from the header if needed.
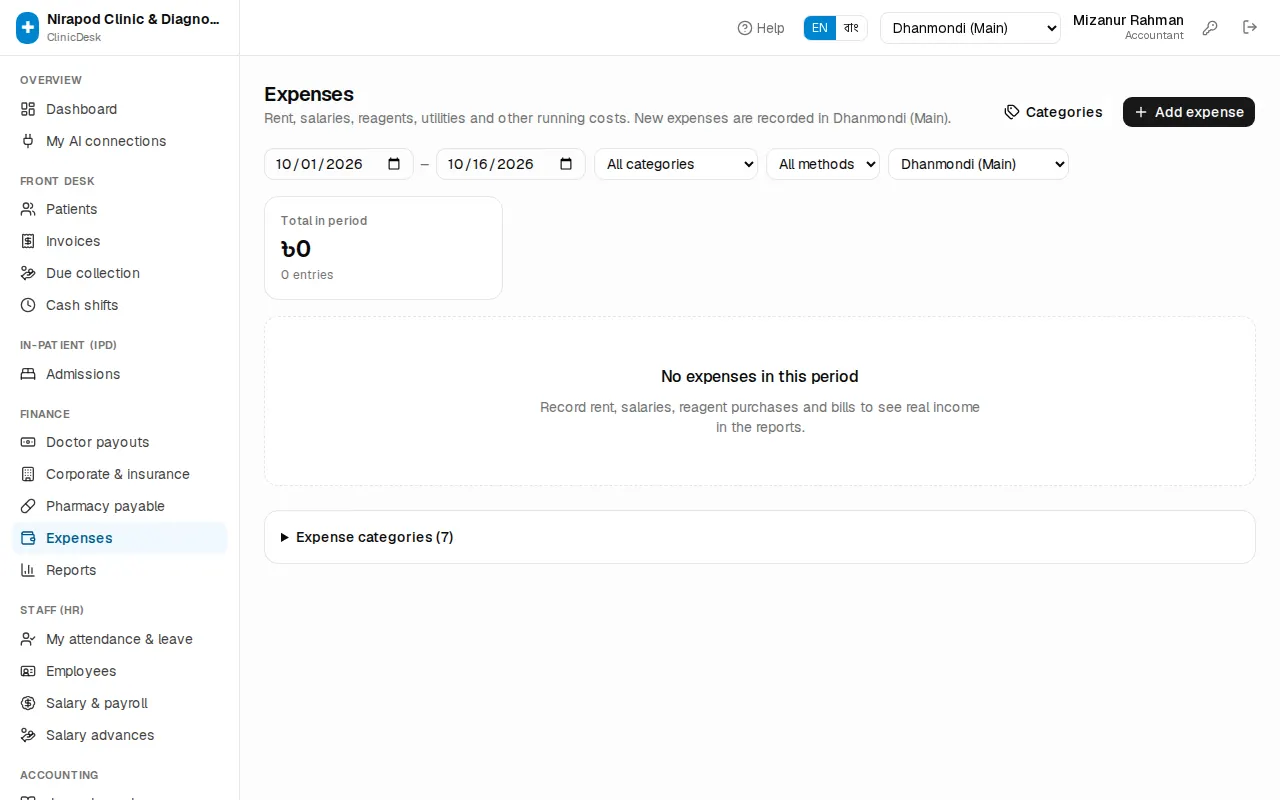
- Press Add expense.
- Choose the Category (rent, electricity, reagents …).
- Enter the Amount (৳).
- Pick Paid by — cash, bKash, bank and so on.
- Check the Date (today is filled in).
- In Paid to write who was paid, e.g. DESCO or landlord. Add a short Note, e.g. October electricity bill.
- Save. "Expense recorded" appears and the expense gets a number.
Use the filters at the top for the date range, All categories and All methods. The Total in period card shows the total for the selection. Click the pencil on a row to correct it, the bin to delete it.
Expense categories
The Categories button at the top jumps to the Expense categories section at the bottom of the page.
- New category: type a name in the last row (e.g. Generator fuel) and press Add.
- Rename: type the new name and press Rename.
- Only a category with no expenses can be deleted.
Every category gets its own expense ledger in the chart of accounts automatically.
Referral commission rules
What each doctor or referrer earns on each test is set on Doctors › Commission rules. Owners, managers and receptionists can open it.
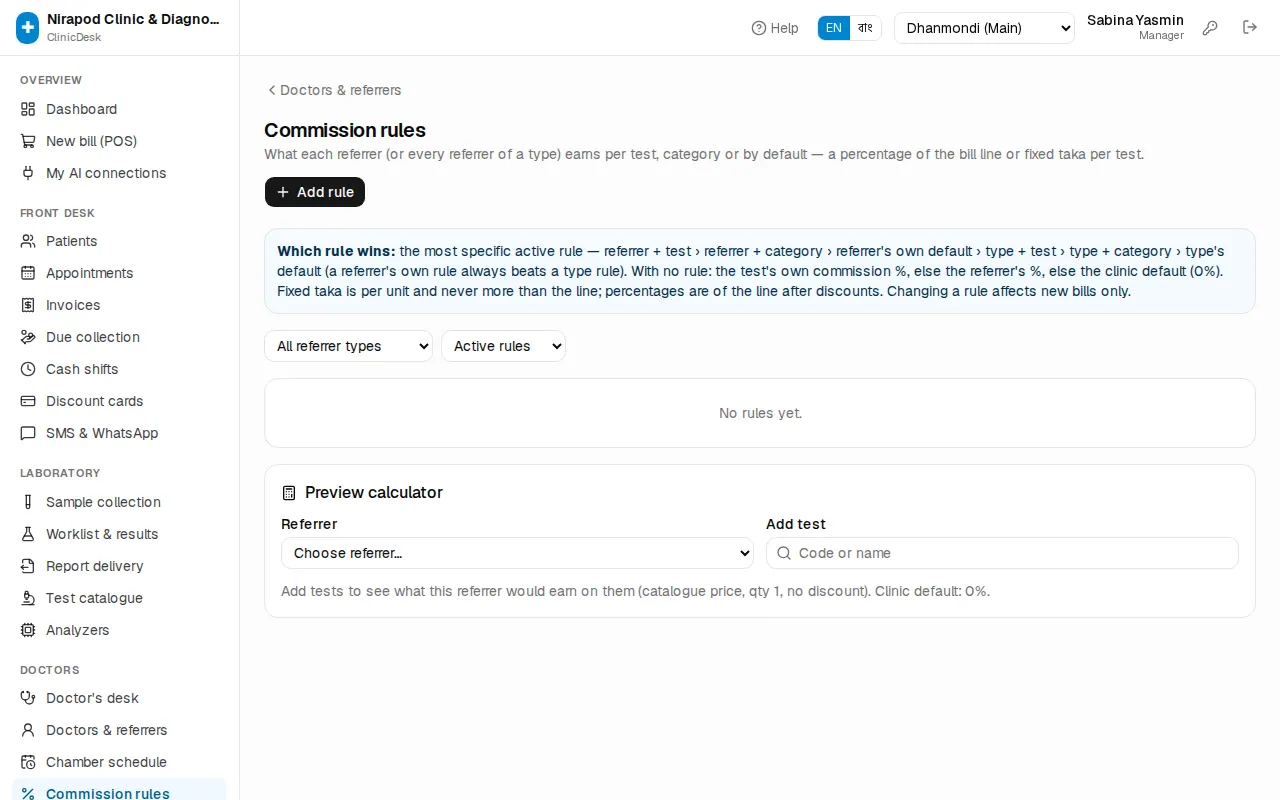
Adding a rule
- Press Add rule. The New commission rule window opens.
- Under Who, choose:
- One referrer — then pick the doctor or referrer from the list.
- Every referrer of a type — e.g. every Village doctor (RMP) or every Agent.
- Under For, choose All tests, A category or One test (search by test code or name).
- Under Commission, choose Percent of the bill line or Fixed taka per test, then fill in Percent (%) or Taka per test (৳).
- Save. "Rule added" appears.
Which rule applies
The blue box on the page explains Which rule wins: the most specific active rule. The order is: referrer + test › referrer + category › the referrer's own default › type + test › type + category › the type's default. With no rule at all, the test's own commission % is used, else the referrer's %, else the clinic default.
- Percentages are of the line after discounts.
- Fixed taka is per unit and never more than the line.
- Consultation, bed and medicine lines never earn through an "All tests" or category rule — only through a rule for that exact service.
To stop a rule, press Deactivate on its row; Activate turns it back on. The filters at the top show All referrer types, Active rules, Inactive rules or All rules.
Preview calculator
At the bottom is the Preview calculator. Pick a Referrer and add a few tests in Add test — it shows what that referrer would earn on each test and which rule it came from. Use it to check a new rule before the next bill.
Paying doctors and referrers
Go to Finance › Doctor payouts in the sidebar. One table shows what each doctor earned and is owed:
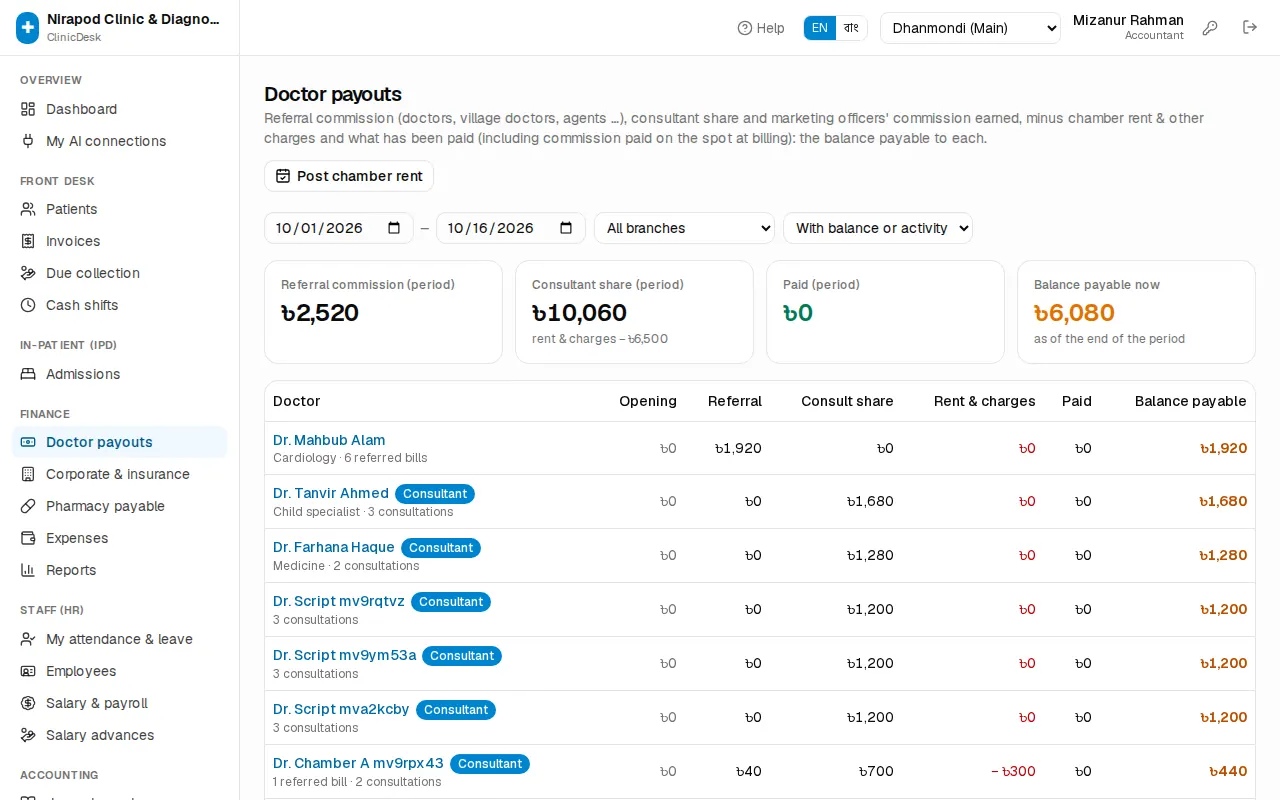
- Opening — what was owed before the period.
- Referral — commission for patients they sent.
- Consult share — the doctor's part of consultation fees.
- Rent & charges — chamber rent, advances and other deductions.
- The cards on top: Referral commission (period), Consultant share (period), Paid (period) and Balance payable now.
Change the dates at the top. The drop-down switches between With balance or activity and All doctors.
Paying one doctor
- Click the doctor's name in the table. The Doctor / referrer statement opens, with every bill behind the numbers.
- Check the Closing balance payable.
- Press Record payout (it is disabled when nothing is owed).
- Amount (৳) is filled with the full balance — lower it for a part payment.
- Choose Paid by, set For period from and to, and put the bKash TrxID or cheque number in Note.
- Press Pay & print voucher. The payout voucher opens in a new tab — print it and get the doctor's signature.
To reprint an old voucher, click its number under Payout history on the statement. Print at the top prints the whole statement.
Chamber rent and other charges
- Monthly rent for everyone: on the payouts page press Post chamber rent, pick the Month and press Post rent. Every consultant with a chamber rent on their profile is charged; anyone already charged for that month is skipped.
- One doctor's charge: on the statement press Add charge. Kind is Chamber rent, Advance or Other charge. Chamber rent needs a Month (rent) — one rent per month.
Remove a wrong charge with the bin icon in the Charges (rent, advances …) section.
Automatic journals and manual vouchers
Accounting › Journal vouchers lists every accounting entry. Bills, receipts / refunds, doctor payouts, doctor charges, expenses, company settlements, salaries, salary advances and payments to the pharmacy all post on their own.
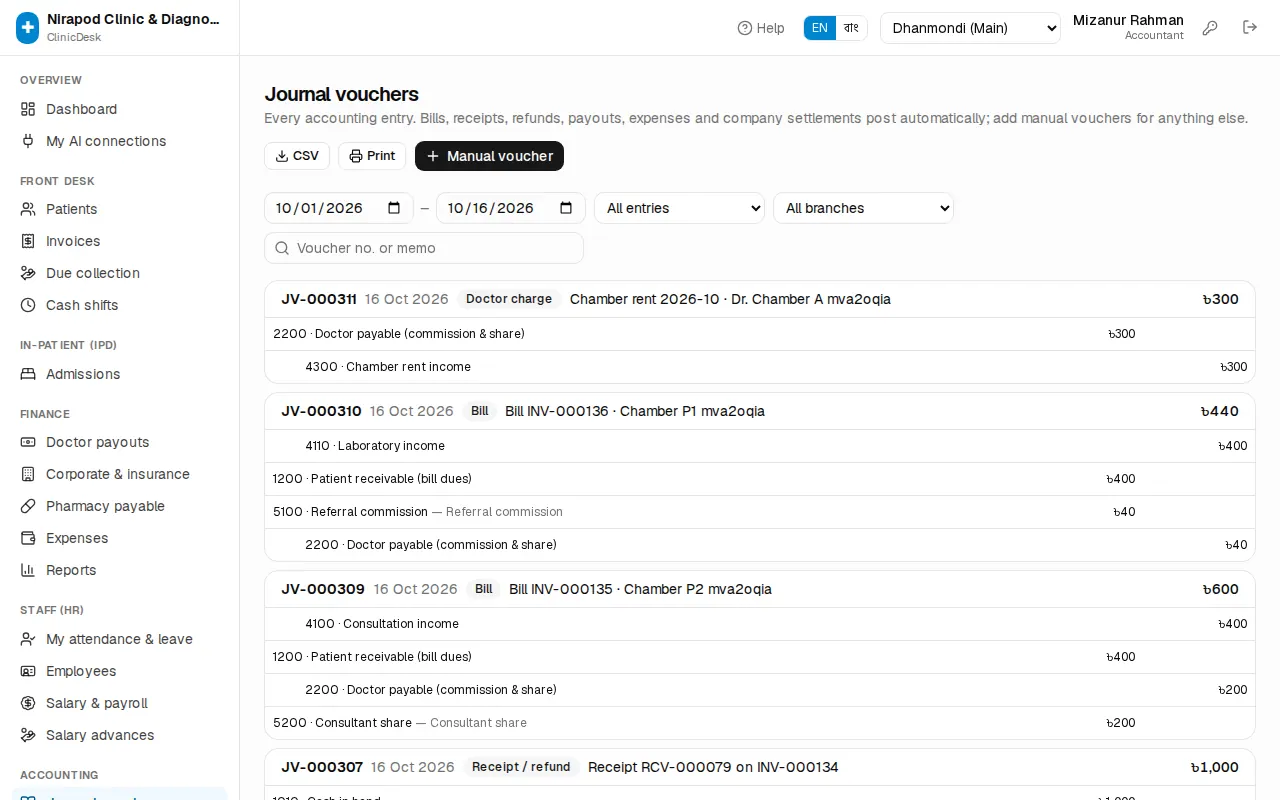
Filter by Automatic, Manual vouchers or one source type, or search by Voucher no. or memo. Open an entry and use Open source document to jump to the bill or expense behind it.
Posting a manual voucher
Use manual vouchers for the owner's capital, opening cash and bank balances, cash deposited to the bank and similar.
- Press Manual voucher. The Manual journal voucher window opens.
- Set the date, the branch (or No branch (head office)) and a Memo, e.g. Owner's capital introduced. It will not save without a memo.
- On each line pick a ledger from Choose ledger… and enter a Debit or a Credit. Press Line for more lines.
- When debits equal credits, a green Balanced shows. Otherwise the difference shows in red and the button stays disabled.
- Press Post voucher.
Open a manual voucher to Edit or Delete it (a deleted voucher stays in the audit log).
Ledgers and the chart of accounts
On Accounting › General ledger pick a ledger and a date range. The Opening, Debits, Credits and Closing cards sit above every transaction with a running balance.
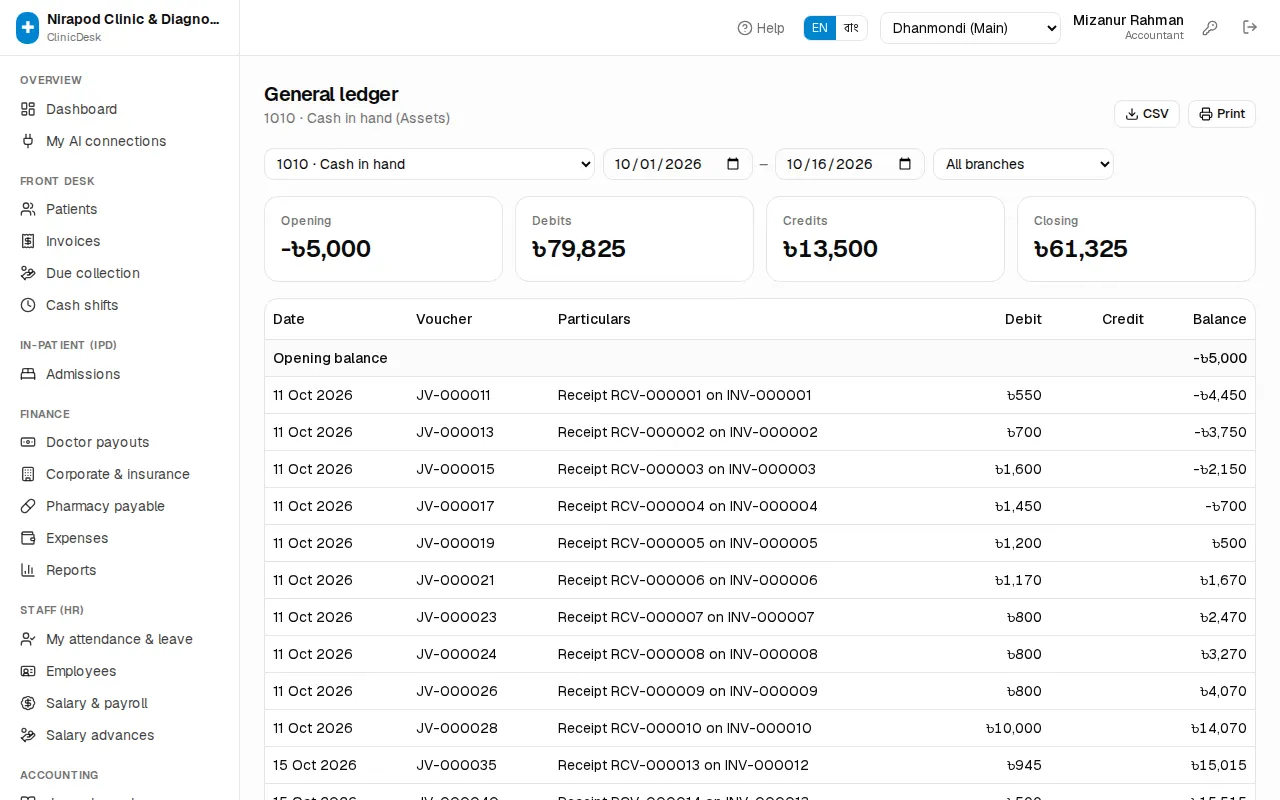
Accounting › Chart of accounts lists every ledger with today's balance. Ledgers with a lock are used by automatic posting; their type cannot be changed.
- New ledger: the Ledger button → Code, Name, Type and, if needed, Parent (optional).
- Press Hide next to a ledger you no longer use — it stays in reports but is not offered on new vouchers.
- Rebuild books (owner only): re-posts every automatic entry from bills, receipts, payouts, expenses and settlements. Manual vouchers are kept. This is the fix when the trial balance does not balance.
Trial balance, income statement and balance sheet
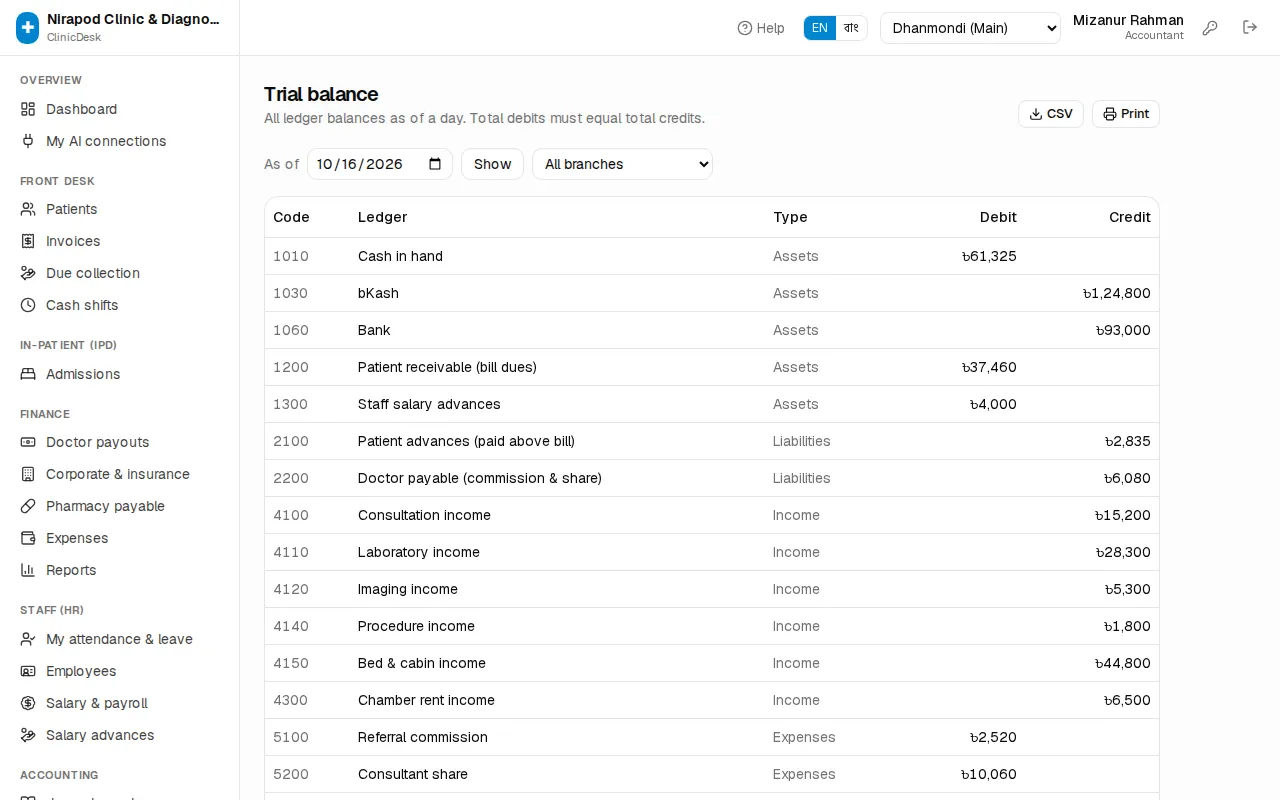
- Trial balance: every ledger balance as of a day. When total debits equal total credits the total row shows ✓ balanced. If not, a warning appears — ask the owner to use Rebuild books on the chart of accounts.
- Income statement: profit and loss for the period — Net service revenue, Gross profit, Net profit — next to the previous period of the same length. It is on an accrual basis: revenue on the day a bill is issued, commission on the day it is earned.
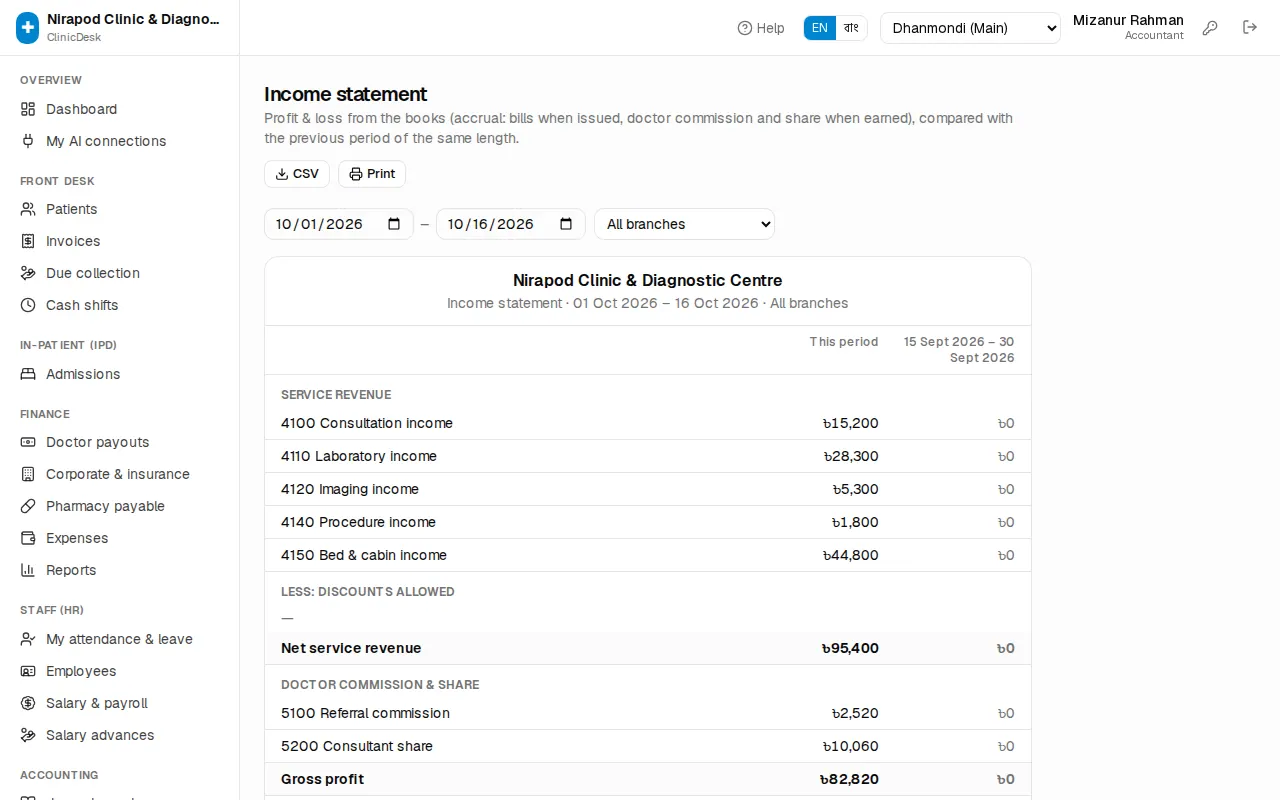
- Balance sheet: on a given day, what the clinic owns (Assets: cash, receivables), owes (Liabilities: doctor payable, patient advances, VAT) and the owner's stake (Equity). When assets equal liabilities + equity the page says it is balanced.
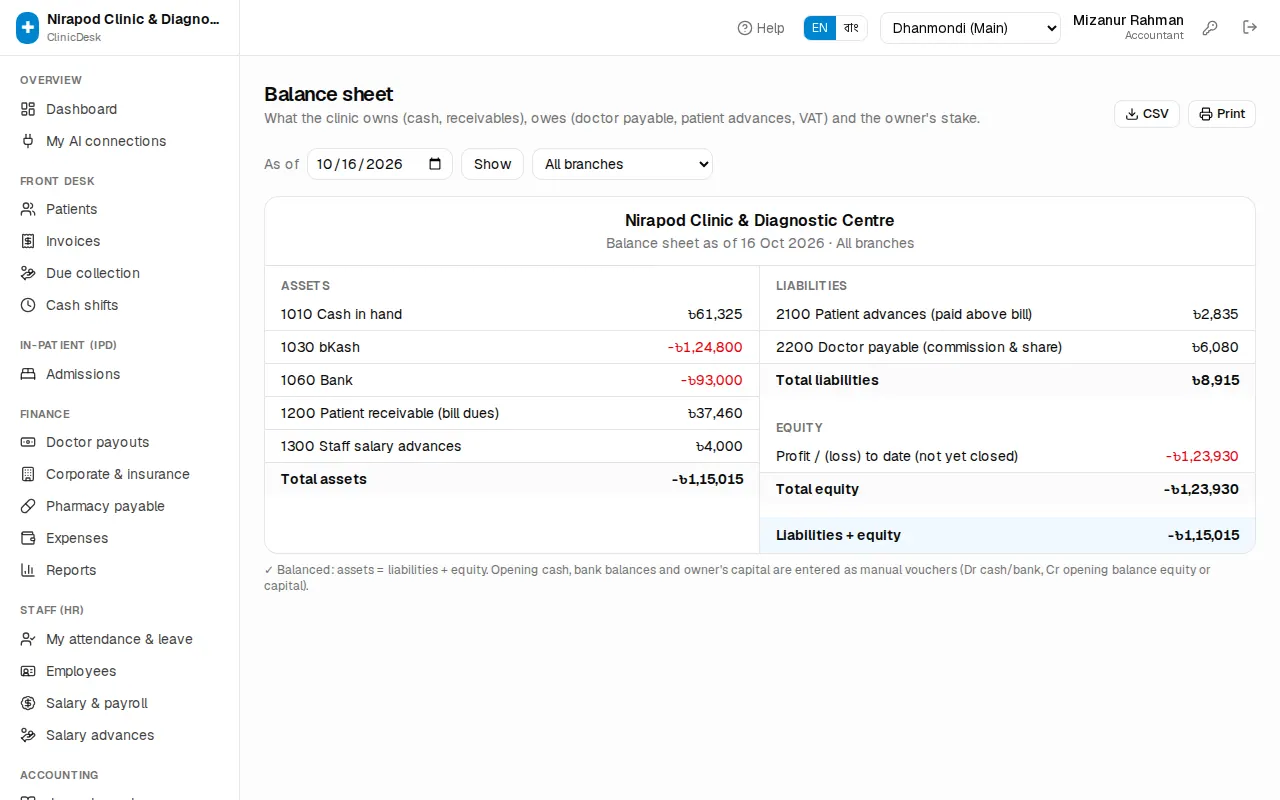
Every one of these pages has a branch picker (with more than one branch), a CSV download and a Print button.
For a cash-basis view of daily income and spending use Reports › Income summary — see Reports.
Chapter 14 · Money, accounts & staff
Staff, attendance & payroll (HR)
Your own attendance and leave requests, the staff list, duty roster, daily attendance, leave approval, salary sheet, payslips and salary advances
The Staff (HR) section of the sidebar covers everyone who works at the clinic — nurses, technologists, front desk, duty doctors, ward boys and cleaners. It runs from daily attendance to the month-end salary sheet and payslips.
Who sees what:
| Task | Who |
|---|---|
| My attendance & leave (own attendance, leave requests, payslips) | every staff member with a login |
| View the Employees list | Manager, Accountant, Owner |
| Add employees, Duty roster, Attendance, Leave decisions | Manager, Owner |
| Salary & payroll, Salary advances | Manager, Accountant, Owner |
My attendance & leave (for every staff member)
Open Staff (HR) › My attendance & leave in the sidebar.
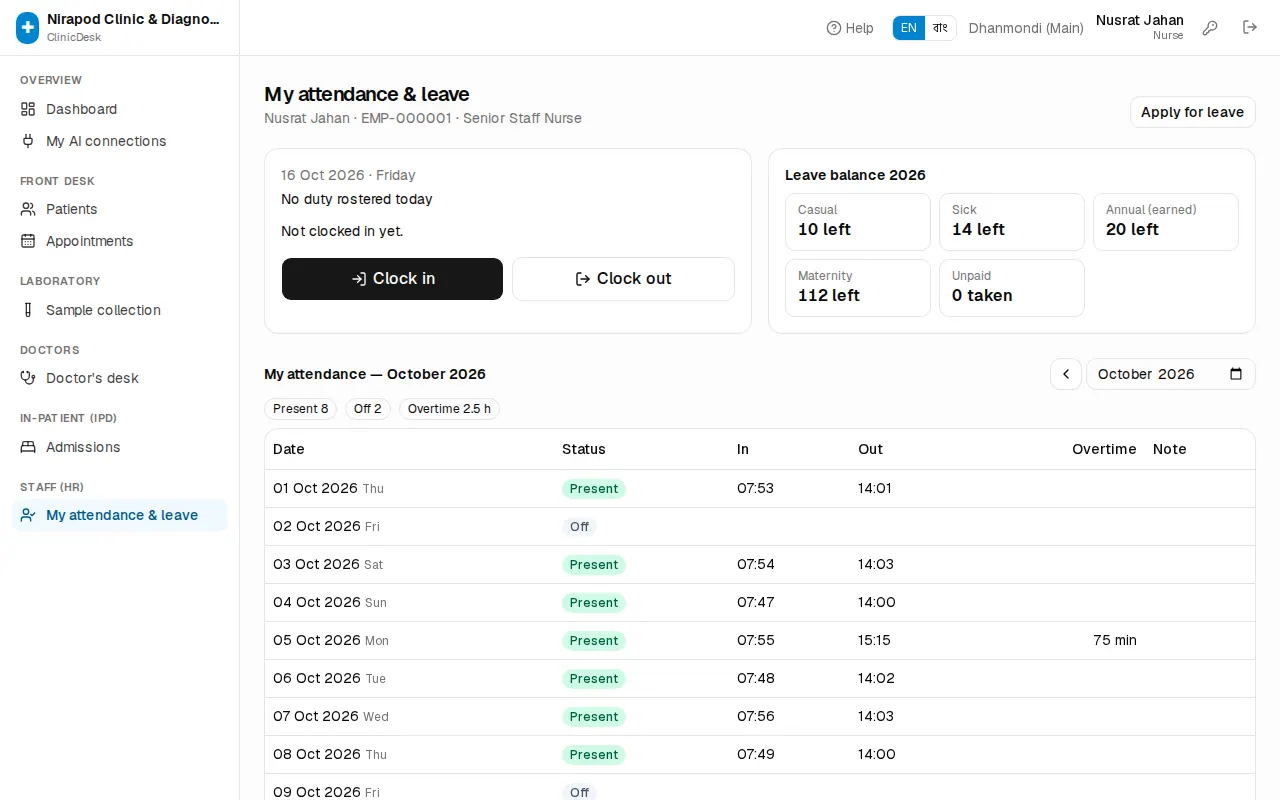
When you arrive for duty:
- The top box shows today's duty (e.g. Morning 08:00–14:00 · Ward 3). If you are not on the roster it says "No duty rostered today".
- Press the big Clock in button. "Clocked in" appears with the time. After the shift start plus the grace minutes you are marked Late.
- At the end of duty press Clock out. It works for a night shift that ends the next morning too.
Applying for leave:
- Press Apply for leave.
- Choose the Leave type — Casual, Sick, Annual (earned), Maternity or Unpaid.
- Set From and To. For half a day tick Half day (single date only).
- Write the Reason and press Send request.
Weekly off days and holidays inside the dates are not counted. The Leave balance box shows, per type, how many days you have taken, have left and have pending. Until a decision is made you can Withdraw a request under My leave requests.
Lower down are this month's attendance and My payslips — once a salary is paid, use Print payslip to get your own payslip.
Adding and editing employees
Staff (HR) › Employees lists everyone with department, branch, mobile, joining date and gross monthly salary. The top shows the Active staff count and the Monthly gross salary.
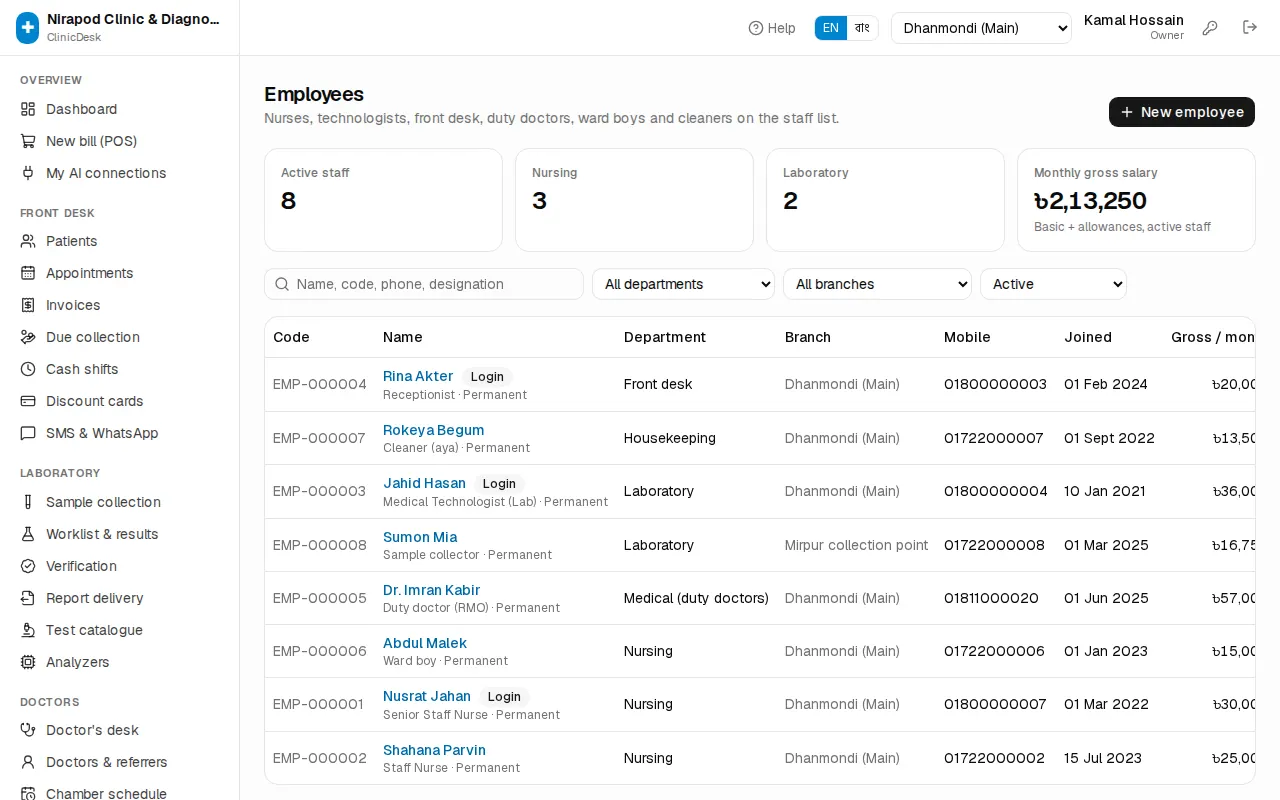
- Press New employee.
- Personal: Full name \*, mobile, sex, NID, blood group, emergency contact, address.
- Job: Designation (e.g. Senior Staff Nurse), Department (e.g. Nursing), Employment type, branch, Joining date.
- Linked login — if the person has a ClinicDesk login, pick it so they can clock in and apply for leave themselves. For a salaried duty doctor / RMO pick the Linked doctor profile.
- Monthly salary (৳): Basic, House rent, Medical, Conveyance, Other allowance, Overtime / hour. (Salary fields only show for users allowed to see payroll.)
- For salary by bank or bKash/Nagad fill Bank name & branch, Bank account no., bKash / Nagad no.
- Press Add employee.
When someone leaves, open their record, set Left on and untick Active. Inactive staff drop off the attendance sheet, roster and payroll, but their history stays. Choose Inactive / left in the list filter to see them.
Duty roster
Staff (HR) › Duty roster holds the weekly duties, Saturday to Friday. Rosters are per branch — switch branch from the header.
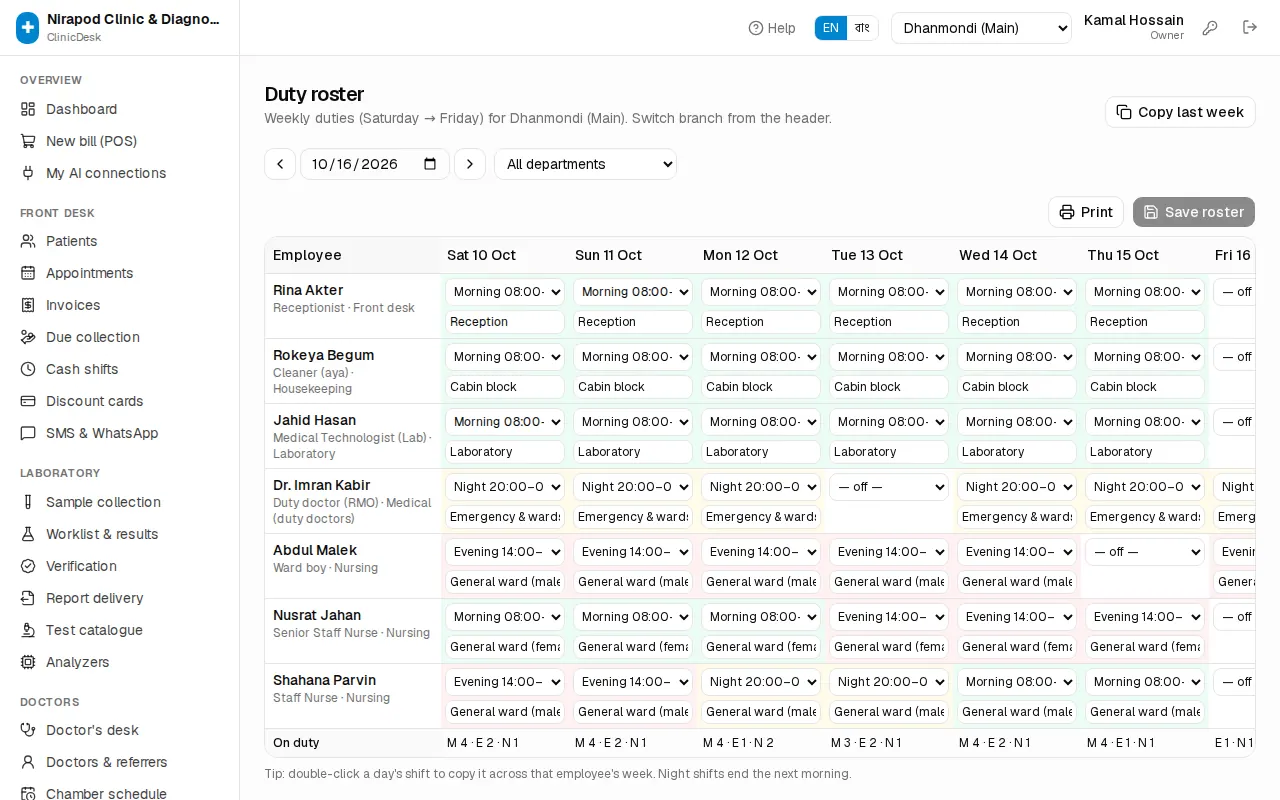
First time: define the shifts. In the Duty shifts section press Add shift — a name (e.g. Morning), Starts, Ends and Grace (min). An end time earlier than the start (20:00 → 08:00) ends the next morning.
The week's roster:
- Pick the week in Week of. Filter by department if you like.
- In each employee's cell for each day choose a shift, or — off —. Type the ward in Ward / posting.
- Double-click a day's shift to copy it across that employee's whole week.
- Press Save roster. Until you do, the top shows how many changes are unsaved.
If every week is the same, press Copy last week — this week's roster is replaced with last week's. Press Print for the notice board.
Daily attendance
Staff (HR) › Attendance has two views: Daily sheet and Month grid.
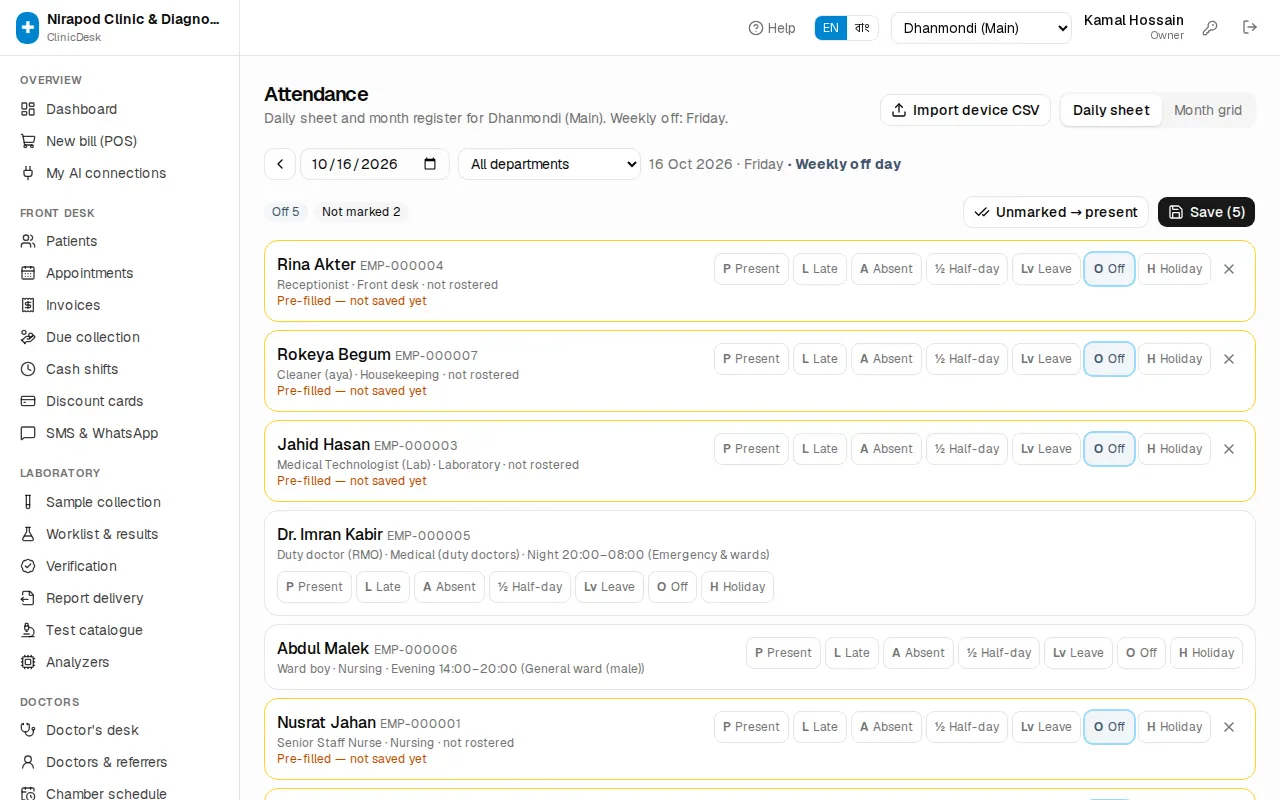
Daily sheet:
- Pick the date (today is the default).
- Each employee has status buttons: P Present, L Late, A Absent, ½ Half-day, Lv Leave, O Off, H Holiday (narrow screens show only the letters). Enter in and out times and late and overtime are suggested from the rostered shift.
- Staff who pressed Clock in themselves, or came from the fingerprint device, are already filled in.
- If almost everyone is present press Unmarked → present, then fix the few others.
- Press Save ({n}) — the number is how many rows changed.
Employees on approved leave show the leave type on their row.
Month grid: every employee's letter code for every day of the month (P, L, A, ½, Lv, O, H). Click a day number to open that day's sheet. Print it as the attendance register.
Fingerprint device: press Import device CSV and choose the CSV exported from the device (columns: employee code, date, in, out). Codes may be EMP-000007 or just 7. At the end it shows how many rows were read, imported and skipped.
Approving leave
At the top of Staff (HR) › Leave is Waiting for a decision.
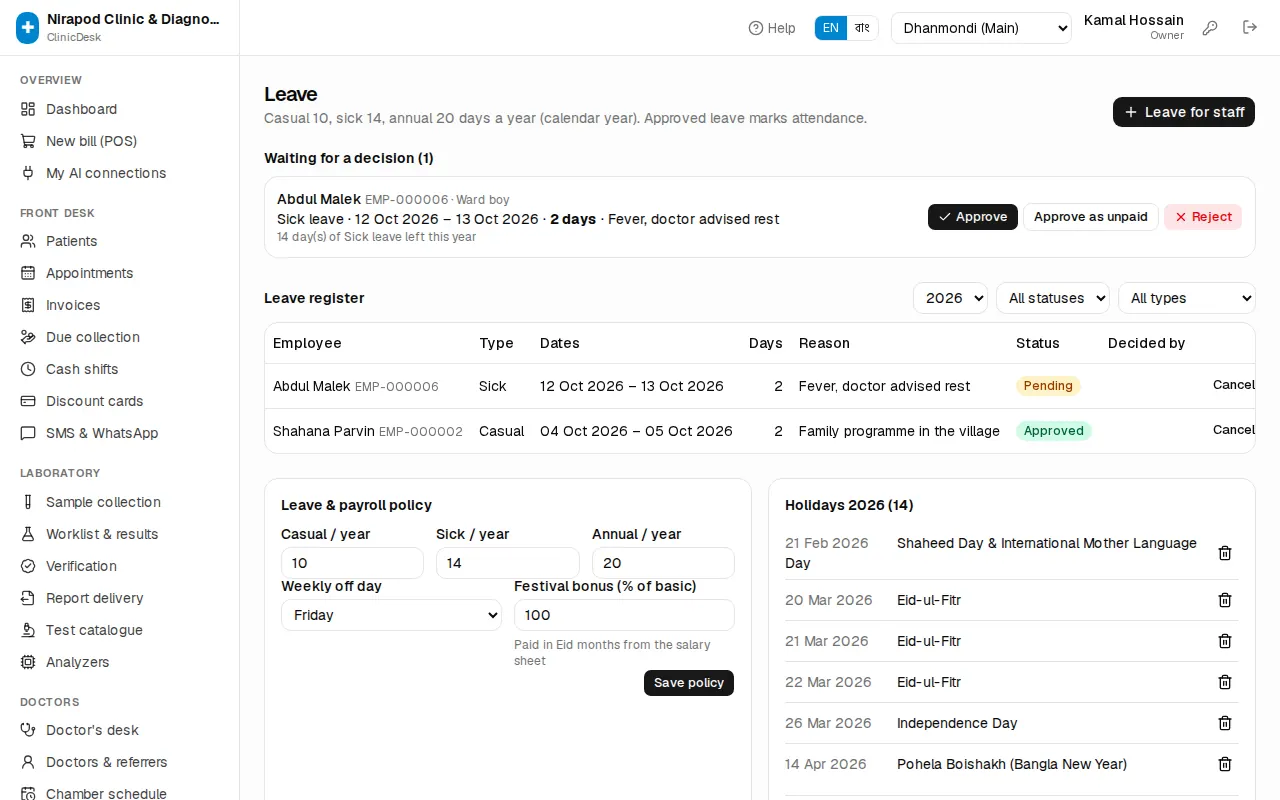
- Each request shows the type, dates, reason and how many days of that type are left.
- Press Approve. If the balance is not enough a warning shows; you can then Approve as unpaid (salary is deducted).
- Otherwise press Reject.
Approved leave marks attendance as "Leave" by itself. If someone cannot apply themselves, use Leave for staff to apply on their behalf.
Further down are the Leave register (every request, filter by status), Leave & payroll policy (Casual / year, Sick / year, Annual / year, Weekly off day, Festival bonus (% of basic)) and the year's holidays. Add the holidays (Eid and so on) at the start of the year and press Save policy after changing the policy.
Salary sheet and payslips
On Staff (HR) › Salary & payroll pick the month. The top line shows the month's working days (days − weekly offs − holidays).
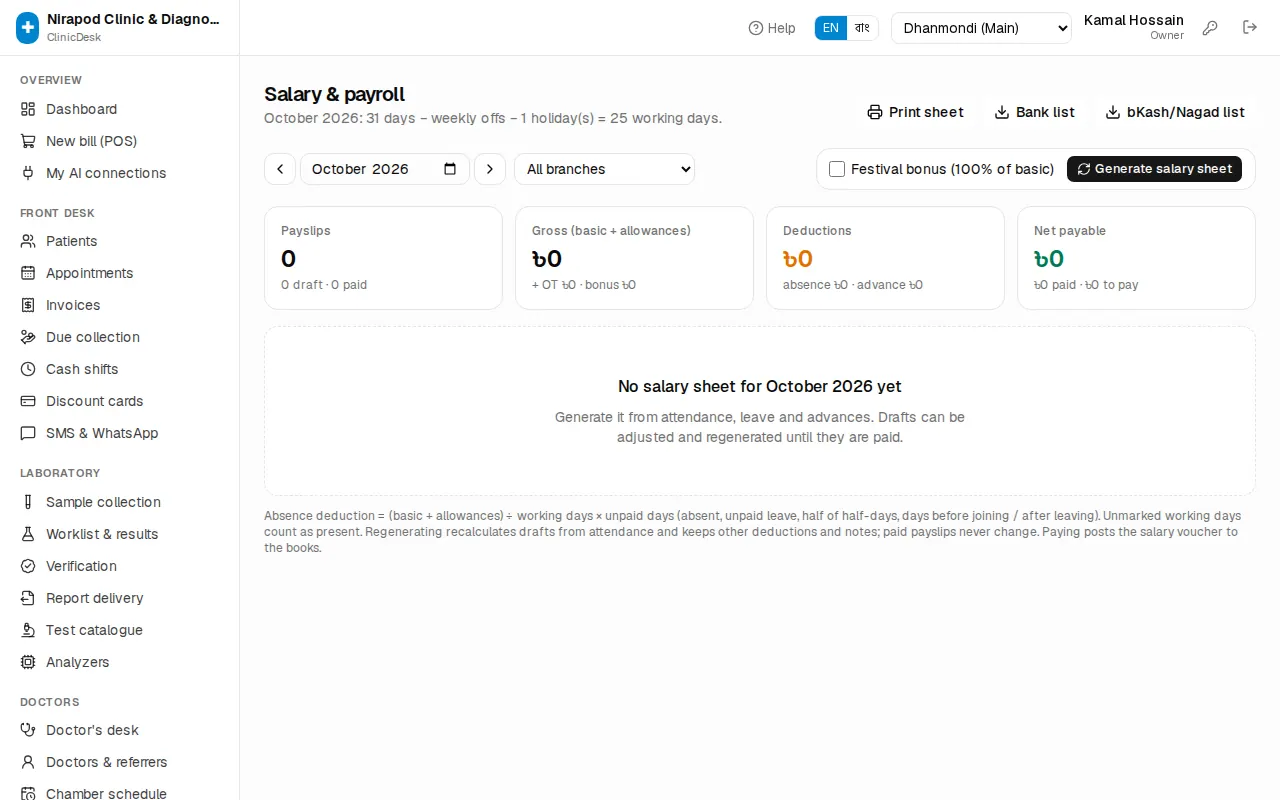
- First check that the month's attendance and leave are complete.
- In an Eid month tick Festival bonus.
- Press Generate salary sheet. Every active employee gets a Draft payslip: working/present/paid-leave/unpaid days, overtime, allowances, bonus, absence deduction, advance recovery and Net pay.
- To change someone's bonus or deductions press the pencil on their row — Bonus (৳), Other deduction (৳), Advance recovery (৳) and Note (printed on the payslip).
- If attendance is corrected later press Regenerate drafts — drafts are recalculated and your deductions and notes are kept.
- To pay: Select all drafts (or tick a few), choose the Payment method and press Pay selected. To pay one person, press the banknote icon on their row, choose Paid by and press Pay.
A paid payslip turns Paid and the salary voucher posts to the books. Use Print payslip on each row; Print sheet at the top prints the whole sheet. To send salaries by bank or mobile wallet, download the Bank list and bKash/Nagad list.
Absence deduction = (basic + allowances) ÷ working days × unpaid days (absent, unpaid leave, half of half-days, days before joining or after leaving).
Salary advances
Staff (HR) › Salary advances records money advanced against salary and recovers it month by month.
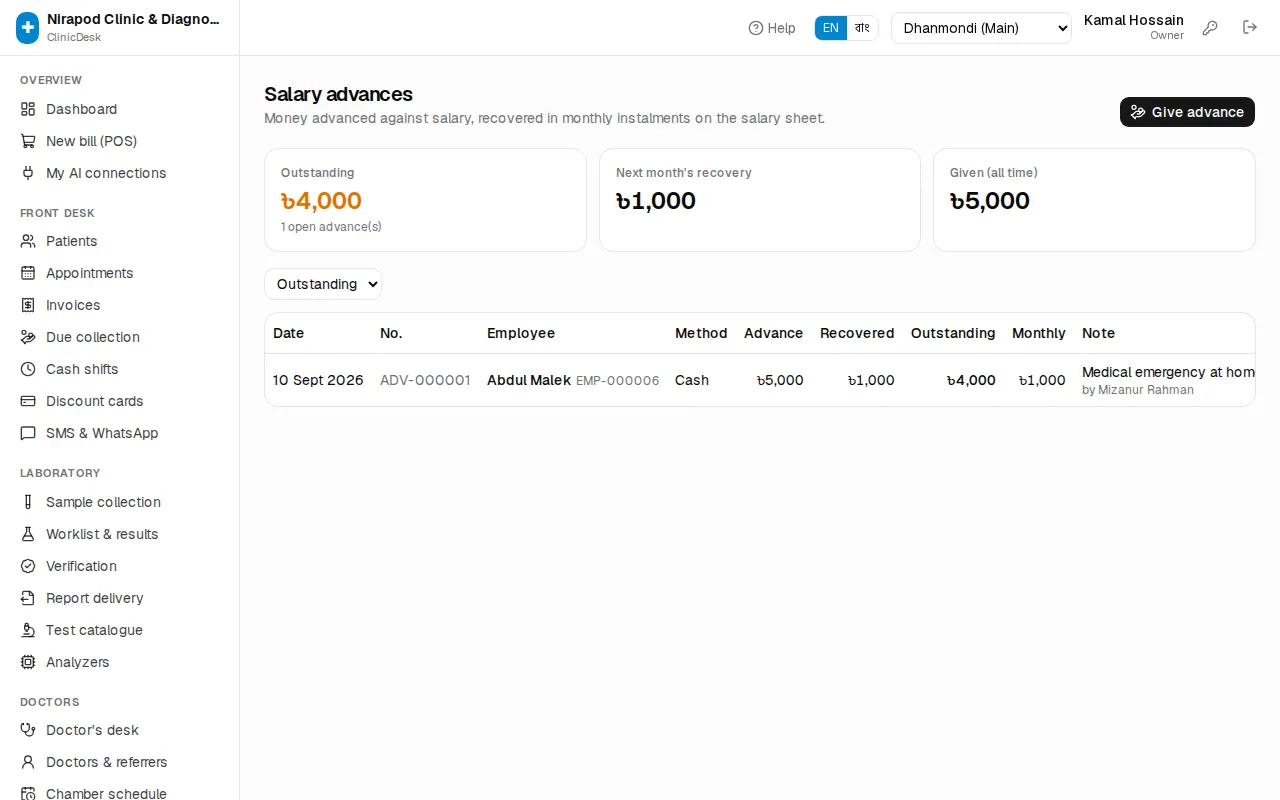
- Press Give advance.
- Choose the employee and enter the Amount (৳).
- Recover per month (৳) — how much to deduct from each salary. Leave it empty to recover everything from the next salary.
- Set Paid by, Date and a Note (e.g. Child's admission fee) and save.
The cards show Outstanding, Next month's recovery and Given (all time). Generating the salary sheet deducts the instalment automatically. Change an instalment with the pencil on the row; Full history shows every advance.
Attendance, leave, payroll cost, overtime and outstanding advance reports are under Reports › Staff & HR — see Reports. How the salary vouchers reach the books is in Expenses, doctor commission & accounting.
Chapter 15 · Reports
Reports & dashboard
What the dashboard numbers mean, which report answers which question, date and branch filters, CSV export and printing
ClinicDesk keeps no separate registers — every report is built from the bills, lab work, OPD, admissions, expenses and salaries you already record. This chapter covers reading the dashboard, finding a report, filtering it, and printing or exporting it.
The Owner, Manager and Accountant can see reports. Someone tied to one branch sees only their branch; a few clinic-wide reports (such as patient registrations and commission rules) are not in their list.
Dashboard numbers
Open Overview › Dashboard. Under the "Welcome" heading are the branch name and today's date. Owners, managers and accountants can pick their branch or All branches in the drop-down on the right — the numbers follow. Money figures are only shown to users who may see bills or reports.
- Billed today — the value of today's bills, the number of bills and how many were cancelled.
- Collected today — money received today, split by payment method (dues of older bills collected today are included).
- Due on today's bills — what is still unpaid on today's bills.
- Refunds today — money returned to patients today.
- All outstanding dues — the total due on all bills of every day.
- Laboratory now — Waiting for sample, In process, Awaiting verification, Ready, not delivered, Overdue (past due time) and Critical results today.
- New patients today, OPD appointments today (seen and waiting), Beds occupied and Beds free.
- The Last 14 days chart — billed, received and refunds per day.
- Top tests this month and OPD today by consultant.
Opening a report
Go to Finance › Reports in the sidebar. Reports are grouped: Billing & cash, Laboratory, Doctors, Patients, OPD & IPD, Corporate & cards, Finance, Staff & HR and Audit. Each card shows the report name and a one-line description.
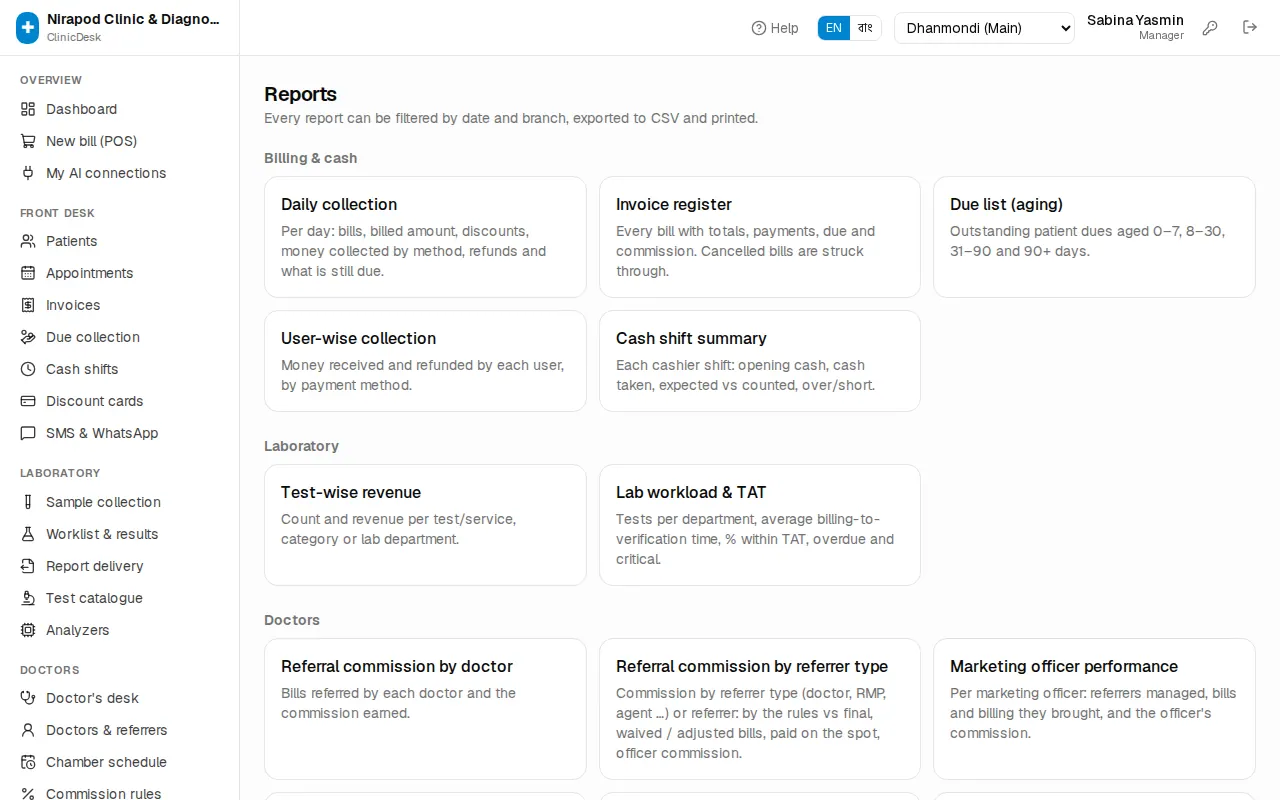
The Doctors group also has a Doctor payouts card and the Audit group an Audit log card (if you have access) — they open those pages directly.
Click a card to open the report. The Reports link at the top takes you back to the list.
Filters: date, branch and view
Under the report title is a row of filters:
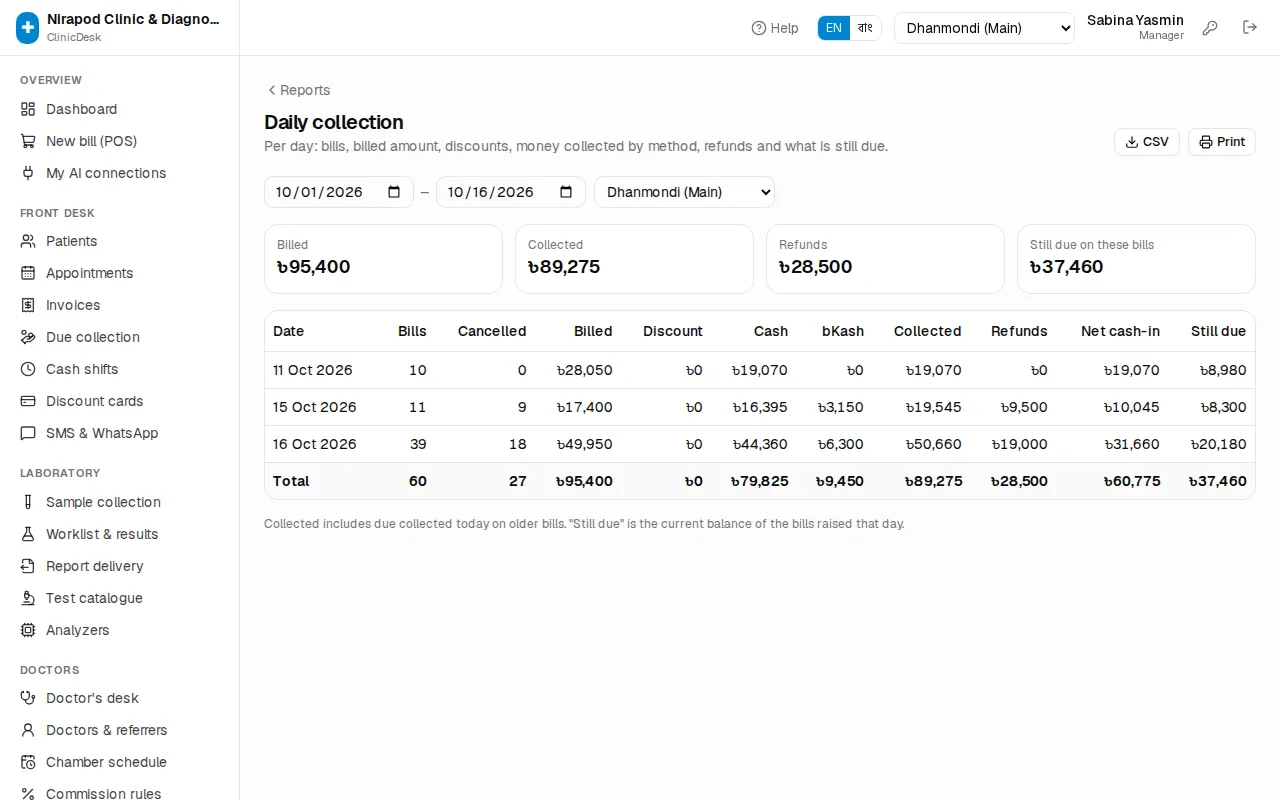
- Dates — two date boxes (from – to). The report reloads as soon as you change a date; there is no separate button. Reports that are "as of today" (such as Due list (aging)) have no date boxes.
- Branch — with more than one branch, pick one branch or all.
- View — some reports have extra choices, e.g. Group by (test / category / department), Per (day / month), Show (summary or Every entry), Bills (all / active / with due / cancelled).
Summary tiles come first, then the table with a totals row. If nothing matches, "Nothing to show" appears — change the dates or filters.
Printing and CSV
Every report has two buttons at the top right:
- CSV — downloads the table as a CSV file. Open it in Excel or Google Sheets for your own calculations.
- Print — opens the browser's print dialog. The printout carries the clinic name, report name, branch, dates and filters, plus who printed it and when. For a PDF choose "Save as PDF" in the print window.
The accounting pages (trial balance, income statement, balance sheet, ledger) are not in the report list, but they have the same CSV and Print buttons — see Expenses, doctor commission & accounting.
Which report answers which question
| Question | Report |
|---|---|
| How much was billed and received today / this month, and by which method? | Daily collection |
| Which bills have dues, which were cancelled? | Invoice register |
| Who owes money, and for how long? | Due list (aging) |
| How much did each receptionist take in? | User-wise collection |
| Which shift was short or over? | Cash shift summary |
| Which tests earn the most? | Test-wise revenue |
| Are lab reports on time? | Lab workload & TAT |
| Which doctor referred how many patients, and what commission? | Referral commission by doctor, Referral commission by referrer type |
| What business did the marketing officers bring? | Marketing officer performance |
| What commission rule applies to whom? | Commission rules |
| How are consultation fees split with doctors? | Consultant share by doctor |
| What do we still owe each doctor? | Doctor payable balances |
| How many new patients per day? | Patient registrations |
| How many patients did each consultant see? | OPD appointments by doctor |
| How full are the beds? | IPD admissions & bed occupancy |
| What does each company owe us? | Company outstanding (aging), Company billing by period, Company settlements |
| How many discount cards were sold, how much discount given? | Discount card sales, Card discount given |
| Where did the money go? | Expenses by category |
| What is the month's profit on a cash basis? | Income summary |
| Who was present or absent, and how often? | Monthly attendance summary |
| Who was on leave, and when? | Leave register |
| What do salaries cost per month? | Salary sheet & payroll cost, Overtime |
| Who still owes a salary advance? | Salary advances outstanding |
| Who cancelled a bill or gave a refund? | Cancelled bills & refunds |
| Who gives how much discount? | Discounts given by user |
A daily and monthly routine
Every evening (manager):
- Daily collection for today. Match the cash, bKash and card totals.
- Cash shift summary — follow up at once on any shift that is short or over.
- Cancelled bills & refunds — check the reason and the user for every cancellation.
Every week:
- Lab workload & TAT — which department is running late.
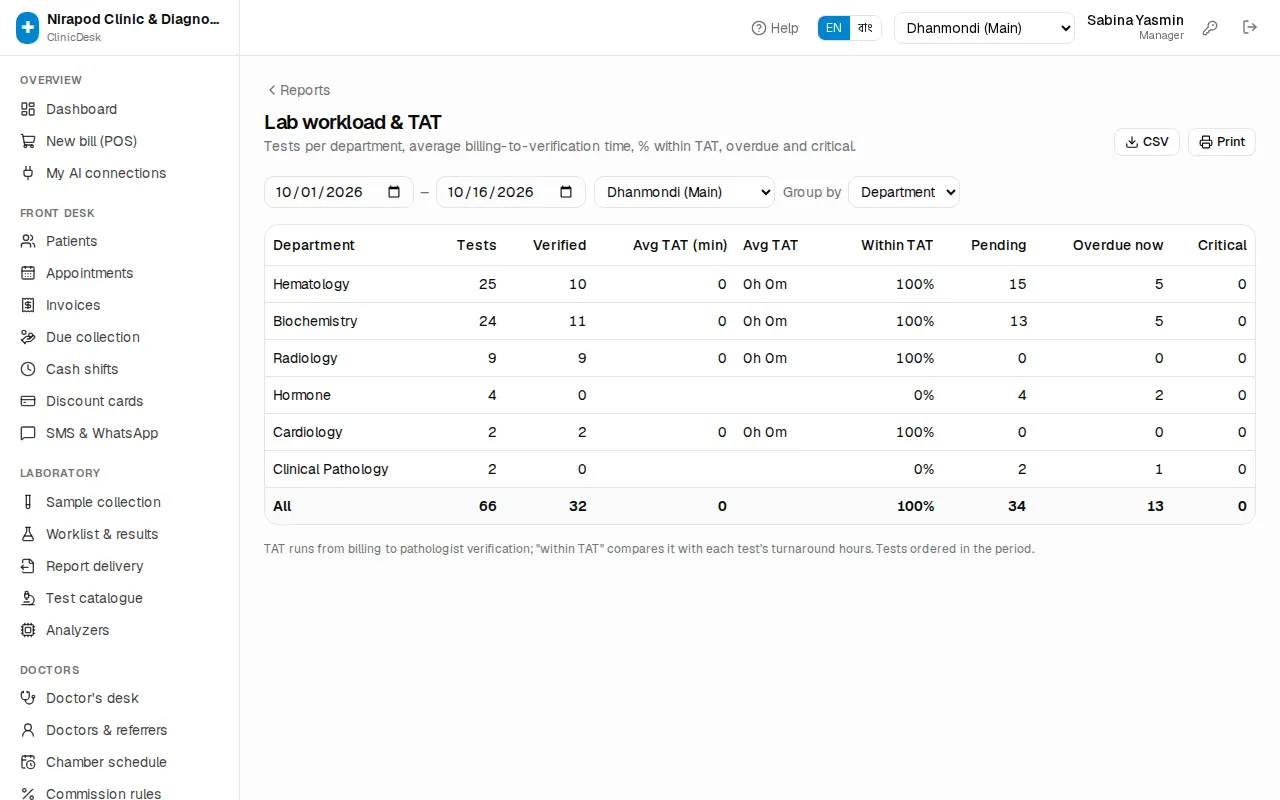
- Due list (aging) — phone patients whose dues are older than 30 days.
At month end (owner and accountant):
- Income summary (Per: Month) — collections − refunds − expenses − doctor payouts = net cash income.
- Doctor payable balances — what is owed to whom; then pay as described in Expenses, doctor commission & accounting.
- Company outstanding (aging) — ask corporate clients for payment.
- Salary sheet & payroll cost — salary cost per department.
- Discounts given by user — is anyone giving too much discount?
To see who did what and when (cancelled bills, price changes, new users), the owner can open Admin › Audit log — see Owner setup.
Chapter 16 · Help
Troubleshooting & FAQ
Answers to common problems: sign-in, no access, features not in your plan, licence locks, cash shifts, cancelling bills, reports missing on the portal, printing, SMS, analyzers and slow internet
If you get stuck, check this page first. For each problem you'll find what the screen says and what to do. If that doesn't solve it, see Contacting support at the end.
Cannot sign in
You sign in with your Mobile number and Password, then press Sign in. Act on what the screen says:
| What the screen says | Meaning | What to do |
|---|---|---|
| "Wrong phone number or password" | The number or password didn't match | Type the 11-digit number (01XXXXXXXXX) carefully. Passwords are case-sensitive; check Caps Lock is off. |
| "Too many attempts. Wait 15 minutes and try again." | More than 10 wrong tries in 15 minutes | Wait 15 minutes. Trying again sooner won't work. |
| "This account is disabled. Contact your clinic owner." | The owner deactivated your user, or the whole clinic account is off | Tell the owner. Once they press Activate next to your name in Admin › Users & roles, you can sign in again. |
Forgot your password
There is no "forgot password" button on the sign-in page. The clinic owner sets a new one:
- The owner opens Admin › Users & roles.
- They click the key icon on your row. The New password for {name} window opens.
- They type a New password (at least 6 characters) and press Set password.
- "Password changed; the user is signed out everywhere" appears. The owner gives you the new password privately.
After signing in, choose your own password: click the key icon in the header to open Change my password, fill in Current password, New password and Repeat new password, and press Change password. Your other devices are signed out.
The "No access" page
If a page shows "No access" with "Your role doesn't allow this page. Ask the clinic owner if you need it.", that page is not part of your role. For example, a receptionist cannot open the accounting pages and a lab technologist cannot cancel bills. Press Go to dashboard to go back.
"You don't have permission to do that" after pressing a button means the same thing. For example:
- Cancelling a whole bill, refunds and discounts above the limit are for a manager (or the owner). A receptionist who gives too much discount sees "Discount above {pct}% needs a manager".
- Verifying and amending reports is for the pathologist only.
- Settings, users and integrations are for the owner only.
If you need something your role doesn't allow, ask the owner. They can change your role in Admin › Users & roles, where the What each role can do table lists every permission. Details: Owner setup.
The "not part of your plan" page
A page that says "{name} is not part of your plan" means the clinic's licence doesn't include that feature (for example IPD, HR or online payments). It is not an error; everything else keeps working.
- The owner sees: "Contact JonakiSoft to add it to your licence. Everything else keeps working."
- Other staff see: "Ask the clinic owner, or contact JonakiSoft to add it to the licence."
If JonakiSoft has turned the feature on but the page still doesn't open, the owner goes to Admin › Settings, finds Licence & features and presses Sync licence now. The licence is also checked once a day by itself. Details: Payments, licence & AI.
Licence expired or locked
Yellow banner: "Your licence has expired"
A yellow banner at the top of every page saying "Your licence has expired. ClinicDesk keeps working until {date}; please renew." means the licence is in its grace days. Everything works normally until that date. Click Details in the banner for the support phone, WhatsApp and email. The owner should renew before that date.
The licence lock page
When the grace days are over, or the licence is suspended or revoked, a single page appears after sign-in. Its title is one of "Your licence has expired", "Your licence is suspended", "Your licence has been revoked" or "No licence found for this clinic".
- Don't panic: "All your patients, bills, lab reports and accounts are saved. They open again as soon as the licence is active. The patient portal and online booking are paused until then."
- The owner contacts us using the phone / WhatsApp / email on the page to renew. Other staff tell the owner.
- Meanwhile patients who open the report portal see "This clinic's online services are paused. Please contact the clinic." Hand reports over at the counter.
After renewing, the owner can press Sync licence now to unlock at once.
Cash shifts
"You have no open cash shift"
If the new bill (POS) page shows the warning "You have no open cash shift — payments won't be counted in a drawer.", you can still bill, but the money you take is not counted in any drawer, and the cash won't reconcile at the end of the day. So before you start:
- Go to Front desk › Cash shifts (or press Cash shift on the POS page).
- Press Open shift, count the drawer and enter Opening cash (৳), then press Open shift again.
Errors when opening or closing a shift
- "You already have an open shift": your earlier shift is still open. Close it first, or keep working in it.
- "This shift is already closed": it was closed already (perhaps in another tab). Refresh the page.
- "Only a manager can close someone else's shift": only a manager can close another person's shift.
When closing, enter Counted cash (৳) and the Difference is shown. Expected in drawer = opening cash + cash received − cash refunded − referral commission paid in cash. For mismatches see Billing & payments.
A bill or test cannot be cancelled
Open the bill and press Cancel bill (the whole bill) or Cancel tests (some tests / services). If it doesn't work:
- The button is missing: cancelling bills and refunds is for a manager or the owner only.
- "Give a reason": a reason is required.
- A test whose report is already verified can't be cancelled: "… is already reported — it can't be cancelled". The dialog also warns "Not possible once a report is verified." If the report is wrong, the pathologist amends it.
- "The company has already settled part of this bill — reverse that settlement first": a corporate client already paid part of this bill. Reverse that settlement first (Memberships & corporate billing).
- "This bill is cancelled" / "Already cancelled": the bill was cancelled earlier.
A patient can't see the report on the portal
Patients open /r and enter the bill number and the 6-digit report PIN printed on their money receipt. What they may see, and why:
| What the patient sees | Cause and fix |
|---|---|
| "Enter the bill number and the 6-digit PIN printed on your receipt" | The bill number or PIN is incomplete. The PIN is exactly 6 digits. |
| "No report found for that bill number and PIN" | Wrong number or PIN. Check the receipt and type again. |
| "Your reports are not ready yet. Please check again later." | Not verified yet. With Pathologist verification required on, a report shows only after verification. Check with the lab. |
| "Please clear the due of {amount} at {clinic} to receive your reports." | Full payment before delivery is on and the bill has a due. Collect it; with online payments on, the patient can pay from the portal. |
| "Too many attempts. Please wait 15 minutes and try again." | Too many wrong tries. Ask them to try after 15 minutes. |
| "Please open the report link from your clinic (the bill number exists at more than one clinic)" | Ask the patient to use the link from the SMS or receipt. |
| "… does not offer online reports. Please collect your report from the counter." | Online report portal is off in Admin › Settings, or the feature is not in your plan. |
If the patient lost the PIN, open the bill at the counter and reprint the receipt. Details: Patient portal.
Printing: receipts, labels and reports
Everything in ClinicDesk prints through the browser's print dialog, so any printer works.
- The receipt / invoice doesn't open: after saving, Print invoice opens in a new tab. If nothing opens, the browser blocked the pop-up. Allow pop-ups for this site with the icon at the right of the address bar. Tick Print invoice after saving on the POS to open it automatically every time (remembered per computer).
- Wrong size or cut off: the owner opens Admin › Settings, section Receipts, and sets Paper size to 80 mm thermal or A4 / half A4. In the print dialog keep scale at 100% and margins "None".
- Sample barcode labels: Sample labels or Print labels opens the label page, which says "(label printer paper: 50 × 25 mm)". Set 50 × 25 mm as the paper size in the label printer's driver. If barcodes don't scan, raise the printer's darkness and keep scale at 100%.
- Lab report overlaps a pre-printed pad: in Settings › Lab reports, turn off Print letterhead. "Off: leave a blank top margin for pre-printed pads."
- A report that won't print or deliver may not be verified yet: "Results can't be printed or delivered until verified."
SMS not sent
Front desk › SMS & WhatsApp shows the Status of every message:
- Not sent (no gateway): no SMS gateway is set up. The page says "No SMS gateway is set up, so messages are logged but not sent. You can still send any of them through WhatsApp with the link." The owner sets up an SMS gateway in Admin › Integrations.
- Queued: waiting to go; it will be sent shortly.
- Failed: the gateway refused it. The reason is shown (for example, no balance). Fix it and press Retry now.
- A patient without a number gives "No mobile number on file"; a bad number gives "Not a valid Bangladeshi mobile number". Correct the number in the patient's profile.
To check the gateway, the owner can press Send test SMS on the Integrations page ("Save the settings first — the test uses what is saved."). Bangla SMS fit 70 characters per part, so they cost more. Details: SMS & WhatsApp.
Analyzer results don't arrive
Open the machine in Laboratory › Analyzers.
- If Last seen says "never" or a long time ago, the bridge on the lab PC isn't running. Check the PC is on, online, and the bridge is started. The command to run it is on the page (with the key).
- If the Message log says "No messages yet — start the bridge, or send a test message.", nothing has come from the machine. Check its cable and port settings.
- A message marked Unmatched or Partial has a sample ID or test code that didn't match. Map the codes listed after "Unmapped:" under Code mapping, then press Re-process.
- "no specimen ID" means the machine ran the sample without reading the barcode. Scan the label and run again, or type the result by hand.
Details: Laboratory.
Slow internet or "Something went wrong"
ClinicDesk works over the internet; bills and results can't be saved without it.
- After pressing save, while the button shows "…" (for example "Saving…"), wait. Don't press again.
- If you see an error ("Something went wrong" or "Request failed"), check Front desk › Invoices before billing again: the bill may already have been created. Billing again without checking can give the patient two bills.
- Restart the router; if possible keep a mobile-data hotspot as a backup.
- Very old browsers cause problems. Use an up-to-date Chrome or Edge.
Bangla text and language
- Switch language with the EN | বাং switch in the header. Your choice is saved on your account.
- The owner sets what new staff see with Default language in Settings. Each user can also have their own Language in Users & roles.
- If Bangla letters look broken or show boxes, update the browser. ClinicDesk loads its own Bangla font (Hind Siliguri), so nothing needs installing. On slow internet the font may take a moment the first time.
- A few texts (especially some error messages) still appear in English even in Bangla mode. That is expected for now.
- Amounts and bill numbers stay in English digits on bills and receipts, on purpose.
Work done in the wrong branch
Bills, cash shifts, samples, appointments and admissions belong to one branch. The header shows the branch name or a branch drop-down.
- If you can't find a bill or a patient's sample, first check the right branch is selected.
- A user the owner has tied to one branch sees only that branch. If they need others, the owner sets their Branch to "All branches" in Users & roles.
- If a bill was made in the wrong branch, a manager cancels it with a reason and you bill again in the right branch. Patients are shared by all branches, so no new registration is needed.
Contacting support
If this page didn't solve it:
- First tell the clinic owner or manager. Many things (passwords, roles, branches, paper size, SMS gateway) they can fix themselves.
- The owner contacts JonakiSoft support. Phone, WhatsApp and email are on the licence page and on the website's Contact page, where you can also use Send us a message.
- When you get in touch, give: the clinic name, which page you were on and what you were doing, what the screen said (a screenshot is best), and the bill number if there is one.
Chapter 17 · Help
Glossary
Plain meanings of the words used in ClinicDesk and clinic bookkeeping: OPD, IPD, MRN, due, referrer, sample, verification, TAT, admission, discount card, settlement, cash shift, trial balance, licence and more
If a word in the software or in this guide is unfamiliar, look it up here. Terms are grouped by topic. The Bangla word the app shows is given in brackets, because many staff know the Bangla word better. The last column points to the chapter that explains it.
Patients and front desk
| Term | Meaning | See |
|---|---|---|
| Patient (রোগী) | A person registered with the clinic. Once registered, the same patient is shared by all branches. | Reception |
| MRN (এমআরএন) | Medical Record Number: each patient's own number. You can search by it; it is printed on receipts and reports. | Reception |
| OPD (ওপিডি) | Out-Patient Department: patients who see a doctor or do tests and go home the same day. | Reception |
| Appointment (অ্যাপয়েন্টমেন্ট) | A booking with a doctor for a given day. | Reception |
| Serial / Token (সিরিয়াল / টোকেন) | The patient's number in a doctor's queue. The token can be printed and handed to the patient. | Reception |
| Check in (চেক-ইন) | The patient has arrived; they now appear in the doctor's Waiting list. | Reception |
| No-show (আসেননি) | Booked, but the patient didn't come. | Reception |
| Online booking (অনলাইন বুকিং) | Patients take a serial themselves from the clinic's web page. | Patient portal |
Bills and money
| Term | Meaning | See |
|---|---|---|
| Bill / Invoice (বিল / ইনভয়েস) | The total of everything a patient was charged, with a number such as INV-000123. | Billing & payments |
| New bill (POS) (নতুন বিল (পিওএস)) | The billing counter screen. | Billing & payments |
| Money receipt (টাকার রসিদ) | Proof of each payment taken. One bill can have several receipts. | Billing & payments |
| Due (বাকি) | The part of a bill not paid yet. | Billing & payments |
| Due collection (বাকি আদায়) | Taking payment of an older bill's due. | Billing & payments |
| Discount (ছাড়) | Money taken off the bill. Receptionists have a limit; more needs a manager. | Billing & payments |
| Refund (ফেরত) | Paying money back to the patient, for example when a test is cancelled. | Billing & payments |
| Cash shift (ক্যাশ শিফট) | The drawer account for one cashier's working period: opened with Opening cash, closed with a count. | Billing & payments |
| Over / short (বেশি / কম) | The gap between the counted cash and the Expected cash when a shift is closed. | Billing & payments |
| bKash, Nagad, Card (বিকাশ, নগদ, কার্ড) | Ways of taking payment other than cash. | Billing & payments |
| Online payments (অনলাইন পেমেন্ট) | Patients pay their bill from the portal with SSLCommerz, bKash or Nagad; the receipt is added to the bill automatically. | Payments, licence & AI |
| Package (প্যাকেজ) | Several tests / services sold together at one price, such as a health check-up. | Owner setup |
| VAT (ভ্যাট) | Government value added tax. Keep it 0 if your services are VAT-exempt. | Owner setup |
Doctors and commission
| Term | Meaning | See |
|---|---|---|
| Consultant (কনসালট্যান্ট) | A doctor who sees patients at the clinic. | Doctors |
| Chamber schedule (চেম্বার সূচি) | Which days and hours each doctor sits, and how many patients they see. | Doctors |
| Doctor's desk (ডাক্তারের ডেস্ক) | The doctor's page: their queue, vitals and prescriptions. | Doctors |
| Consultation fee (পরামর্শ ফি) | The fee for seeing a doctor. A return visit within the follow-up window charges the follow-up fee instead. | Doctors |
| Consultant share (কনসালট্যান্ট শেয়ার) | The part of a consultation fee that belongs to the doctor; the rest is the clinic's. | Accounting & commission |
| Referrer (রেফারার) | The doctor or person who sent the patient for tests. Shown as Referred by on the bill. | Doctors |
| Referral commission (রেফারেল কমিশন) | The amount paid to the referrer on a bill, worked out from the Commission rules. | Accounting & commission |
| Marketing officer (মার্কেটিং অফিসার) | Staff who look after referrers; they can earn a commission on bills from their referrers. | Accounting & commission |
| Doctor payouts (ডাক্তারদের পেমেন্ট) | Paying doctors and referrers what they have earned. | Accounting & commission |
Laboratory
| Term | Meaning | See |
|---|---|---|
| Sample (স্যাম্পল) | Blood, urine and so on, taken for testing. | Laboratory |
| Sample ID / barcode (স্যাম্পল আইডি) | Each sample's number, printed as a barcode on a 50 × 25 mm label stuck on the tube. | Laboratory |
| Sample collection (স্যাম্পল সংগ্রহ) | Taking the sample from the patient and labelling it. | Laboratory |
| Worklist (ওয়ার্কলিস্ট) | The list of tests waiting in the lab; STAT and urgent come first. | Laboratory |
| Reference range (রেফারেন্স রেঞ্জ) | The normal range for healthy people. Results outside it are flagged Abnormal (Low / High). | Laboratory |
| Critical (ক্রিটিক্যাল) | A dangerous value (critical low / high); the doctor or patient must be told at once. | Laboratory |
| Verification (যাচাই) | The pathologist checks and approves the results. Only verified reports can be printed, delivered or seen on the portal. | Laboratory |
| Amend (সংশোধন) | Re-opening a verified report to correct it; pathologist only. The old values stay in the audit log and the report must be verified again. | Laboratory |
| Report delivery (রিপোর্ট ডেলিভারি) | Handing the report to the patient or sending it online. | Laboratory |
| TAT | Turnaround time: how long from billing until the report is ready. Each test has its target time. | Reports |
| Analyzer (অ্যানালাইজার) | A lab machine that sends results straight into ClinicDesk through the bridge program on the lab PC. | Laboratory |
| Code mapping (কোড ম্যাপিং) | Telling ClinicDesk which of its tests each machine code belongs to. | Laboratory |
| Report PIN (রিপোর্ট পিন) | The 6-digit number on the money receipt; with the bill number it lets the patient see reports online. | Patient portal |
In-patients (IPD)
| Term | Meaning | See |
|---|---|---|
| IPD (আইপিডি) | In-Patient Department: patients who stay admitted at the clinic. | IPD |
| Admission (ভর্তি) | Admitting a patient to a bed; it opens an admission number and a running bill. | IPD |
| Wards & beds (ওয়ার্ড ও বেড) | The clinic's rooms and their beds, each with a daily charge. | IPD |
| Bed board (বেড বোর্ড) | Which beds are free and who is in the others, at a glance. | IPD |
| Running bill (চলতি বিল) | The bill that keeps growing during the stay with bed charges, medicines and tests. | IPD |
| Advance (অগ্রিম) | Money taken in advance at admission or during the stay, deducted on the final bill. | IPD |
| Transfer (স্থানান্তর) | Moving a patient from one bed to another. | IPD |
| Discharge (ছাড়পত্র) | Releasing the patient; the final bill is settled and the Discharge summary printed. | IPD |
Corporate, cards and pharmacy
| Term | Meaning | See |
|---|---|---|
| Corporate & insurance (কর্পোরেট ও ইনস্যুরেন্স) | A company or insurer that pays all or part of its people's bills later. | Memberships & corporate |
| Company share / patient share | On a corporate bill, how much the company pays and how much the patient pays. | Memberships & corporate |
| Credit limit (ক্রেডিট সীমা) | The most a company may owe at one time. | Memberships & corporate |
| Authorisation no. (অনুমোদন নং) | The insurer's or company's approval / claim number; required on bills for some companies. | Memberships & corporate |
| Settlement (সেটেলমেন্ট) | Money received from a company and which bills it was allocated to. | Memberships & corporate |
| Discount card (ডিসকাউন্ট কার্ড) | A card sold to a patient or family (for example MEM-000001) that gives a set discount on bills until it expires. | Memberships & corporate |
| Plan (প্ল্যান) | A kind of card: its price, discount rate and validity. | Memberships & corporate |
| Renewal (নবায়ন) | Extending a card after it expires. | Memberships & corporate |
| Pharmacy payable (ফার্মেসির পাওনা) | Medicines the linked PharmaDesk pharmacy charged to admitted patients' bills; the clinic collects them and pays the pharmacy. | Pharmacy link |
Accounting and expenses
| Term | Meaning | See |
|---|---|---|
| Expenses (খরচ) | Entries for spending such as rent, electricity or reagents. | Accounting & commission |
| Journal voucher (জার্নাল ভাউচার) | One accounting entry: which account is debited and which credited. Bills, payments and expenses create them automatically. | Accounting & commission |
| Debit / Credit (ডেবিট / ক্রেডিট) | The two sides of double-entry bookkeeping. In every voucher both sides add up to the same amount. | Accounting & commission |
| Chart of accounts (হিসাবের তালিকা) | The list of all accounts: cash, bank, income, expenses, receivables and so on. | Accounting & commission |
| General ledger (সাধারণ খতিয়ান) | Every transaction of one account and its balance. | Accounting & commission |
| Trial balance (রেওয়ামিল) | The balances of all accounts; when total debits equal total credits, the books are in balance. | Accounting & commission |
| Income statement (আয় বিবরণী) | Income, expenses and profit / loss for a period. | Accounting & commission |
| Balance sheet (স্থিতিপত্র) | The clinic's assets, liabilities and equity on a date. | Accounting & commission |
Staff and salary
| Term | Meaning | See |
|---|---|---|
| Employees (কর্মচারী) | Paid staff; not all of them need to sign in to the software. | HR & payroll |
| Duty roster (ডিউটি রোস্টার) | Who works which shift on which day. | HR & payroll |
| Attendance (হাজিরা) | Each day: present, late, half-day, absent or on leave. | HR & payroll |
| Leave (ছুটি) | Staff leave requests and approvals. | HR & payroll |
| Overtime (ওভারটাইম) | Work beyond the set hours, paid at a set rate. | HR & payroll |
| Salary sheet (বেতনশিট) | One month's salaries for all employees. | HR & payroll |
| Payslip (পে-স্লিপ) | One employee's month in detail: basic, allowances, deductions and net pay. | HR & payroll |
| Salary advance (বেতন অগ্রিম) | Salary paid early, recovered from salary in monthly instalments. | HR & payroll |
Software and licence
| Term | Meaning | See |
|---|---|---|
| Branch (শাখা) | A separate site or collection point of the clinic. Bills, shifts and samples belong to one branch. | Owner setup |
| Role (রোল) | The kind of work a user does (receptionist, doctor, lab technologist…); it decides which pages they see. | Owner setup |
| Audit log (অডিট লগ) | A record of who changed what and when, such as cancelling a bill. | Owner setup |
| Licence (লাইসেন্স) | Your permission from JonakiSoft to use ClinicDesk, with an end date. | Payments, licence & AI |
| Grace (অতিরিক্ত সময়) | A few days after the licence ends when everything still works, so you can renew. | Payments, licence & AI |
| Feature (ফিচার) | A module switched on in your licence (for example IPD, HR). If it's not in your plan, the "not part of your plan" page appears. | Payments, licence & AI |
| Licence sync (সিঙ্ক) | ClinicDesk fetching the licence's latest state from JonakiSoft's server: once a day by itself, or when you press Sync licence now. | Payments, licence & AI |
| AI assistants (MCP) (এআই অ্যাসিস্ট্যান্ট) | A way to let an AI assistant such as Claude or ChatGPT read the clinic's data with your permission. | Payments, licence & AI |
| SMS gateway (এসএমএস গেটওয়ে) | The company that delivers your SMS; without one, messages are only logged. | SMS & WhatsApp |
| Patient portal | The web page for patients: download reports and pay bills online. | Patient portal |