Front desk & billing
OPD billing & payments
Opening a cash shift, billing tests, consultations and services at the counter, referrers, discounts, payment methods, receipts and sample labels, due collection, cancellations and refunds, and closing the shift.
Who it is for:ReceptionistManagerOwnerAccountant
On this page
All of a patient's money goes through the billing counter — tests, doctor's fees, procedures and packages on one bill. Receptionists land on this screen as soon as they sign in. This chapter walks through a whole day: open the shift, make bills, collect dues, cancel or refund when something goes wrong, and close the shift at the end of the day.
In the sidebar: Overview › New bill (POS), and under Front desk: Invoices, Due collection and Cash shifts.
Open a cash shift at the start of the day
A shift is the account of your cash drawer. Money you take is counted in your drawer only while a shift is open.
- Open Front desk › Cash shifts, or use the button next to the yellow message on the billing counter.
- Press Open shift.
- Count the cash in the drawer and type it in Opening cash (৳).
- Press Open shift. You see "Shift opened".
Without a shift the billing counter shows a yellow message: You have no open cash shift — payments won't be counted in a drawer. You can still bill, but the drawer cannot be reconciled at the end of the day.
A new bill, step by step
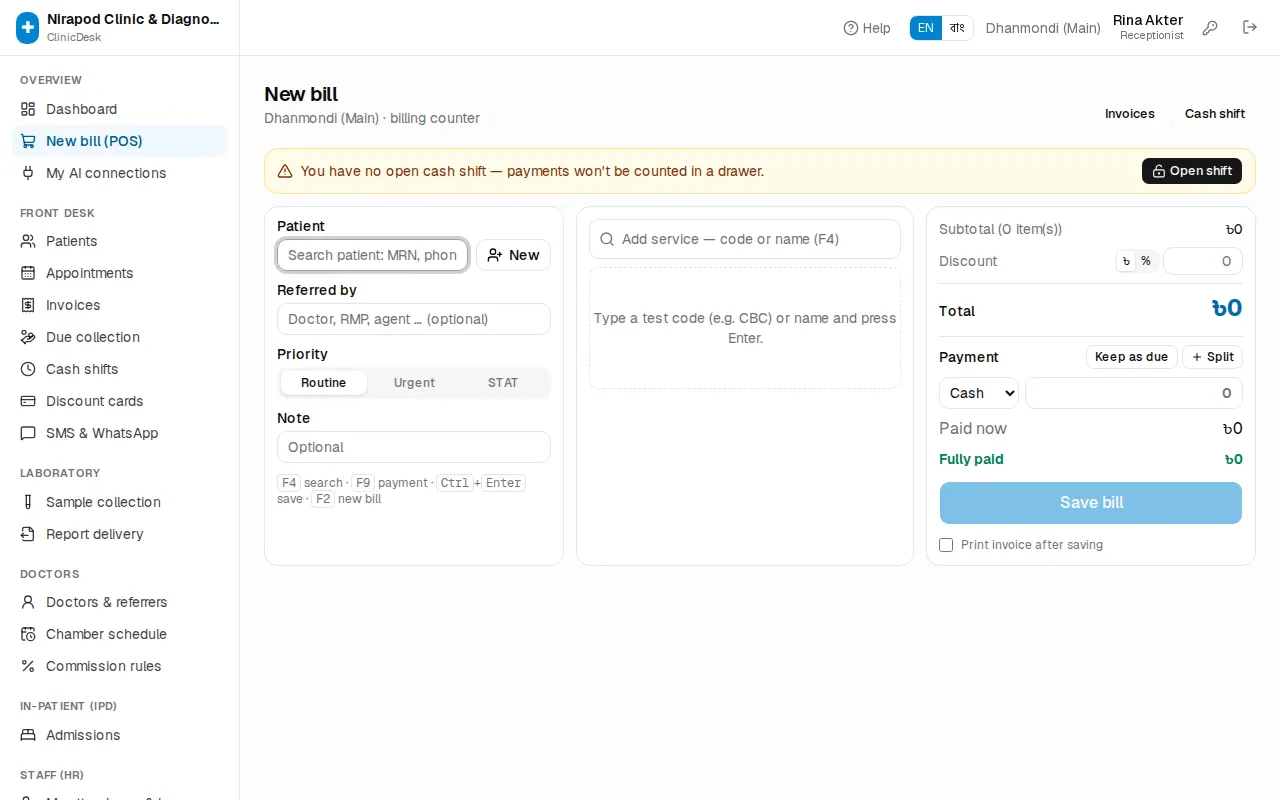
The screen has three parts: patient and referrer on the left, the services in the middle, totals and payment on the right.
- In Patient type an MRN, phone or name and pick the patient. For a new patient press New and register them right there. (See Reception & appointments.)
- In the middle box Add service — code or name (F4) type a test code (e.g.
CBC) or name and pressEnter. When a list appears, use the arrow keys andEnter. Add every service the same way. - When you add a Consultation, a Choose consultant… box appears under it — pick the doctor and their fee fills in. If the patient saw the same doctor recently, Follow-up is ticked for you and the lower fee applies.
- Bed, procedure, medicine and similar lines have a Qty box (Days for a bed). The same test cannot be added twice — you see "… is already on the bill".
- To drop a line, press the bin icon next to it.
- Check the Total on the right. The payment amount follows the total automatically.
- Press Save bill & receive ৳… (or
Ctrl+Enter).
Keyboard shortcuts: F4 service search, F9 payment box, Ctrl+Enter save, F2 new bill.
On a small screen (phone or tablet) the three parts stack one below the other:
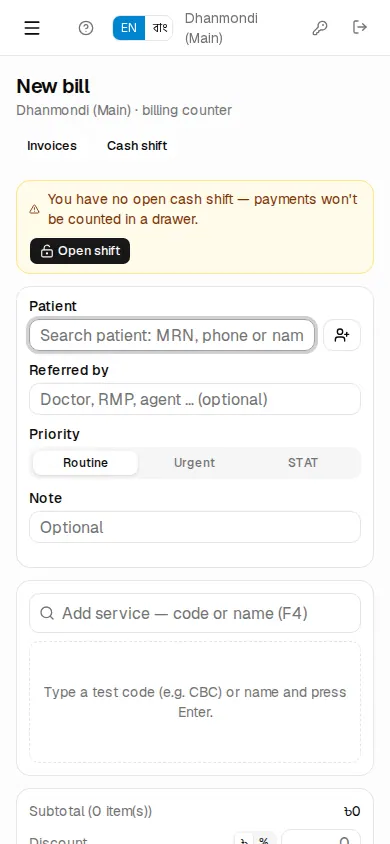
Referrer, priority and note
- Referred by — the doctor, RMP or agent who sent the patient. Referral commission is worked out from this. Leave it empty if nobody referred.
- Priority — Routine, Urgent or STAT. Urgent tests come to the top of the lab worklist with a badge.
- Note — any remark on the bill (optional).
If the patient belongs to a company or holds a discount card, a Payer box appears under the patient. Details: Memberships & corporate billing.
Giving a discount
There are two kinds of discount:
- Line discount: in Disc ৳ under each service, in Taka.
- Bill discount: in Discount on the right. The ৳ / % switch next to it chooses Taka or percent.
A bill discount opens a box for the reason — Discount reason (e.g. poor patient, staff). The bill will not save without one (Give a reason for the discount).
Who may give how much: the owner sets the Receptionist discount cap (%) in Admin › Settings. If a receptionist goes above it, a red line says "Total discount …% is above your limit of …% — a manager must bill this." and the save button stays off. Managers and the owner can go above the cap.
Card and company contract discounts are applied automatically (incl. card discount / incl. contract discount) and do not count against this cap.
Taking payment
In the Payment part on the right:
- Pick the method: Cash, bKash, Nagad, Rocket, Card or Bank.
- Check the amount. For anything but cash, type the TrxID / reference (for cards, Card last 4 / approval code).
- For a split payment (some cash, some bKash), press Split — a second row appears.
- Patient will pay later? Press Keep as due — the amount goes to zero and Due shows in red below.
- For cash, type what the patient handed over in Cash given — the Change to give back is shown.
If you type more than the bill, a red line says Payment is more than the total. — correct it.
After saving: receipts and labels
When the bill is saved you see a green tick, Bill saved and the bill number in large type (e.g. INV-000123), with Total, Paid and Due below.
If the bill has lab tests, two more things are shown:
- Report PIN — a 6-digit PIN. With the bill number and this PIN the patient can download reports online. The PIN is also printed on the invoice.
- Reports expected — when the reports will be ready.
The buttons:
- Print invoice — the bill/receipt for the patient.
- Sample labels — barcode labels for the tubes (for a 50 × 25 mm label printer). Only shown when the bill has tests that need a sample.
- View bill — opens the bill page.
- New bill (
F2) — the next patient.
Tick Print invoice after saving and the print page opens by itself after every bill. The choice is remembered on this computer.
When there is a referrer and you are allowed, a Referral commission box appears here with Pay commission now — to pay the referrer in cash at the counter. That cash is taken out of your shift. Commission rules: Accounting, commission & HR.
The invoice list and the bill page
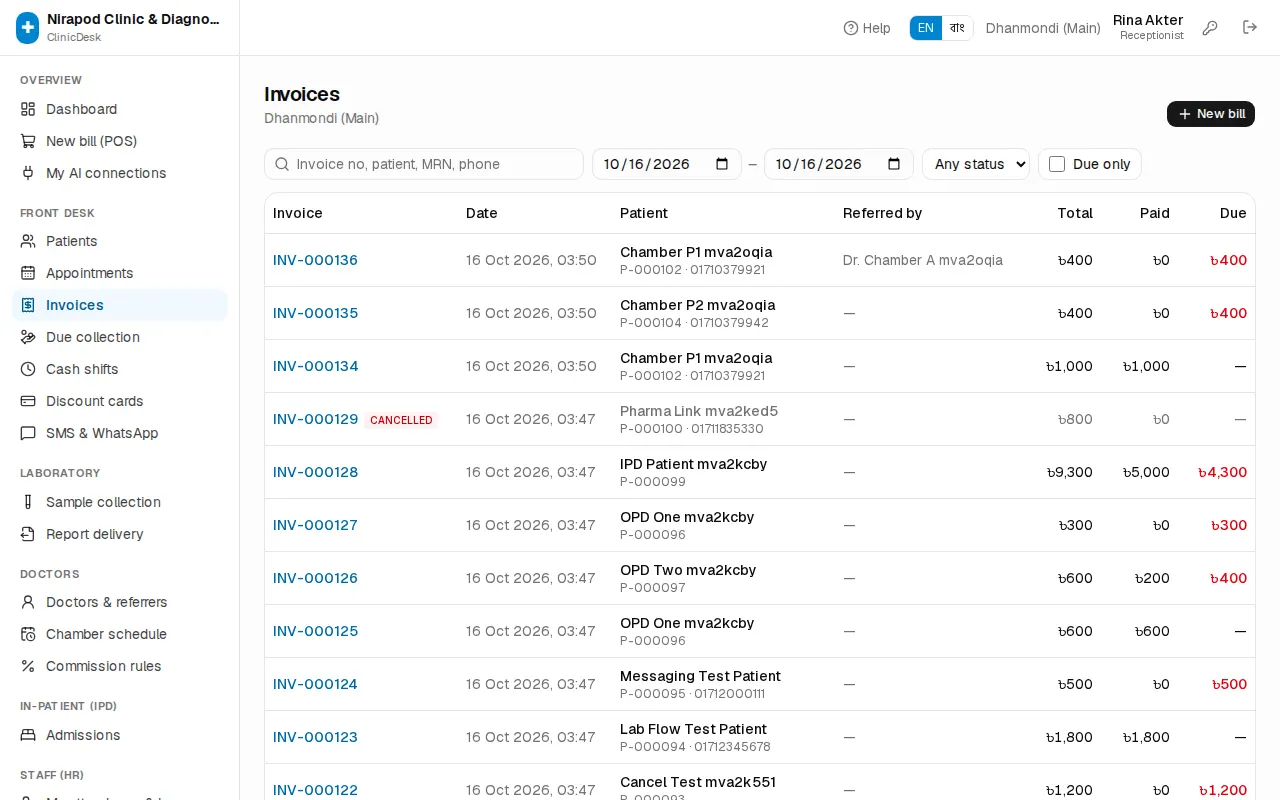
Front desk › Invoices lists the bills. Search by Invoice no, patient, MRN, phone (a search looks across all dates), change the date range, filter Active or Cancelled, or tick Due only. Totals are at the bottom.
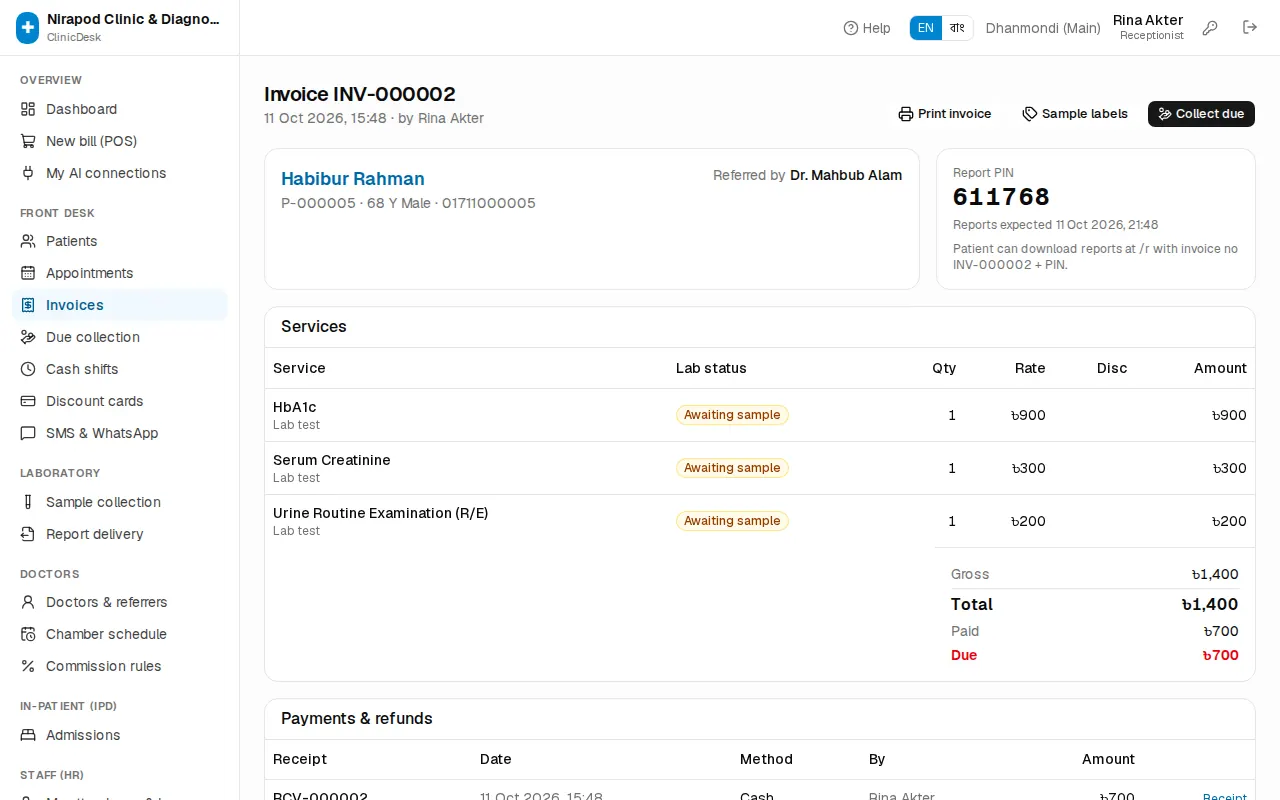
Click a bill number to open it. The buttons at the top: Print invoice, Sample labels, Lab report once reports are ready, and Collect due when money is outstanding. In the middle each service shows its Lab status (Awaiting sample, Collected, Processing, Resulted, Ready, Delivered). At the bottom, Payments & refunds lists every receipt, with a Receipt link to reprint it.
Collecting dues
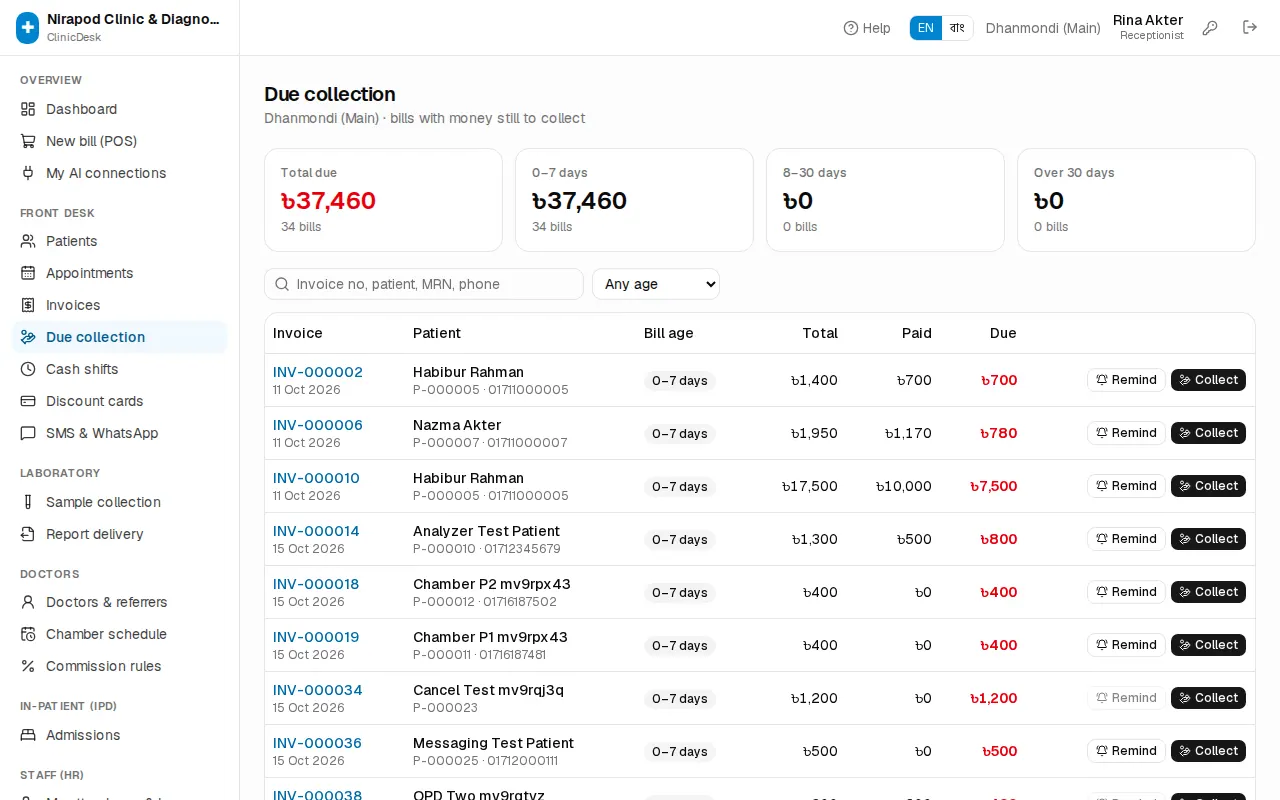
Front desk › Due collection lists every bill with money still to collect. At the top: Total due and the split by age — 0–7 days, 8–30 days, Over 30 days; click a box to see just those bills.
- Search by patient or bill number.
- Press Collect on the row (on the bill page the button is Collect due).
- Check the Amount (৳) — type less for a part payment. Choose the Method; for anything but cash add the Reference / TrxID.
- With Print money receipt ticked, the receipt opens.
- Press Receive. You see "Received … · RCV-…".
The Remind button on a row texts the patient a due reminder (if a mobile number is on file). To remind many patients at once see SMS & WhatsApp.
Cancellations and refunds
Only the manager and the owner can cancel bills and refund money. On the bill page the buttons are above the Services table:
- Cancel tests — cancel some tests/services on the bill. Tick the ones to cancel. Lab work for the chosen items is cancelled and the bill is recalculated.
- Cancel bill — the whole bill. All lab work on this bill is cancelled.
Both need a Reason (e.g. patient not fasting, wrong test). If the patient had paid, tick Refund the excess paid now via and pick the method. Then press Cancel selected or Cancel bill.
If the patient paid more than the bill, Refundable shows and a Refund button appears next to Payments & refunds. Enter the amount, method and a Reason, then press Refund — a refund voucher prints (RFD-…). Every cancellation and refund is kept in the audit log.
Close the shift at the end of the day
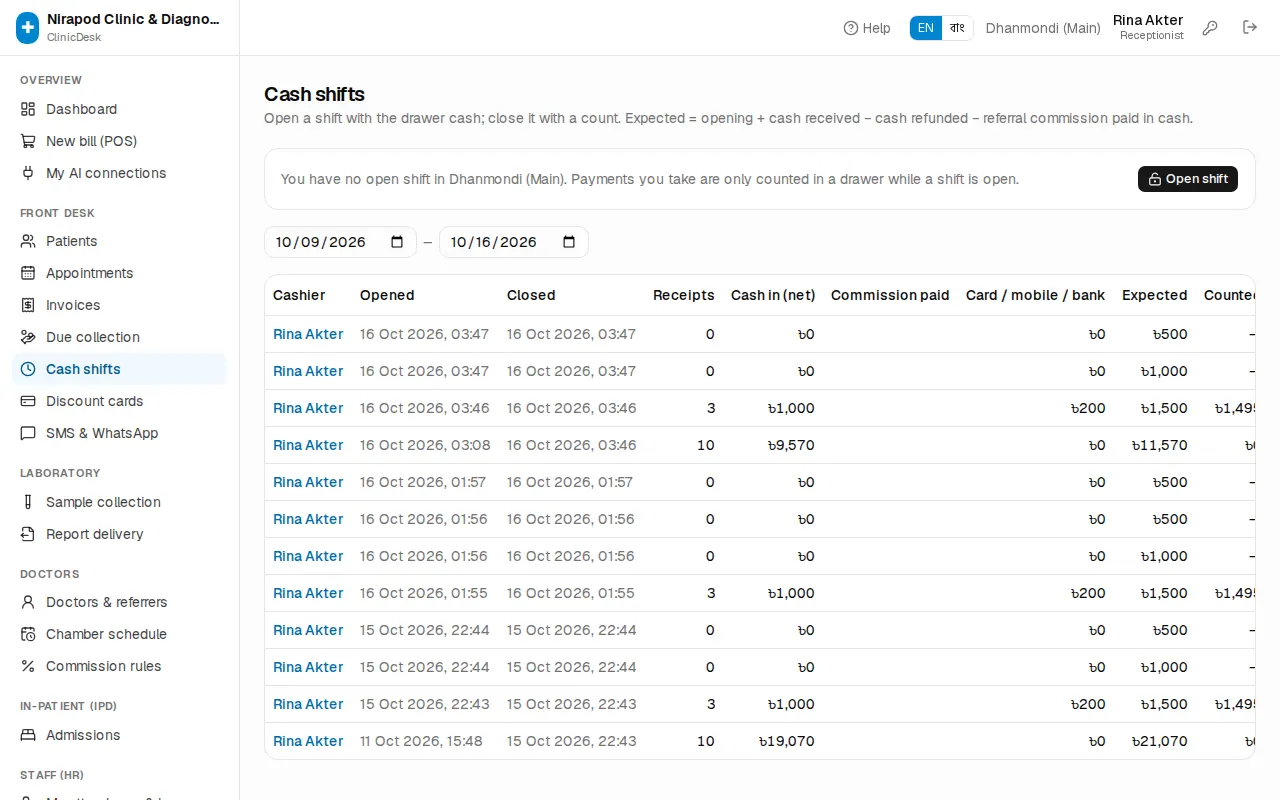
On Cash shifts, your open shift shows Opening cash, Cash (net), Other methods (bKash, card and so on) and Expected in drawer: opening cash + cash received − cash refunded − referral commission paid in cash. View payments lists every payment in the shift.
- Count all the cash in the drawer.
- Press Close shift.
- Type the Counted cash (৳). It shows at once Matches exactly, or by how much it is Over / Short.
- If there is a difference, write why in Note.
- Press Close shift.
The table below lists past shifts with Expected, Counted and Difference (OK when it matches). Managers and accountants (anyone who can see reports) see everyone's shifts here; others see only their own.