Doctors, lab & IPD
Laboratory
Sample collection and barcode labels, receiving at the lab, the worklist, result entry, pathologist verification, printing and delivering reports, the test catalogue and analyzer connections.
Who it is for:Lab technologistPathologistReceptionistManagerOwner
On this page
From the moment a lab test is billed until the report is in the patient's hand, it passes five steps. ClinicDesk has a page for each step, under Laboratory in the sidebar:
| Step | Page | Usually done by |
|---|---|---|
| 1. Take the blood / urine | Sample collection | Reception, nurse, lab technologist |
| 2. Accept the sample at the lab | Sample collection › Receive at lab | Lab technologist |
| 3. Run it and enter the results | Worklist & results | Lab technologist |
| 4. Review and approve | Verification | Pathologist |
| 5. Hand the report over | Report delivery | Reception, lab technologist |
Each test shows its stage as a coloured badge: Awaiting sample → Sample collected → Processing → Awaiting verification → Ready → Delivered.
A lab technologist lands on Worklist & results after signing in; a pathologist lands on Verification.
Collecting samples and labels
When a bill contains lab tests, ClinicDesk creates the samples by itself — one accession number per tube (for example S-000123). Tests that go in the same tube share one sample. Right after billing, the Bill saved window has a Sample labels button to print the labels.
Open Laboratory › Sample collection. The To collect tab shows a card for every patient whose sample has not been taken — STAT and urgent first, then by billing time.
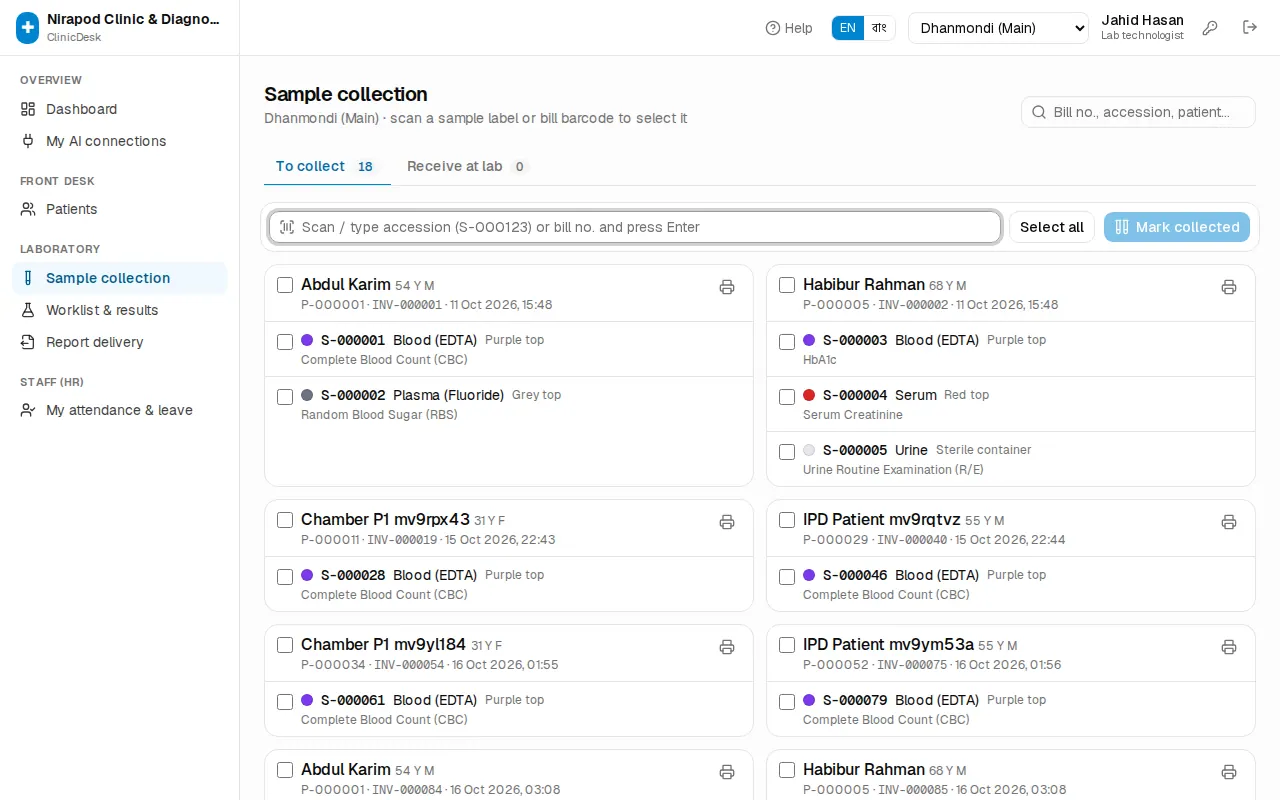
Each card shows the patient's name, age and sex, ID, bill number, and every sample below: a dot in the tube colour, the accession number, the sample type (for example Blood), the tube name and the tests on it.
- Call the patient. Press the printer icon (Print labels) at the card's top right. The label page opens and starts printing by itself (label printer paper: 50 × 25 mm).
- Stick each label on its own tube — match the tube colour.
- Take the blood or other sample.
- Scan the label's barcode in the box at the top (or type the accession number and press Enter). The sample is selected and turns blue. Scanning the bill's barcode selects all samples of that bill at once.
- Without a scanner, tick the checkboxes instead; Select all selects the whole list.
- Press Mark collected. The samples leave this list and move to the Receive at lab tab.
Receiving samples at the lab
When collection and the lab are in different places (for example, samples arrive from a collection point), accepting them at the lab matters.
- On Sample collection, open the Receive at lab tab.
- Scan the tubes as they arrive.
- Press the Receive at lab button. A message like "2 sample(s) received — now on the worklist" confirms it; the tests are now on Worklist & results.
Rejecting a sample
If a sample is unusable (haemolysed, clotted, insufficient quantity, wrong container …), do not receive it:
- In the Receive at lab tab, press the red Reject on that sample's row.
- Pick a reason or type one in Reason.
- Press Reject & recollect.
A new sample with a new accession number is created and its tests go back to the To collect queue. Call the patient back, take a fresh sample and use the new label.
The worklist
Laboratory › Worklist & results is the lab's to-do list for the day: STAT and urgent tests first, then whichever is due soonest.
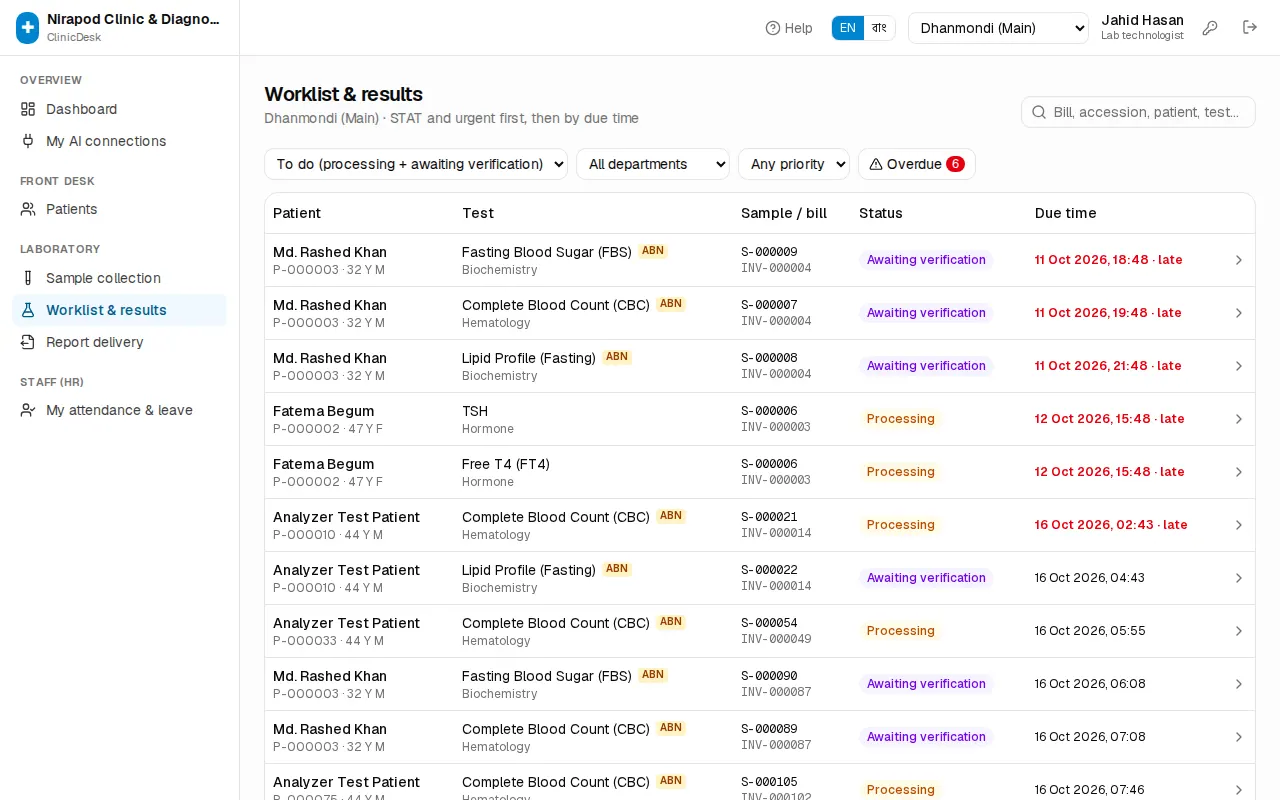
Filters at the top:
- Status — starts at To do (processing + awaiting verification). Other choices: Processing, Collected, not received, Awaiting verification, Rejected — awaiting recollection, Verified (today).
- All departments — show only haematology, biochemistry and so on.
- Any priority — only STAT, urgent or routine.
- Overdue — the red button; tests past their due time, with a count.
The table shows the patient, the test (with a CRITICAL or ABN mark), the sample and bill numbers, the status and the Due time. Late tests show the time in red with "late". Click any row to open result entry.
Entering results
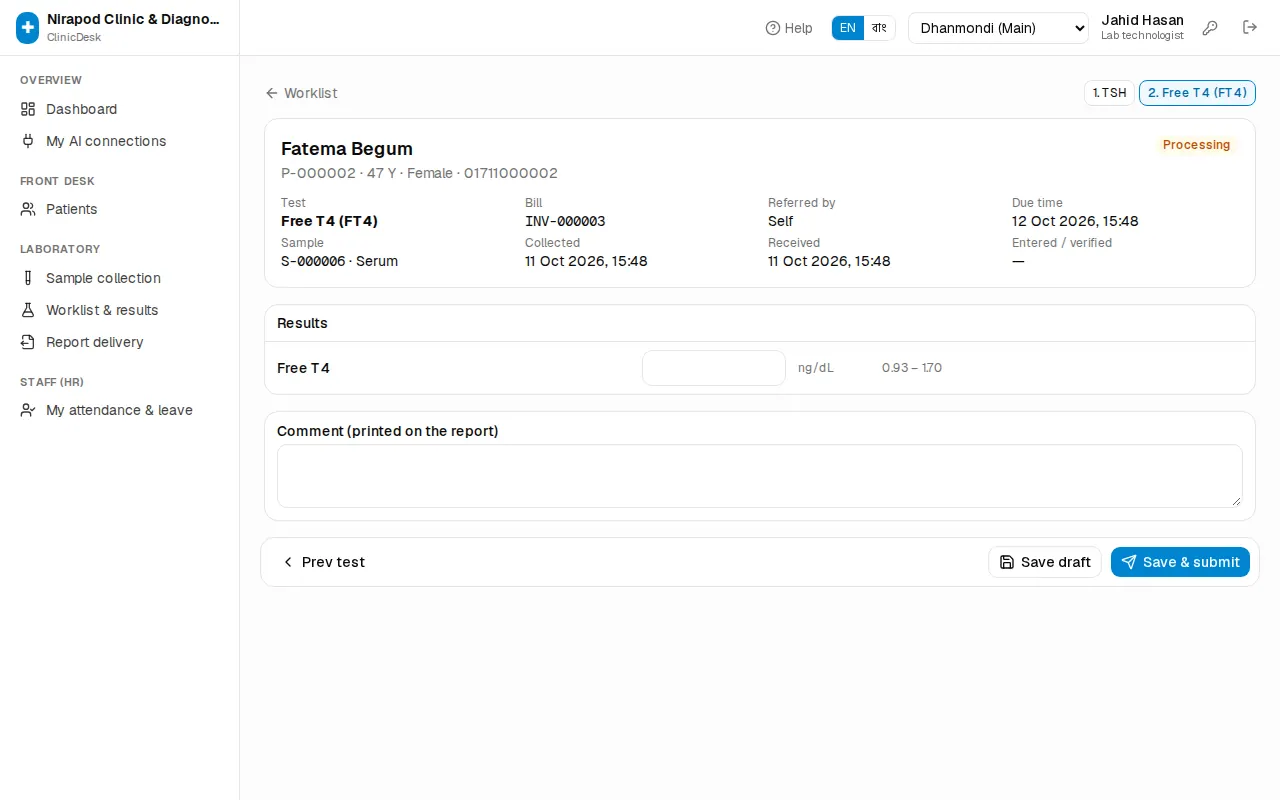
The top of the page shows the patient, test, bill, referring doctor, due time, the sample, and when it was collected and received. When the bill has several tests, small buttons at the top list them all; finished ones have a ✓.
- Under Results, type the value next to each parameter. Enter moves to the next box.
- For parameters with set answers (such as Positive/Negative), pick from the drop-down.
- Calculated values (from a formula) are grey and fill themselves — "Calculated: …" shows under the name.
- Each value shows its unit and the reference range for the patient's age and sex. As soon as a value is out of range a flag appears: Low, High, Abnormal (yellow) or Critical low, Critical high (red). The header counts the critical and abnormal values.
- If the patient has an earlier result, the previous value shows alongside ("prev …"), so big changes stand out.
- Add an Impression and a Comment (printed on the report) if needed. Narrative tests (for example an ultrasound) have the Report box pre-filled with the template; just edit it.
- The buttons at the bottom:
- Save draft — keep part-done work; the report does not go for verification yet.
- Save & submit — the report goes to the pathologist as Awaiting verification.
- Save & verify — pathologists only; enter and approve in one go.
- Prev test / Next test — move to the next item on the list.
When verification is not required (see Settings below), Save & finalise replaces Save & submit and the report becomes Ready straight away.
Pathologist verification
On Laboratory › Verification the pathologist reviews submitted reports and approves them. Only verified reports can be printed and delivered.
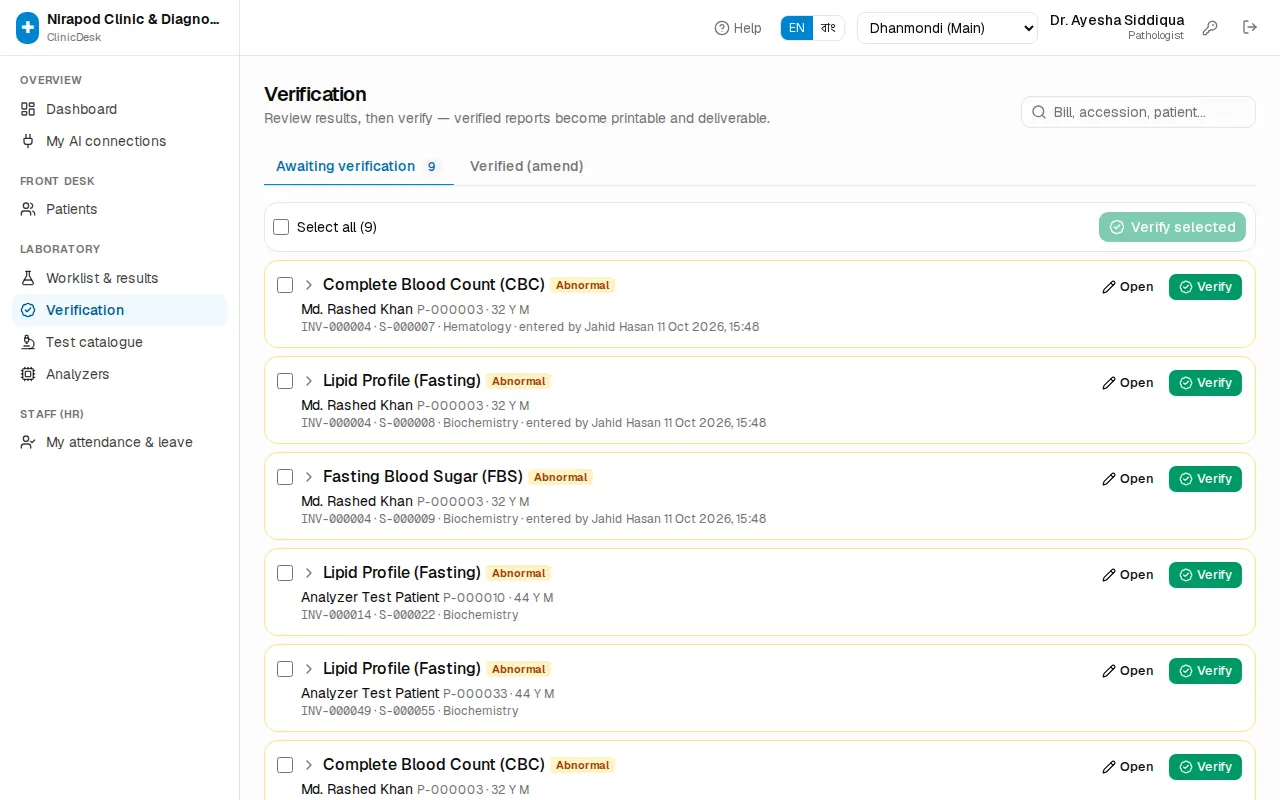
In the Awaiting verification tab each test card shows all values with their flags, the impression and comment, and who entered them when — no need to open another page.
- Read each card. Pay special attention to CRITICAL or Abnormal marks.
- If it is right, press the card's Verify button. To approve several at once, tick them and press Verify selected.
- To correct a value, press Open to go to result entry, fix it, then press Save & verify.
When every test on a bill is verified and the patient has a mobile number (and the "report ready" SMS is switched on), the patient gets an SMS automatically with the online portal link and PIN (see SMS & WhatsApp).
Amending a verified report
After verification the values are locked. If a mistake is found:
- On Verification, open the Verified (amend) tab and search by bill number or patient (or go to the result entry page).
- Press Amend and give a reason.
- The report opens again — correct the values and verify again.
The old values stay in the audit log and the report shows how many times it was amended. Only pathologists can amend.
Printing and delivering reports
Laboratory › Report delivery starts with reports verified today and not yet delivered. If older ready reports are still waiting, a link appears at the top: "… older ready report(s) not delivered — show all".
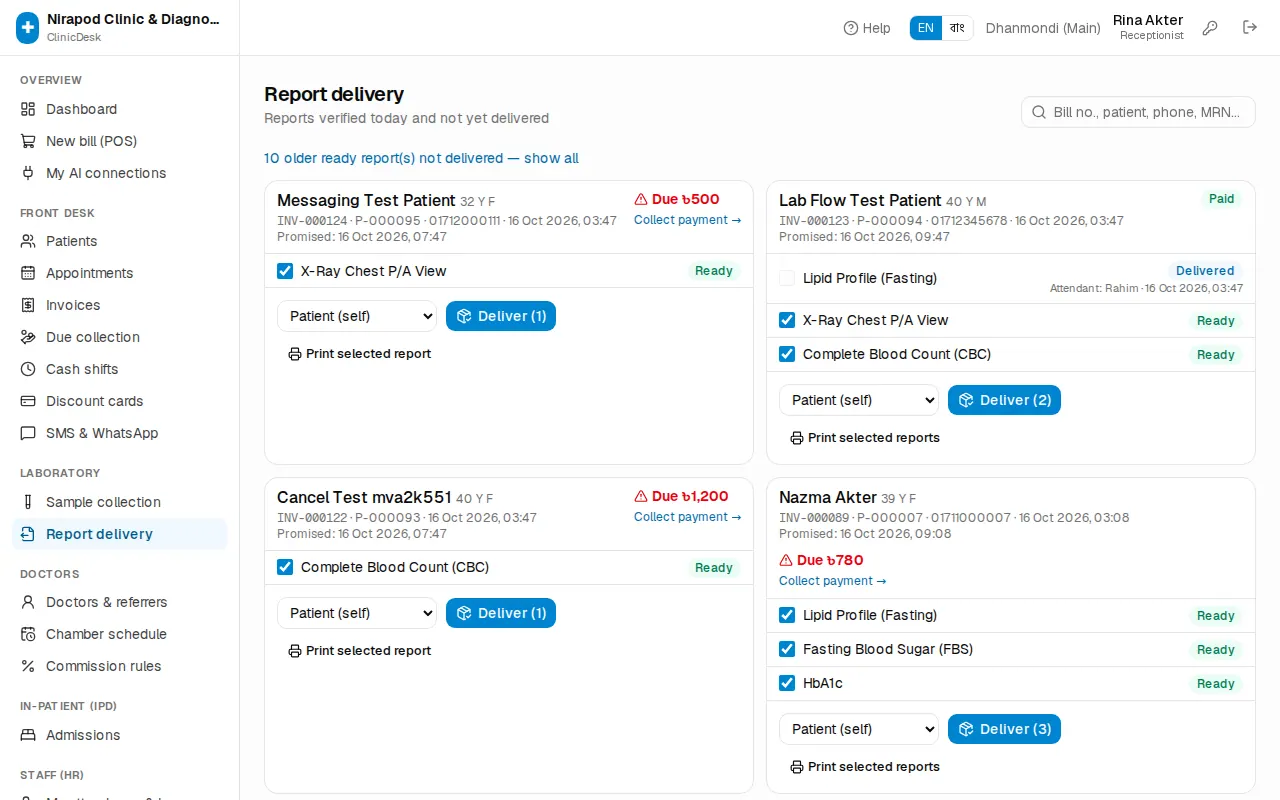
When the patient comes with the receipt:
- Type the bill number, patient name, phone or MRN in the search box.
- Check each test's status on the bill's card. Ready ones can be selected.
- If the bill has a due, it shows in red with a Collect payment → link. Take the money first (Billing & payments).
- Press Print ready reports (or Print selected reports after selecting). On the report page press Print report.
- Choose who is taking it: Patient (self), Attendant… (type the name) or Online / WhatsApp.
- Press Deliver. The tests become Delivered and leave the list.
Reports online (PIN)
Every bill has a 6-digit Report PIN, printed on the money receipt as "Online report PIN". With the online report portal on, patients download their verified reports at home with the bill number and PIN. How patients do this is in Patient portal.
The test catalogue
Laboratory › Test catalogue (managers, pathologists and the owner) lists every test by department with its code, sample and tube, number of parameters, turnaround (hours) and price.
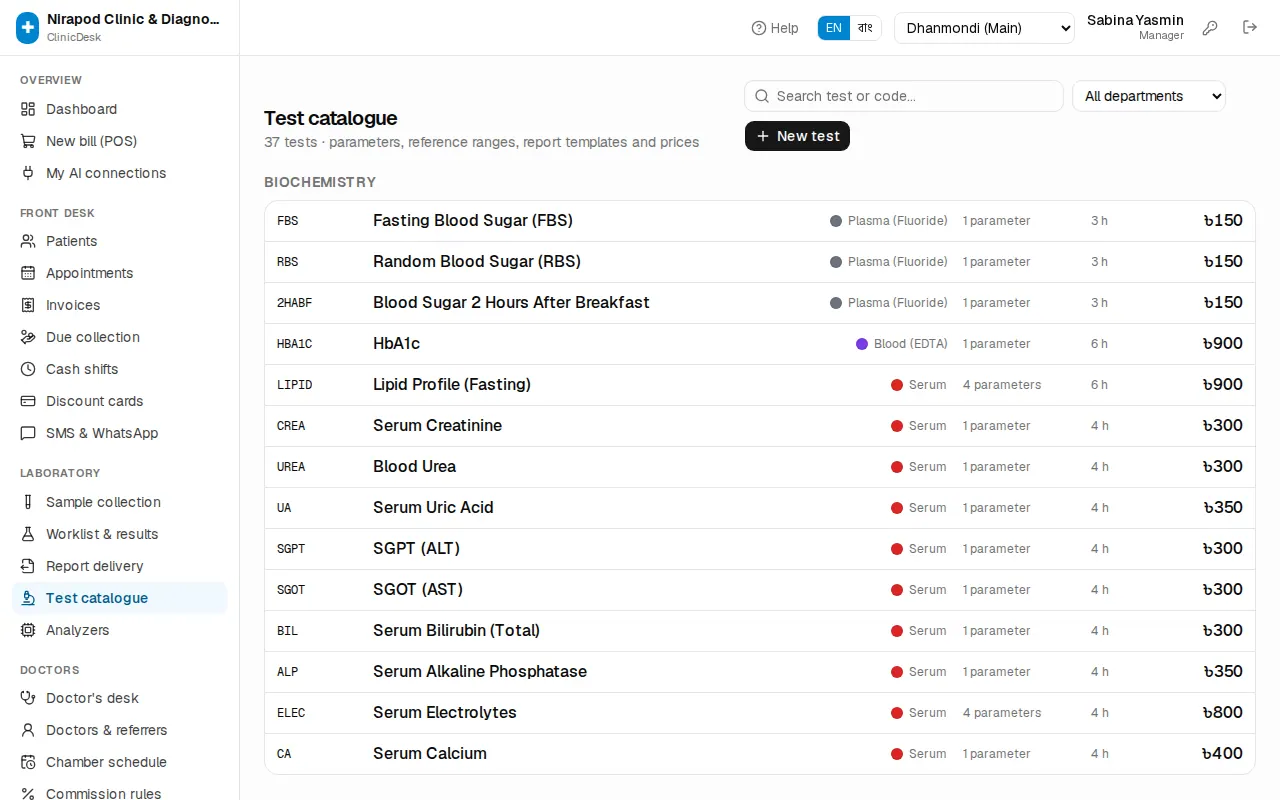
A new test
- Press New test.
- Enter the Test name \, Code \ and Department \*.
- Kind — Lab test or Imaging / ECG (no specimen).
- Report type — Parameters (values & ranges) for numbers with ranges, Text report (narrative) for written reports.
- Fill Sample type, Container / tube (for example Purple top — the colour identifies the tube), Turnaround (hours) and Price (৳) \*.
- Press Create test. Then add parameters on the test's page.
Parameters and reference ranges
Click a test to open its page: Test & price at the top (change and press Save test), Parameters below.
- Press Add parameter. Enter the Name \*, a Code (used in formulas, for example HB), the Unit and a Group heading (for example Differential count).
- Result type: Number, Choice (options) or Free text. For a choice, list the Options (one per line) and set the Normal answer — any other answer is flagged abnormal.
- For numbers, set Decimals. For a value calculated from other parameters, write a Formula (calculated).
- After saving, use the Range button next to the parameter to add reference ranges: Sex, Age from, Age up to (below), low and high limits, critical low and high limits. To print something other than low–high on the report, use Printed text (optional).
- For different ranges for men, women and children, add separate ranges. Result entry picks the right one for the patient's age and sex automatically.
The up and down arrows change the order of parameters. Deleting a parameter that already has results only deactivates it — old reports stay intact.
Connecting analyzers
Connect your haematology or chemistry machine to ClinicDesk and results no longer need typing. A small program (the bridge) runs on the lab PC next to the machine; the machine sends results in ASTM or HL7, and the bridge forwards them to the clinic. If the internet drops, the bridge keeps the results and sends them later.
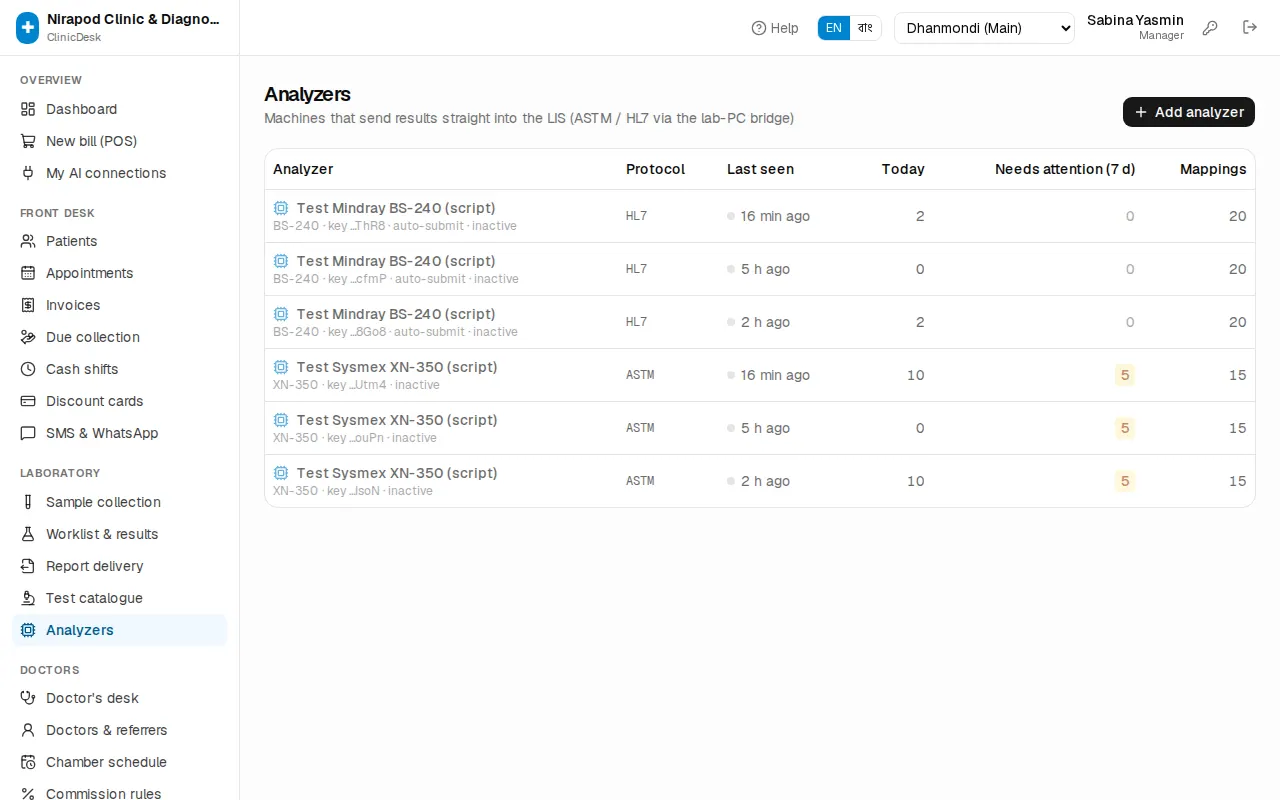
Set-up (manager or pathologist):
- Open Laboratory › Analyzers and press Add analyzer.
- Enter the Name, Model (for example XN-350 — helps auto-mapping) and Protocol. Tick Submit results automatically to send machine results straight to verification; otherwise they stay a draft for the technologist to submit.
- Press Create & show key. An API key and the command to run on the lab PC appear. Copy the key now — it is shown only once.
- Press I've copied it — set up mappings.
- On the Code mapping tab, choose which parameter each machine code (for example HGB) goes to. Auto-map matches the usual codes — then check every row. Use Factor to convert units (for example 1000 for 10³/µL → /µL).
- Get the bridge installed on the lab PC: contact JonakiSoft support and give them the key and the command shown on the page — they install it and confirm the first result arrives. In the machine's LIS/host settings, point it at this PC's port 5600. For a machine that exports result files, the second (folder) command is used instead.
- On the Test message tab, process a sample message with a test patient's accession to check everything works.
Day to day: the analyzer list shows Last seen, messages Today and Needs attention (7 d). In the Message log, map any unmapped codes of a problem message, then press Re-process. Values that came from a machine show a small blue "from …" (the machine's name) in result entry.
Lab settings
The owner sets these in Admin › Settings, section Lab reports:
- Pathologist verification required — reports cannot be printed or delivered until verified.
- Full payment before delivery — delivery is blocked while the bill has a due.
- Online report portal — patients download reports with bill no. + PIN.
- The report header and footer, and whether the letterhead is printed.
Details: Owner set-up.