Front desk & billing
Reception & appointments
Finding and registering patients, the patient profile, booking doctor serials, online bookings, check-in, tokens and the queue board.
Who it is for:ReceptionistManagerOwner
On this page
Reception work starts with the patient. Every patient has one permanent number, the MRN (for example P-000012). All their bills, tests, consultations and admissions hang off that number. This chapter shows how to find or register a patient, book a doctor's serial, and check the patient in when they arrive so they join the doctor's queue.
In the sidebar these screens are under Front desk: Patients and Appointments.
Find a patient
Always search before you register someone new. Two MRNs for the same person split their history in two.
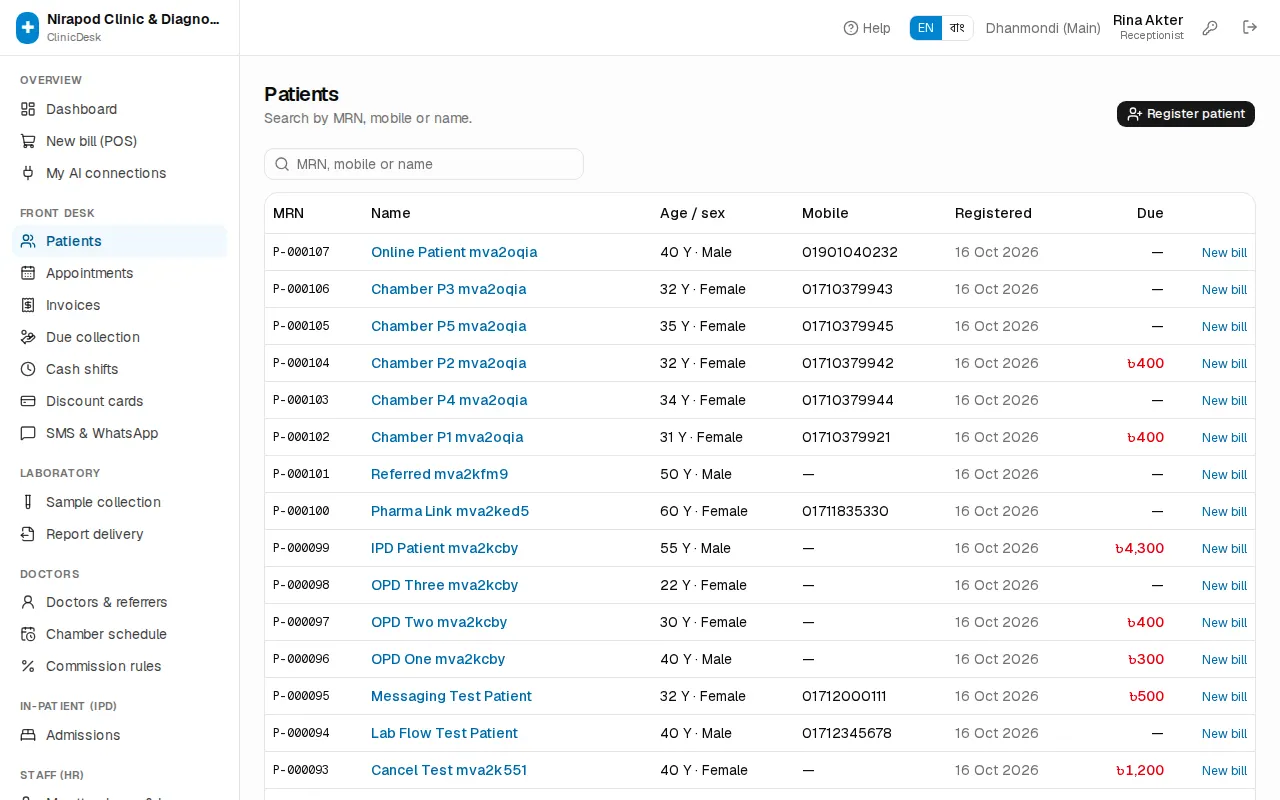
- Open Front desk › Patients in the sidebar.
- Type in the search box (MRN, mobile or name). Any one of these works:
- the full MRN (
P-000012) or just the number (12); - at least 4 digits of the mobile number;
- any part of the name.
- the full MRN (
- The list shows MRN, Name, Age / sex, Mobile, the Registered date and Due. A red due amount means one of the patient's bills still has money to collect.
- Click the name to open the patient profile. The New bill link on the right starts a bill for that patient straight away.
If nobody matches you see No patient found — Try the MRN or the mobile number.
Register a new patient
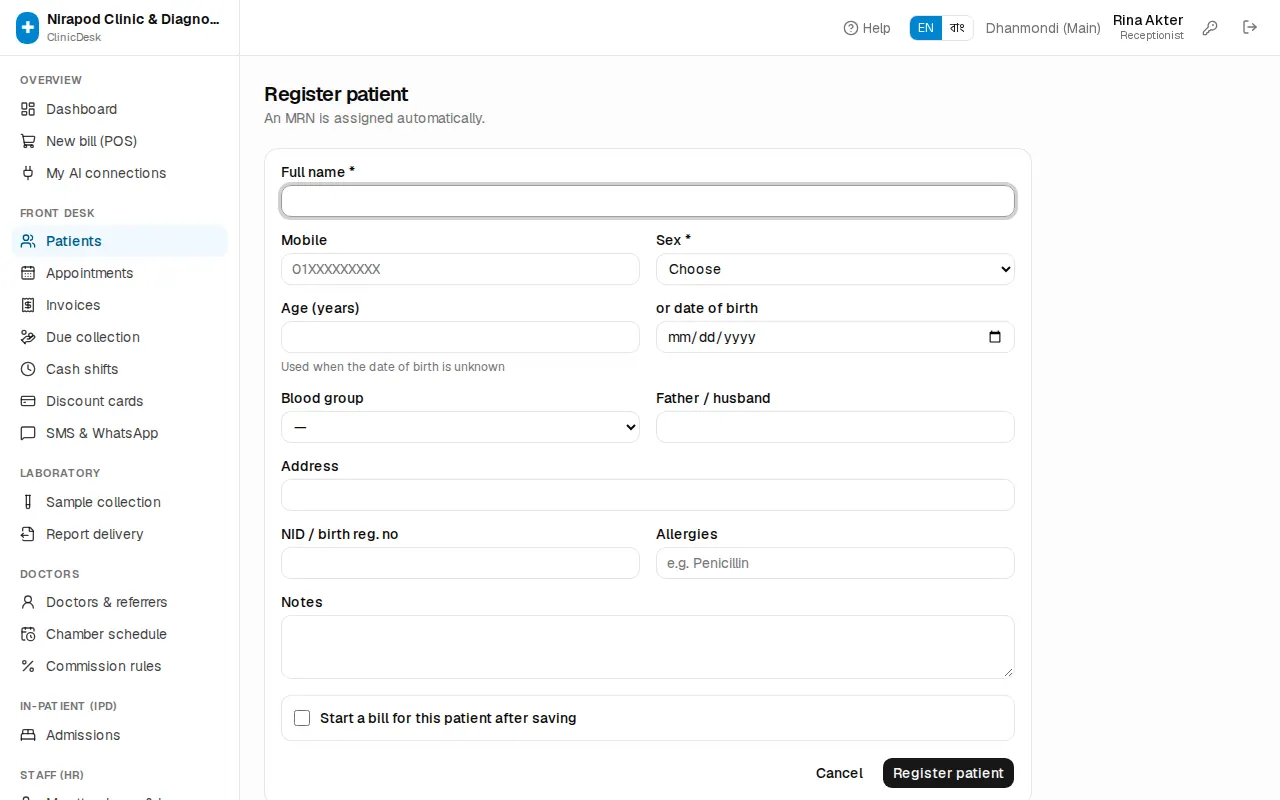
- On the Patients page press Register patient (top right).
- Type the Full name (at least 2 letters) and choose Sex — these two are required (\*).
- Enter the Mobile number (
01XXXXXXXXX). Report-ready SMS and online reports go to this number, so type it carefully. - Give the age: Age (years) or or date of birth. If the date of birth is unknown, the age alone is enough; it moves forward with time automatically.
- If useful, fill Blood group, Father / husband, Address, NID / birth reg. no, Allergies (e.g. Penicillin) and Notes. Allergies are shown in red on the bill page.
- If the patient's employer or insurer pays their bills, pick it under Bills to (corporate / insurance) and enter the Employee ID / policy no. (These two fields only appear once companies have been added.)
- To bill right away, tick Start a bill for this patient after saving.
- Press Register patient. You see "Registered P-0000xx" — the MRN is assigned automatically.
To correct details, open the profile, press Edit, change what is wrong and press Save changes.
The patient profile and history
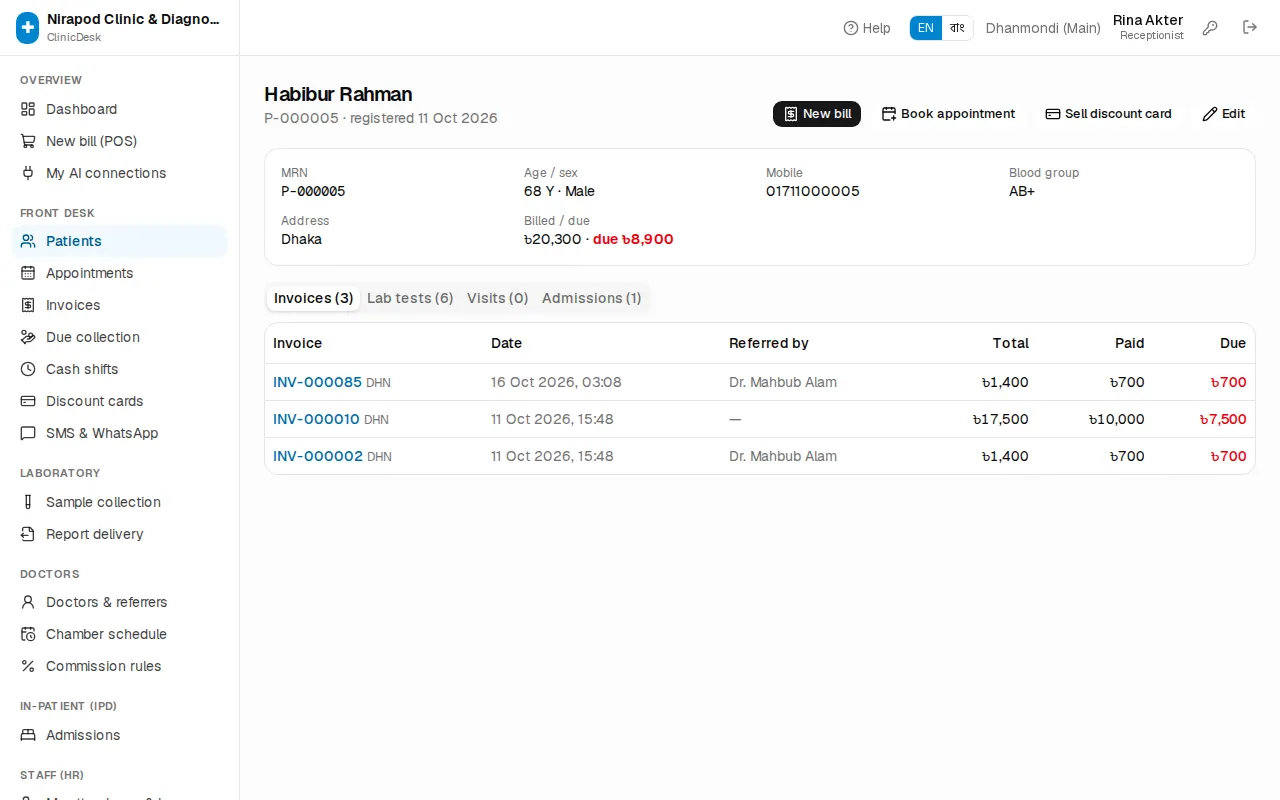
The top of the profile shows the name, MRN and registration date. The buttons next to it:
- New bill — opens the billing counter for this patient.
- Book appointment — opens the booking form with this patient already chosen.
- Sell discount card — shown when the patient has no valid card. See Memberships & corporate billing.
- Edit — change the details.
Below, the full history in sections:
- Invoices — every bill with Billed / due. Click a bill number to open it.
- Lab tests — the status of every test. When a report is ready, the Report link prints it.
- Visits — consultations with the Diagnosis and a Prescription print link. If the doctor advised tests, Bill tests (n) puts those tests on a new bill for you.
- Admissions — in-patient stays.
If the patient belongs to a company, Bills to is shown; if they hold a discount card, Discount card with its validity.
Book a doctor's serial
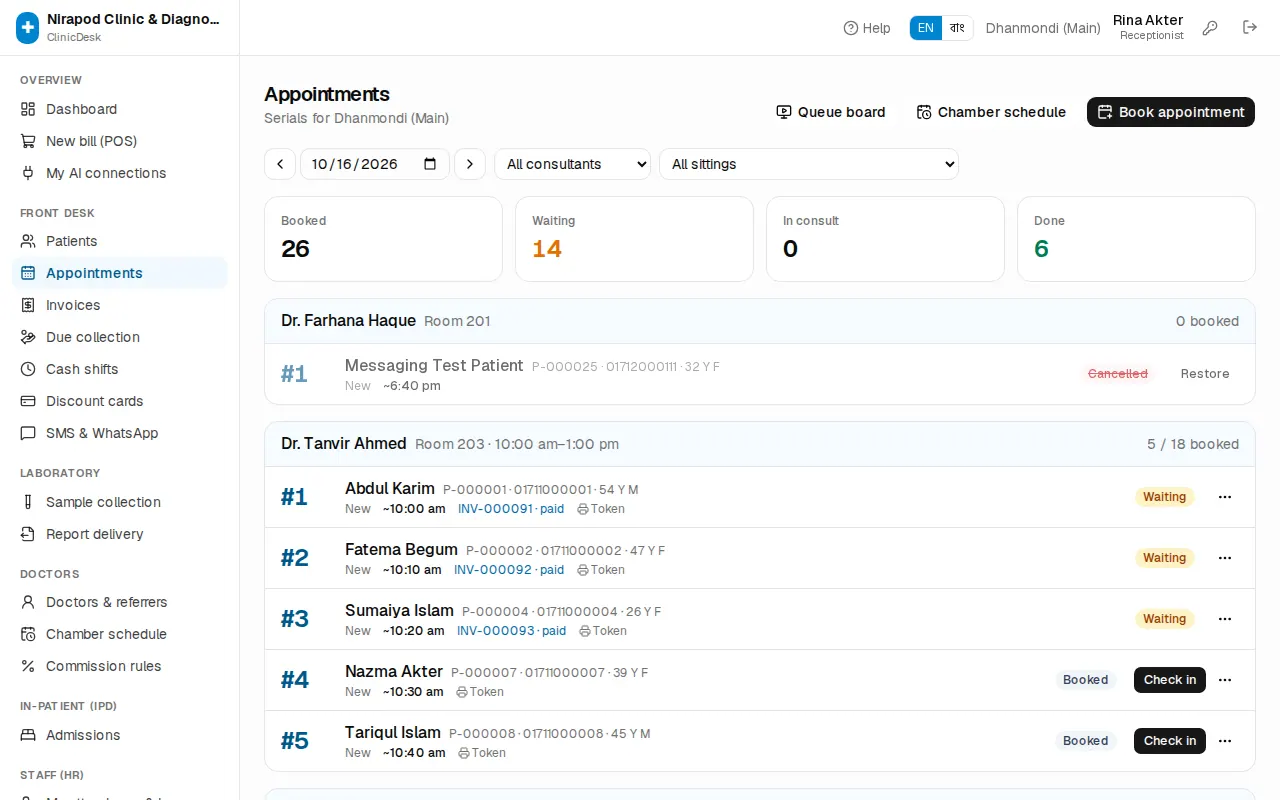
Front desk › Appointments lists the day's serials grouped by doctor and sitting. The four boxes at the top count Booked, Waiting, In consult and Done. Change the day with Previous day / Next day or Today, and filter by doctor with All consultants.
To book a serial:
- Press Book appointment.
- In Patient \* type an MRN, phone or name and pick the patient. For someone new, press New and register them right there.
- Choose the Consultant \ and the Date \ (today or a later day).
- Under Sitting \* pick the sitting for that day. Each shows how many are booked, e.g. "12/20 booked"; a full sitting says "full". If the doctor is on leave or does not sit that day, a yellow message appears instead, such as No sitting that day.
- Choose the Type: New, Follow-up or Report show. If the patient saw this doctor before, the form says how many days ago; within the follow-up window it picks Follow-up for you. The Fee is shown below.
- Add a Note if needed. For a phone booking tick Booked by phone.
- With Print token ticked, the token print page opens as soon as the serial is booked.
- Press Book serial. You see, for example, "Serial #7 booked for Rahima · around 10:30 AM".
When a sitting is full the system asks Book anyway (overbook)? — say yes only if the doctor agrees.
Online bookings
When the clinic has online booking switched on, patients can take a serial themselves on the clinic's booking page (/book/<clinic-name>). How that looks for the patient is in Patient portal.
What reception needs to know:
- Online serials appear in the Appointments list like any other, with a purple Online tag. Phone bookings carry a Phone tag.
- The patient books with a mobile number, name, sex and age. ClinicDesk looks up the mobile number first (written any way — 01…, +880…, with spaces) and links the booking to the patient on that number whose name and age fit, even if the name is spelled a little differently ("Md. Karim" and "Karim"). A new MRN is created only when nobody has that number.
- When the number belongs to patients but none clearly fits (for example a child booked on the father's number), ClinicDesk never merges them. The booking goes to a new record and shows an amber Check patient tag. Click it, ask the patient, then press Use this patient next to their existing record, or Keep new patient if it really is someone else.
- When the patient arrives, Check in as usual (see below). The fee is normally taken at the counter.
Online booking is switched on or off by the owner in Admin › Settings with Allow online booking, and per sitting with the Online booking tick in the chamber schedule.
Check in when the patient arrives
Check the patient in when they reach the clinic. Check-in puts them in the doctor's queue as Waiting.
- On Appointments, press Check in on the patient's row.
- The small form offers two ways:
- Bill fee now — shows the Consultation fee. Check the amount in Received (৳) and pick the Method (Cash, bKash, Nagad, Rocket, Card, Bank). For anything but cash, enter the Transaction ref.
- Already paid — the fee was taken earlier at the counter. Optionally type the Bill no. (optional) (e.g.
INV-000123); this links the consultation to that bill.
- Press Check in. You see "#7 Rahima is waiting · INV-000123".
Doctors who collect their own fee are marked Doctor collects fee. Checking in their patient makes no clinic bill; the form says so and the patient simply joins the queue.
After check-in the row shows the bill number and due or paid. Once the doctor has seen the patient and advised tests, a Bill advised tests (n) link appears — press it to open a bill with the patient, the tests and the referring doctor already filled in.
Tokens and the queue board
Token: print it from the Token link on the row, or Print token in the More (⋯) menu. The token shows the serial number, doctor, sitting time and expected time.
Queue board: for the TV in the waiting area.
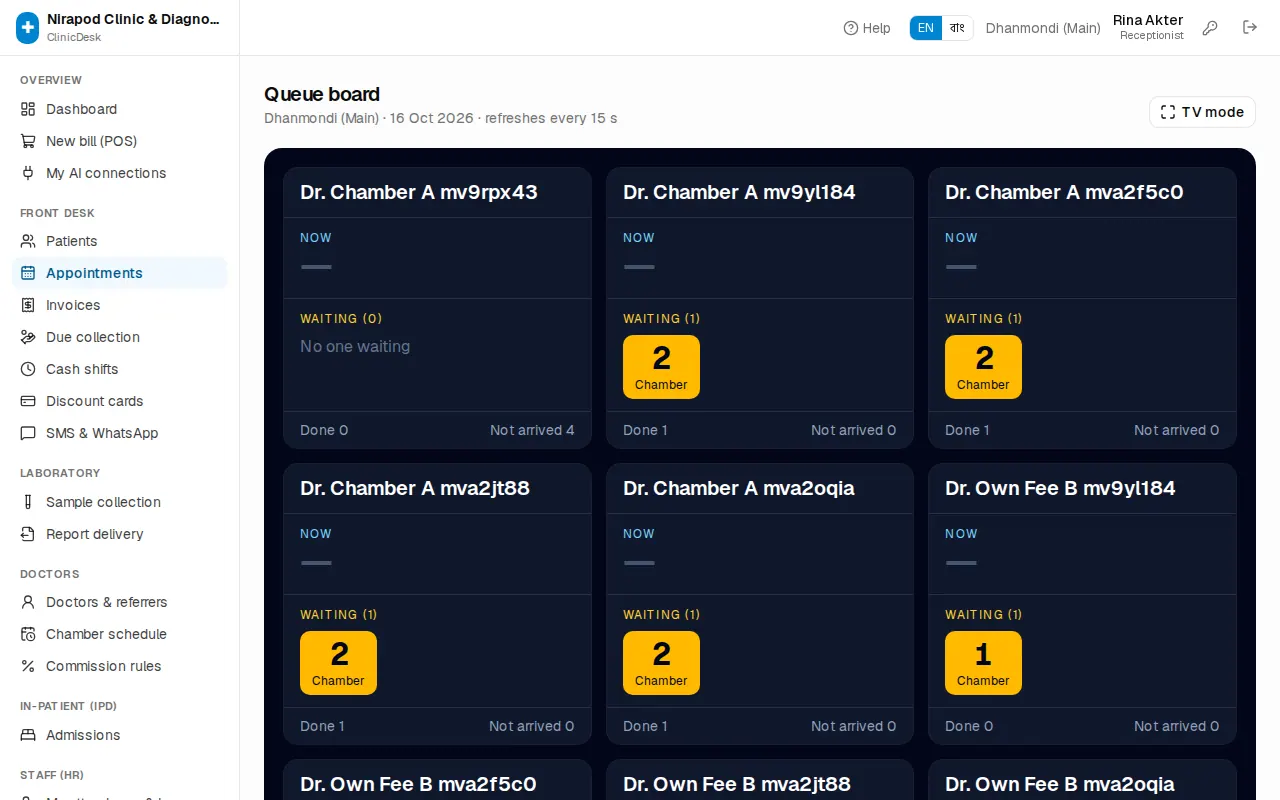
- On Appointments press Queue board.
- Each doctor has a column: Now (the patient with the doctor), Waiting (n) (the next one highlighted in yellow), and at the bottom the Done and Not arrived counts.
- Press TV mode for full screen. The board refreshes itself every 15 seconds; nobody needs to touch it.
The board shows only the patient's first name — never the full name or phone number.
Cancel, no-show and restore
In the More (⋯) menu at the right of a row:
- Mark no-show — the patient did not come.
- Cancel appointment — asks to confirm: "Cancel serial #7 (Rahima)?".
Cancelled and no-show serials are greyed out and get a Restore button — use it if you cancelled by mistake.
With SMS switched on, booking, cancellation and the day-before reminder go to the patient's mobile automatically. See SMS & WhatsApp.